
Capacity Digital Apps Support
Plan And Cost
Project Planning and Costing
Where Plan And Cost data is stored.
The data in Plan And Cost is stored in a SQLite Database.
The main tables in the database are:
* Customisations.
* Projects.
* Project Tasks.
* Project Milestones.
* Milestones Types.
* Task Costs.
* Task Types.
* Cost Types.
* And several other supporting tables used in drop down selection lists etc.
How to use Plan And Cost.
The Main Menu has four option buttons:
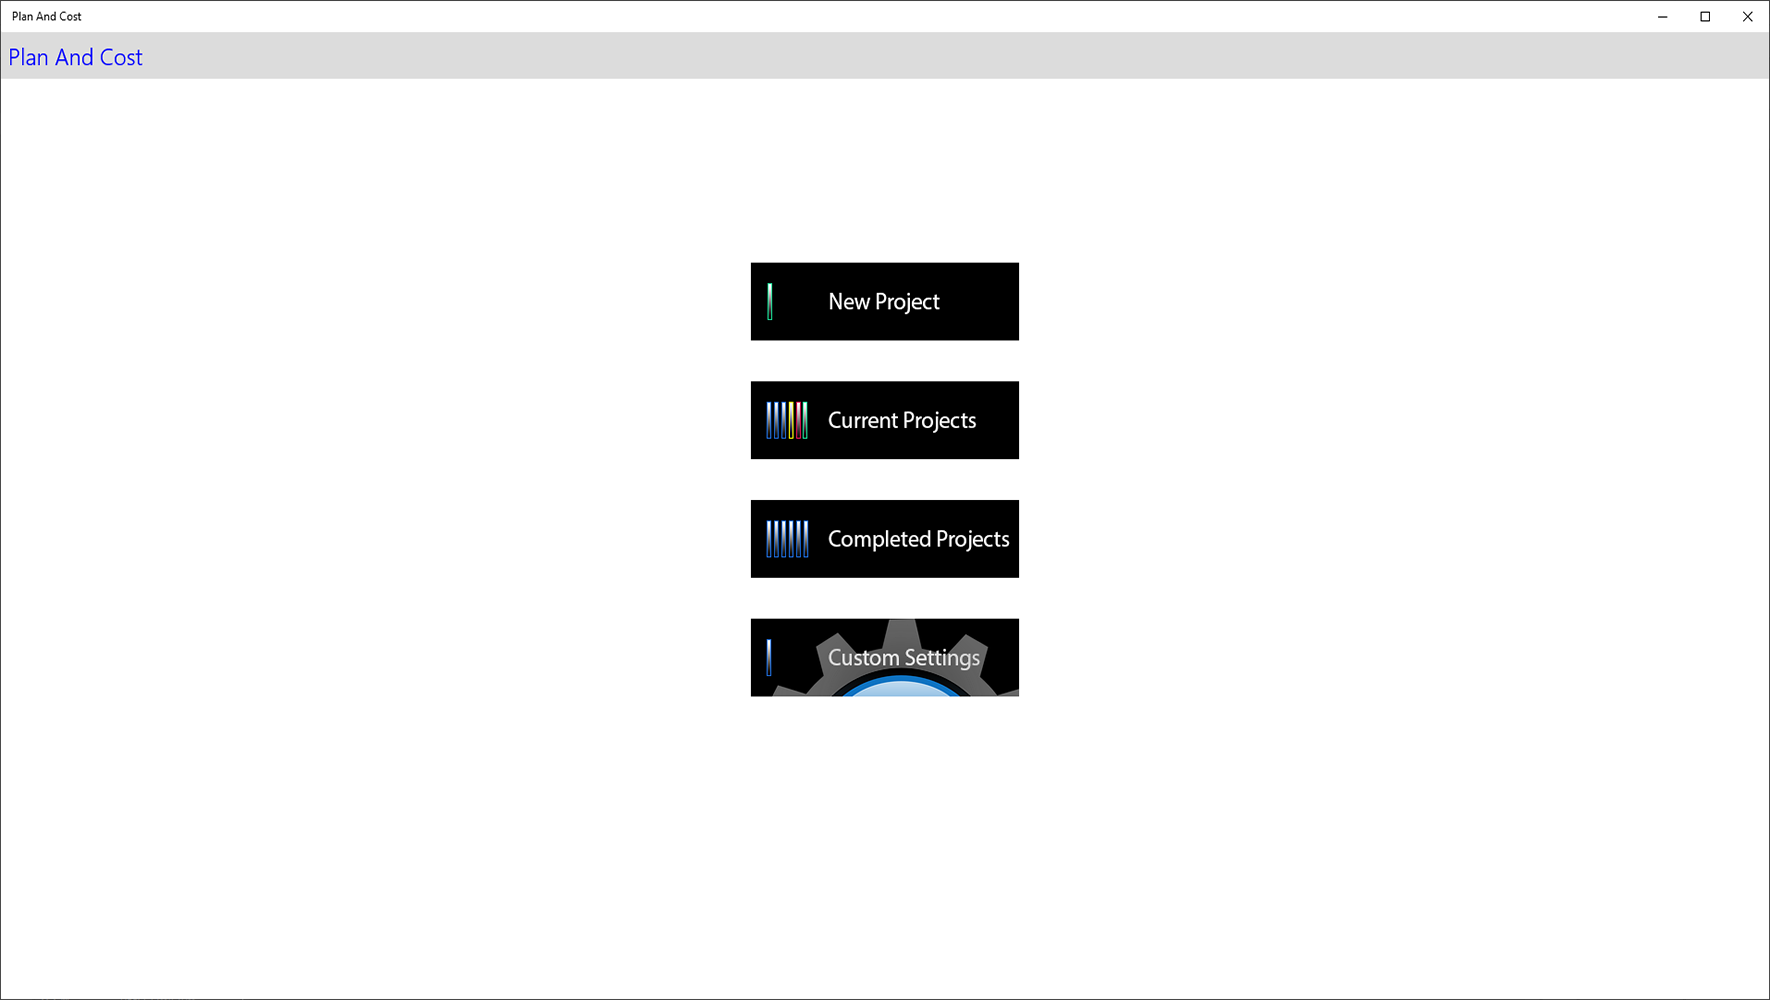
* New Project.
Clicking this opens up a form to start a New Project
* Current Projects.
Clicking this opens a timeline listing all current projects.
* Completed Projects.
Clicking this opens a timeline listing all completed projects.
* Custom Settings.
Clicking this opens up a form with a list of customisable settings.
This is the place to start because the settings are used in new Projects.
Setting up Custom Settings.
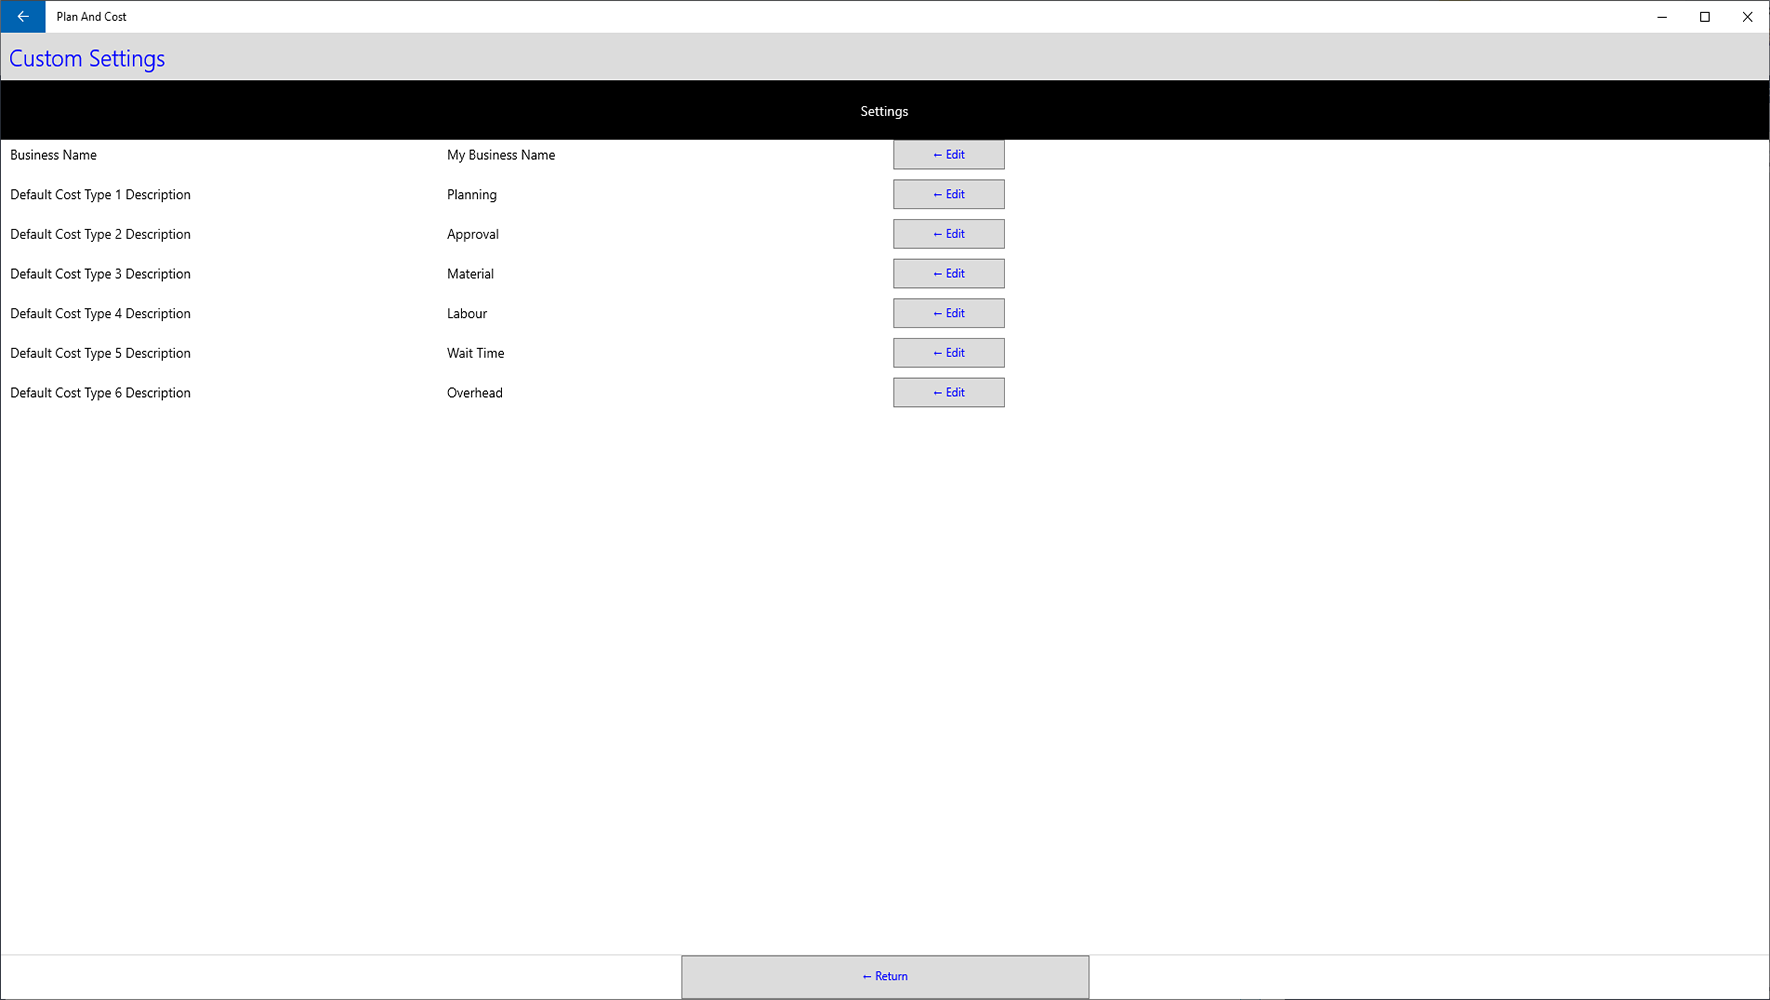
To set up My Business Name click the ← Edit button to the right.
Enter your business name then click the Update button at the bottom right.
To set up the six Default Cost Type Descriptions go through the same process for each cost type.
When you start a New Project your cost type descriptions will default into the new project data entry boxes.
You can override the cost descriptions for any project when you start or edit a project.
Starting a New Project.
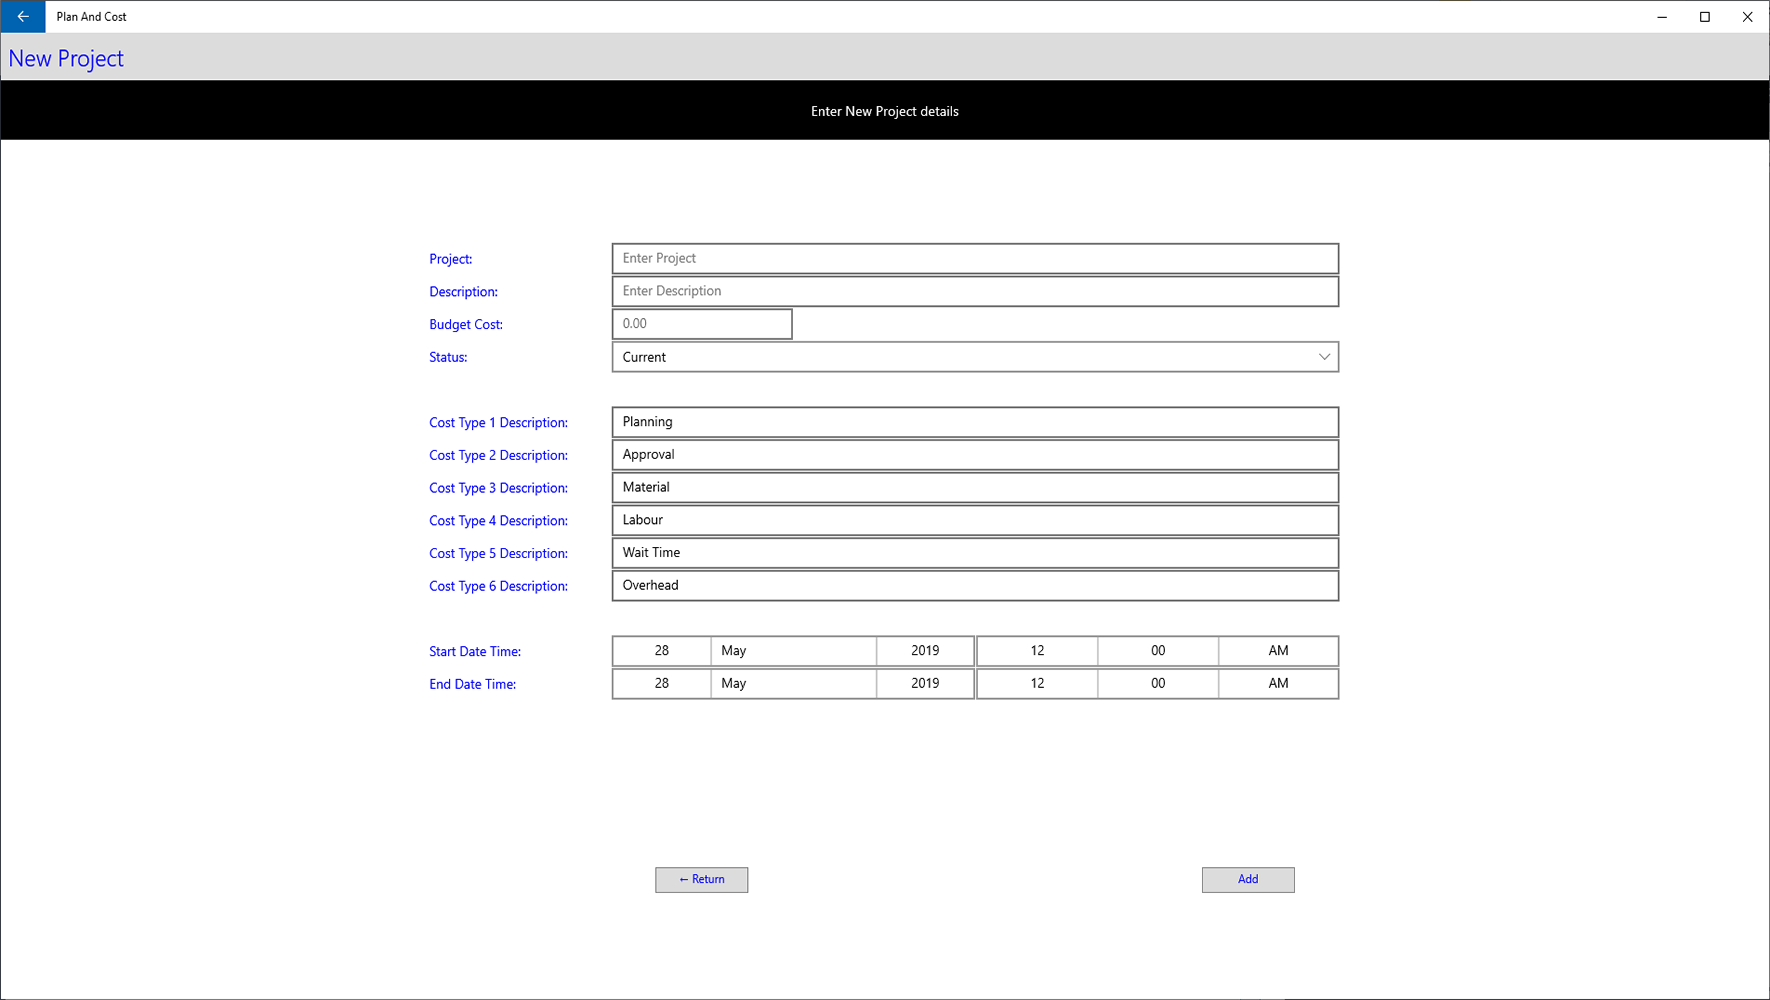
To start a New Project the minimum you need to do to create the project is enter your project identification in the Project entry box and click the Add button.
The Description entry box is for a more detailed description of the project but it's optional.
The Budget Cost entry box is where you define the budget for the project, the value you enter here is used to compare against the project total costs you enter into tasks.
The six Cost Types are pre-populated from the default configuration in the custom settings menu option discussed above.
You can change the cost descriptions to whatever you want them to be for this project now or edit them later.
They will be displayed in the Current and Completed project lists and at the bottom of the Project Task timeline page beside the cost totals.
Start Date Time and End Date Time defines the project timeline duration span, even if you don't know the duration it will be less confusing working with the project tasks timeline if you enter a likely span now.
You can come back and edit this at any time to fine tune the span to reflect reality.
Click in the Date entry box and a month day year selection list will pop up.
If using the Windows App select the month day and year then click the tick icon to populate the entry box.
If using the iOS App select the month day and year then click the Done icon to populate the entry box.
Same process applies to the Time entry box for hour minute and AM/PM.
If you enter conflicting dates/times you will get an error message when you click the Add button with this message.
"End date/time must be equal to or later than start date/time"
When you are happy with your entries click the Add button and the Project will be created if there are no errors.
Current Projects Timeline.
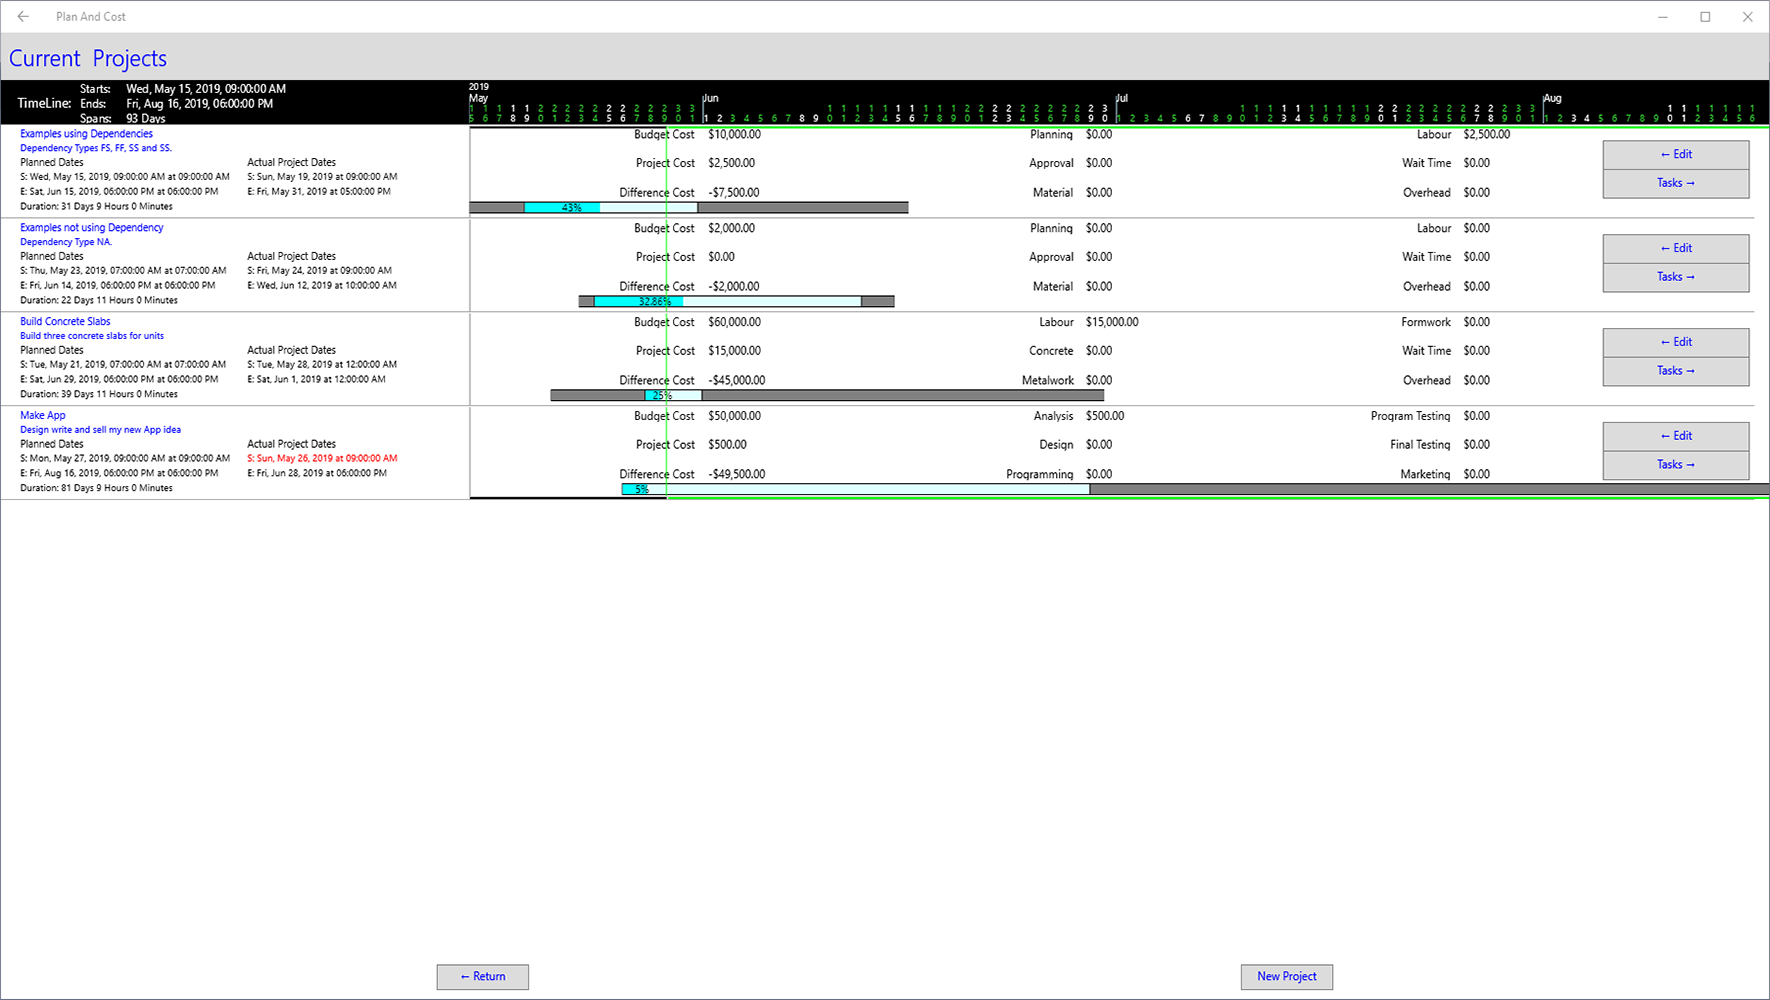
The Current Projects Timeline displays all projects where their status is set to Current.
The Timeline heading at the top with a black background shows the extent of all current projects.
The section at the left has:
The Start date is the start date/time of the earliest current project.
The End date is the end date/time of the latest current project.
The Spans days is the number of days from the start date/time to the end date/time above.
The section at the right is a breakdown of the timeline between the start and end dates/times above represented in Year, Month, Day increments if the projects span more than seven days.
Alternatively if the projects span seven days or less it's displayed in Year, Month, Day, Hour increments.
The projects list section below the heading lists all current projects in the order they were created.
When you have a project where the start and end date/time spans over the current date/time on your device a thin vertical green line will be dropped down through the current projects from the actual current time position in the heading date increments.
When this is so the horizontal lines above the first project and below the last project will be displayed black before the green vertical line and green after representing history and the future.
I call this the now position.
To highlight a potential problem if a project tasks date/time spans over the project planned date/time range then:
If it's the start date the Actual Project start date at the left will be displayed red to highlight the issue. The Make App project in the image above shows this.
If it's the end date the Actual Project end date at the left will be displayed red to highlight the issue.
The two buttons on the right of each project are to:
Edit the project.
Go to the projects task timeline page.
You can go to start a new project by clicking the new Project button at the bottom right of the page.
Completed Projects Timeline.
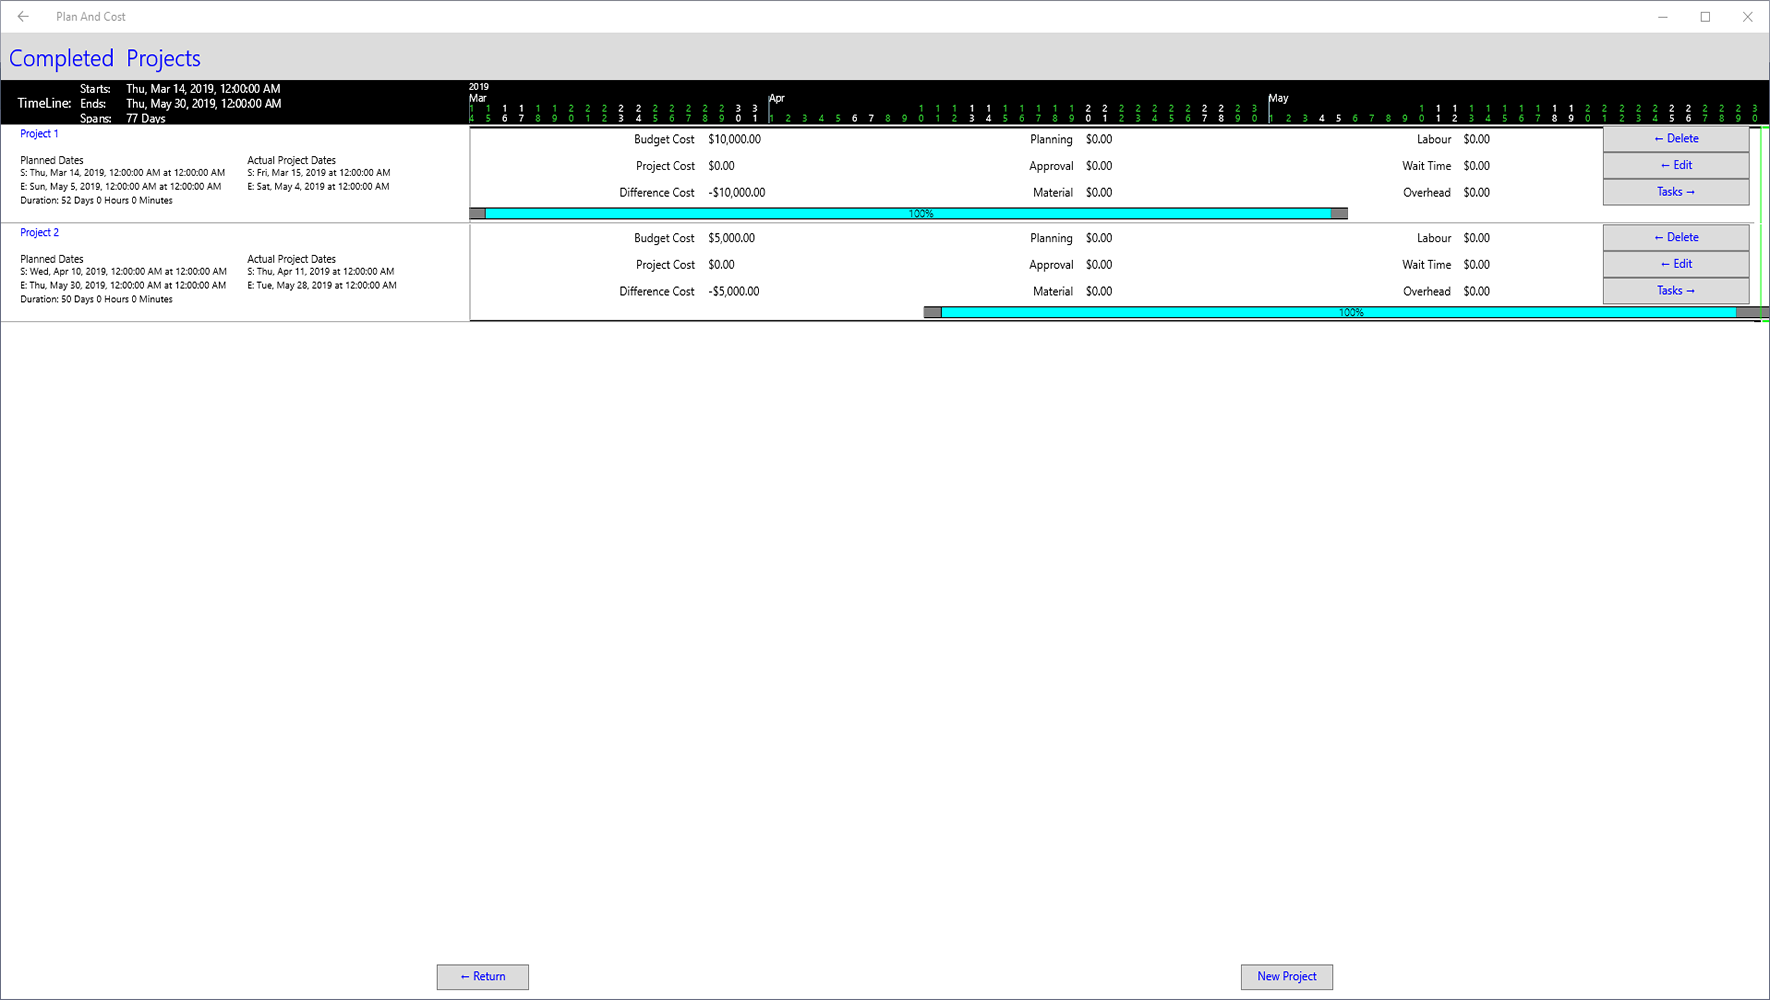
The Completed Projects Timeline displays all projects where their status is set to Completed.
This page has the same functionality as the current projects page with one exception.
There are three buttons at the right of each project, the extra being the Delete button.
If you click the Delete button you will get a page something like this.
Delete Project.
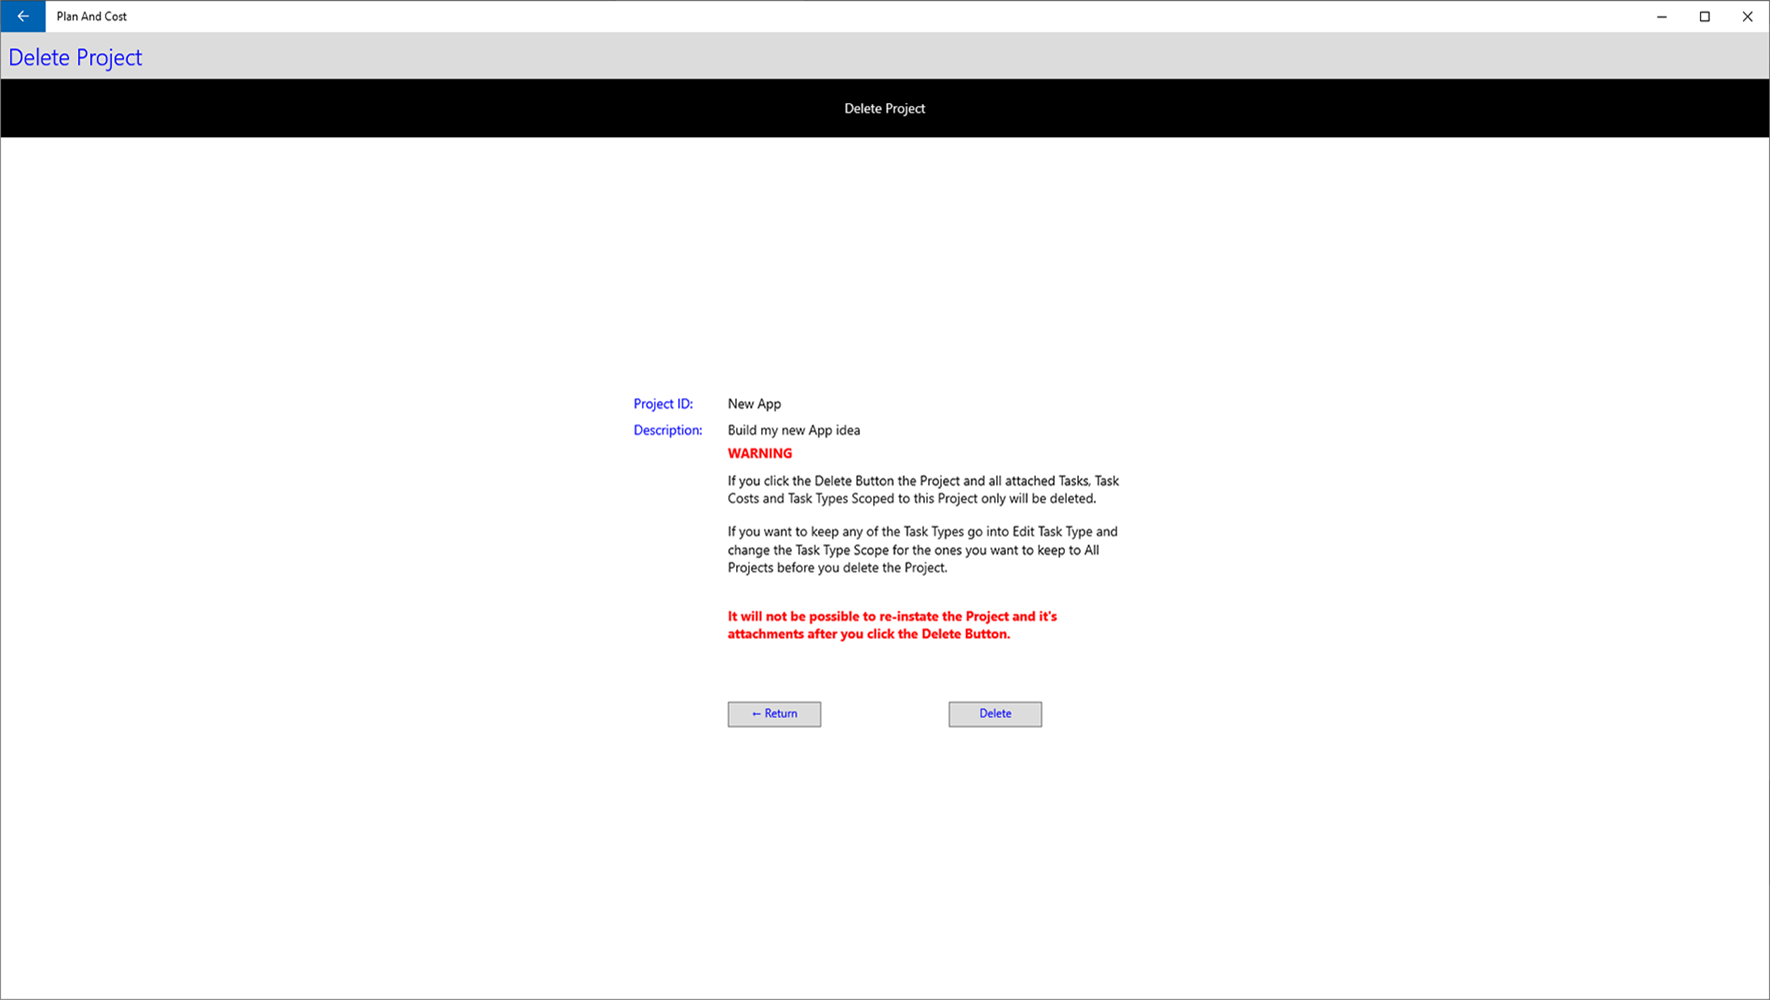
If you are absolutely sure you won't need the project later you can click Delete and it will delete everything about the project.
The result of a delete is that nothing is retrievable later.
If you're not sure then click the Return button to back out.
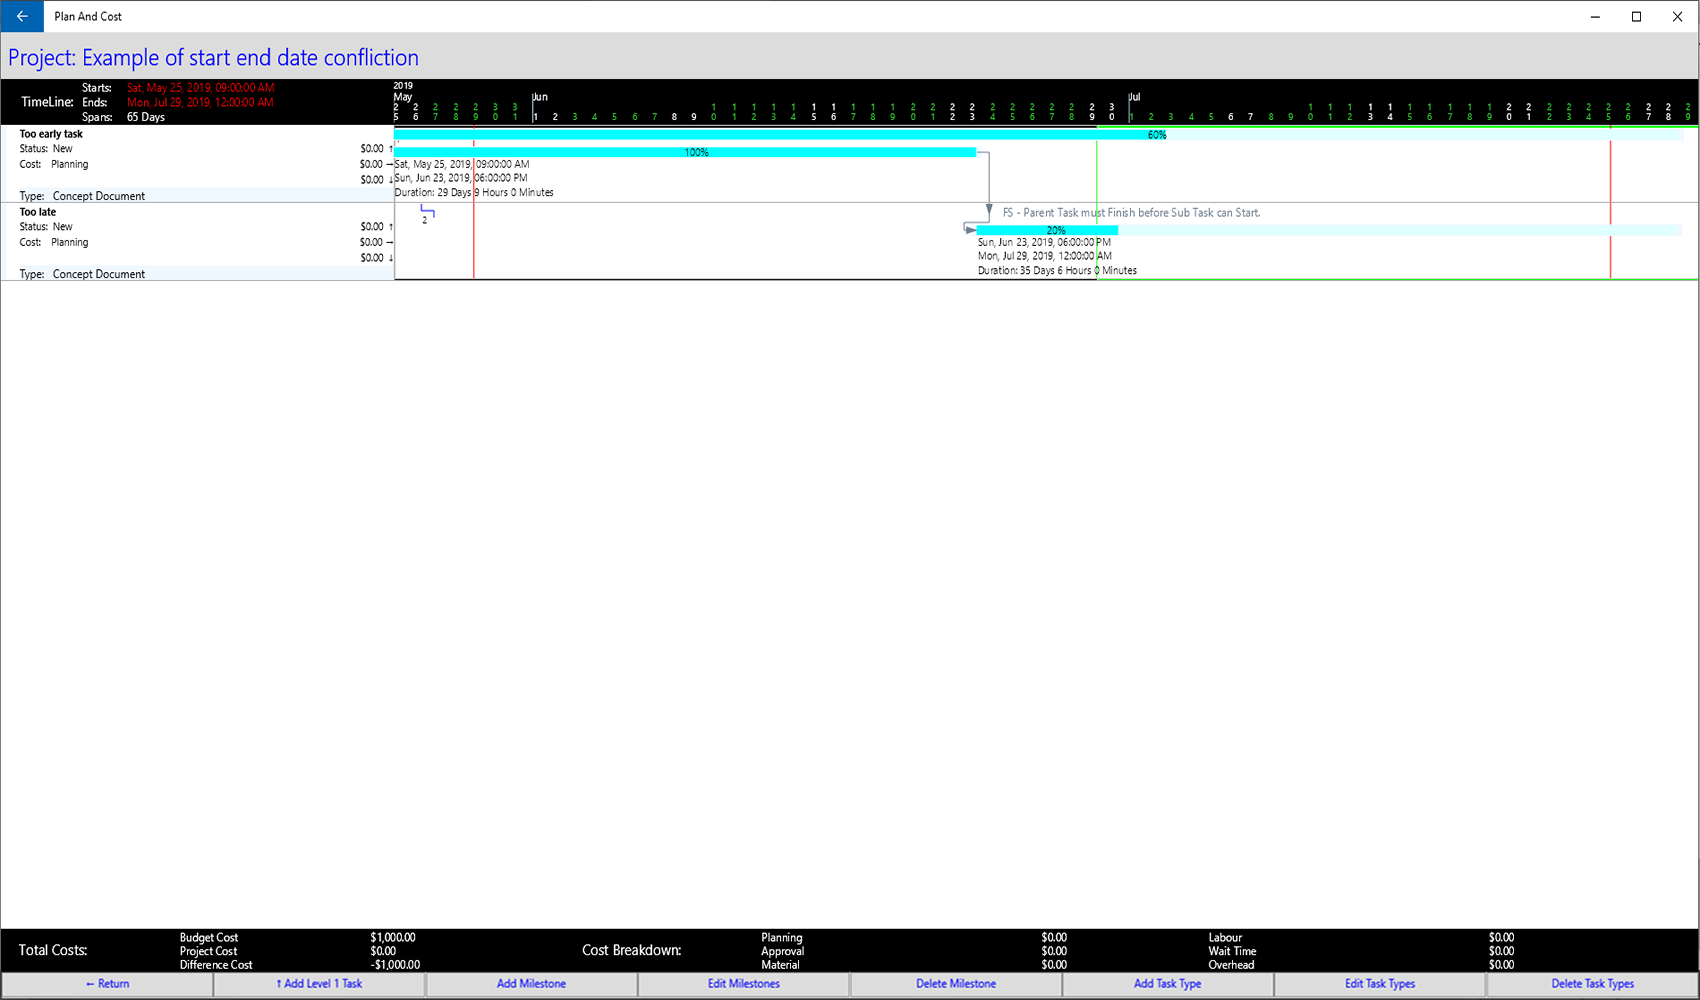
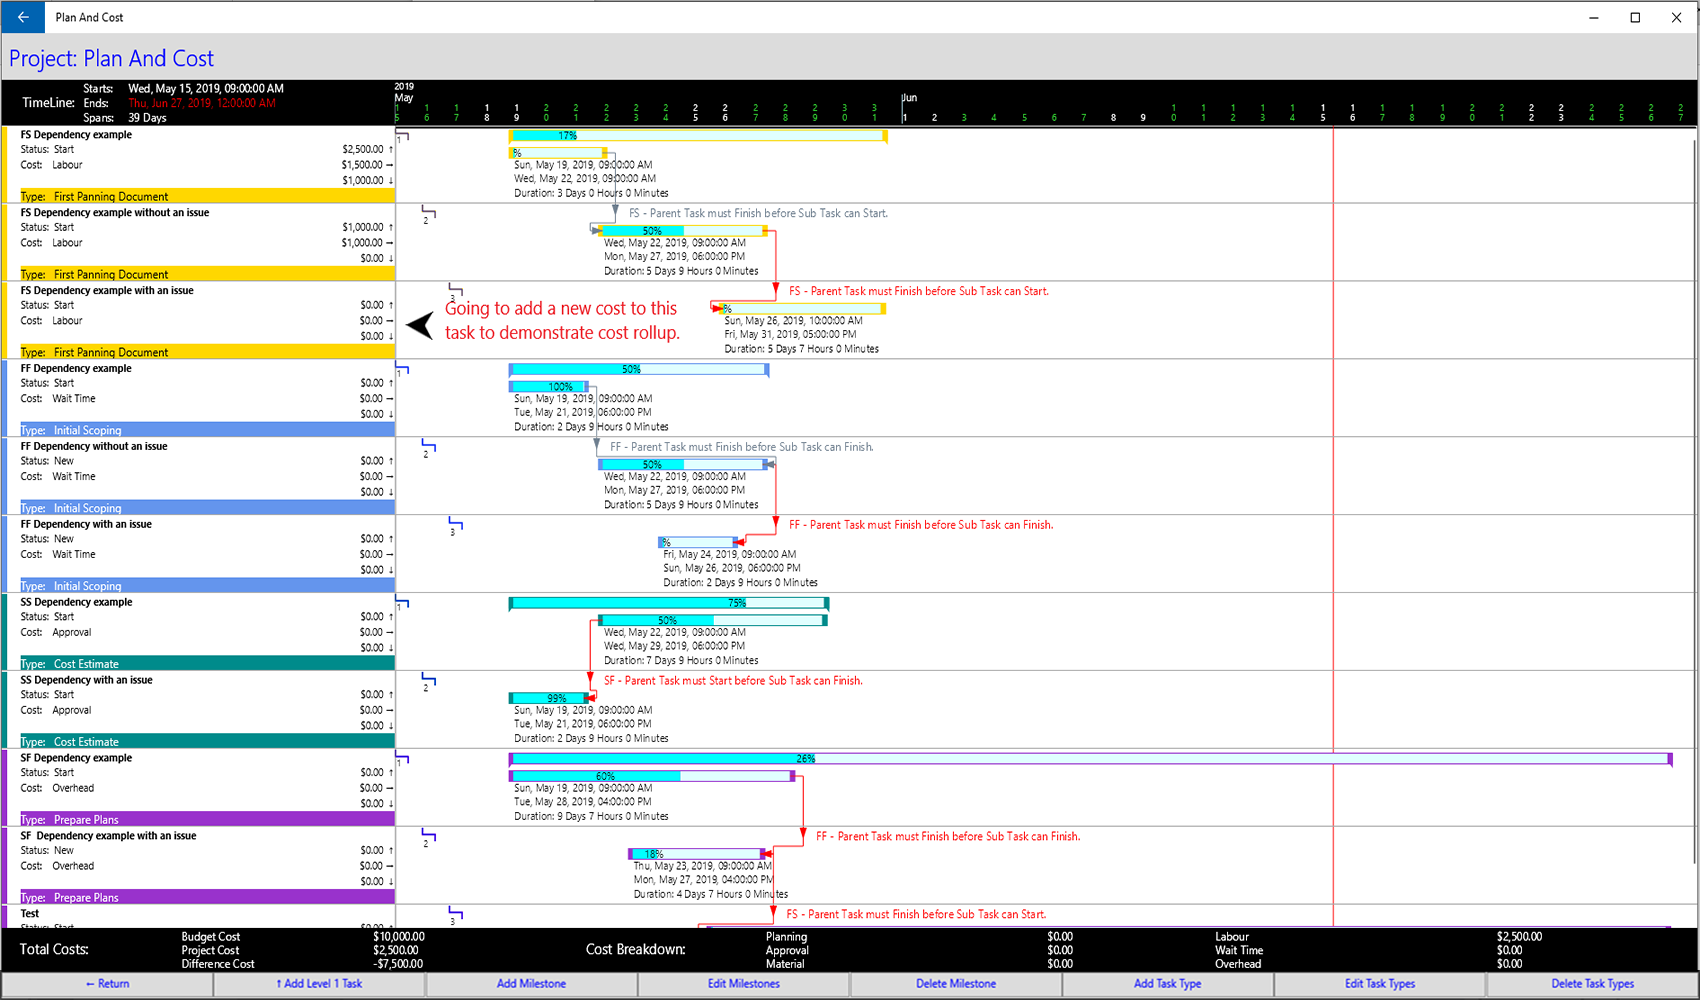
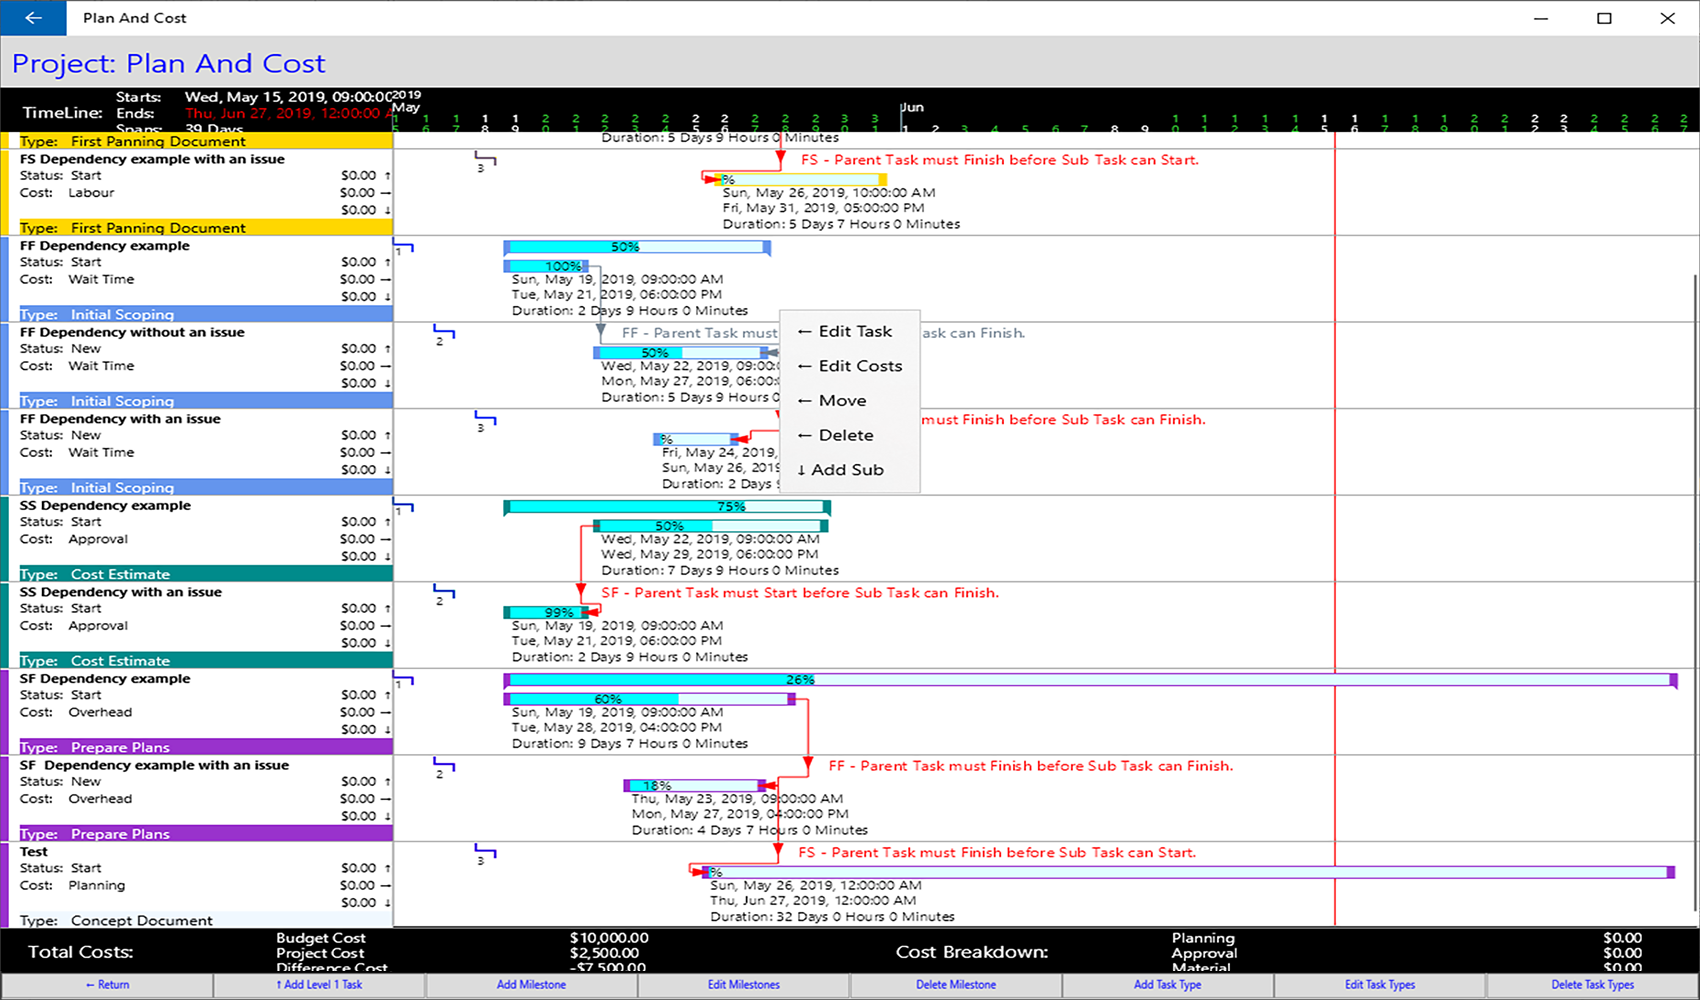
Project Tasks Page.
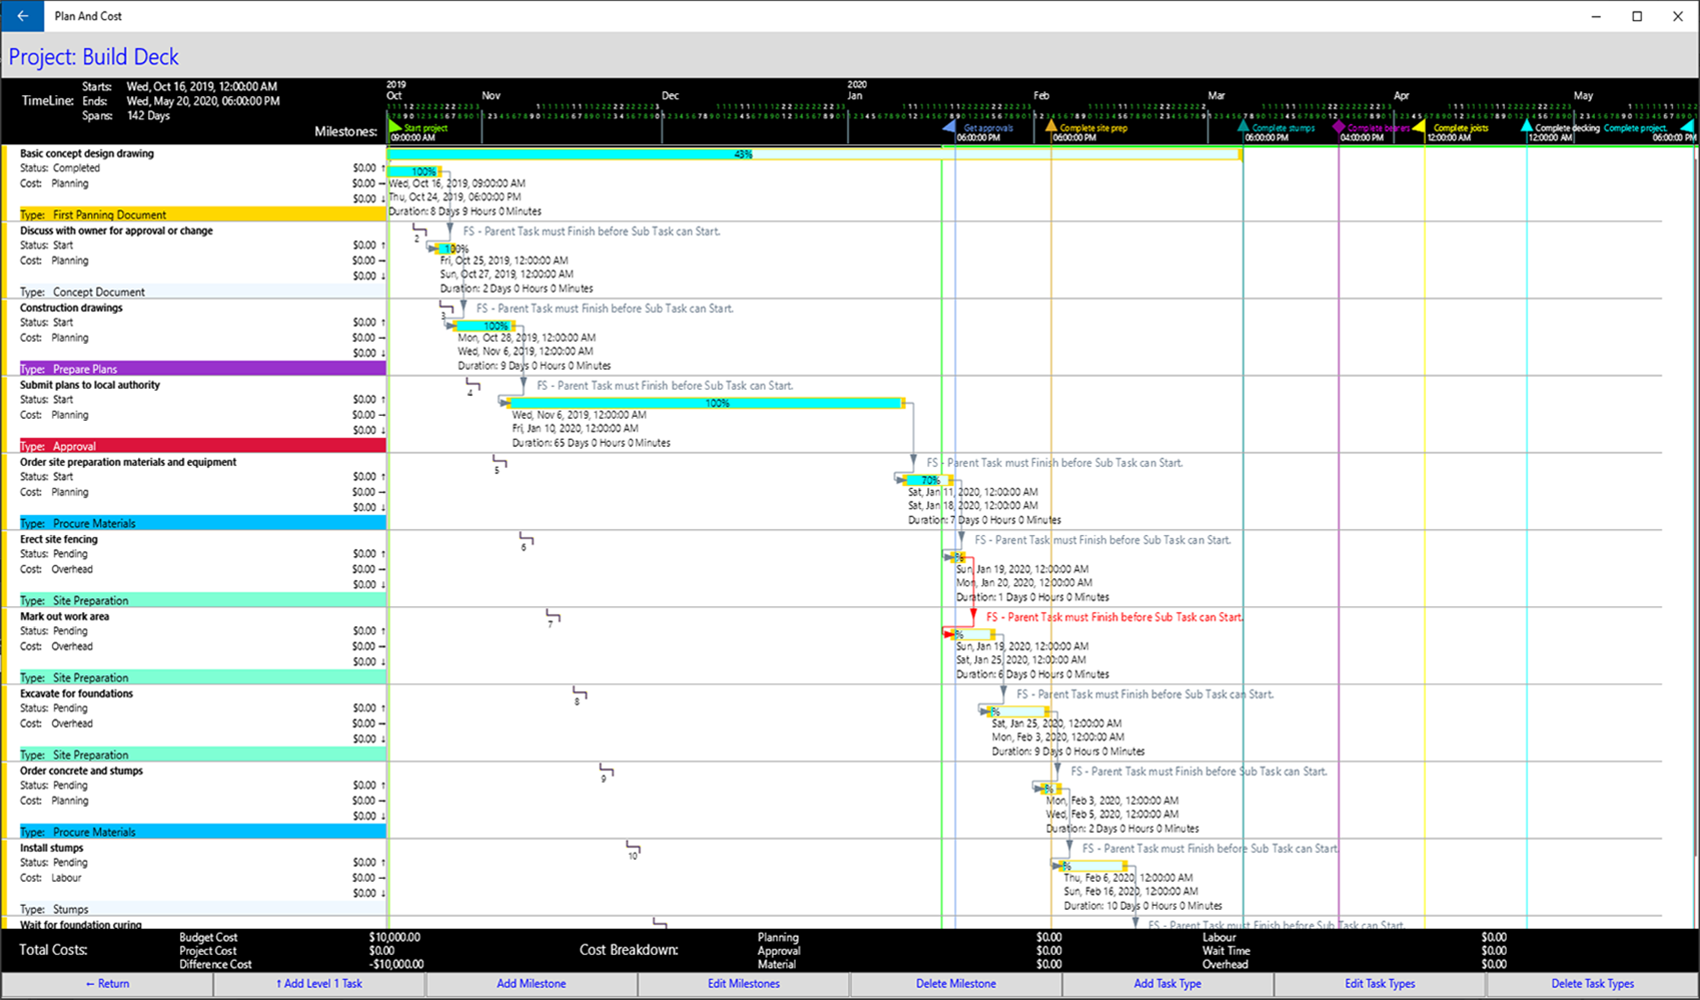
If you had clicked a Tasks button on a project line in the Current Projects page you would get a page like this.
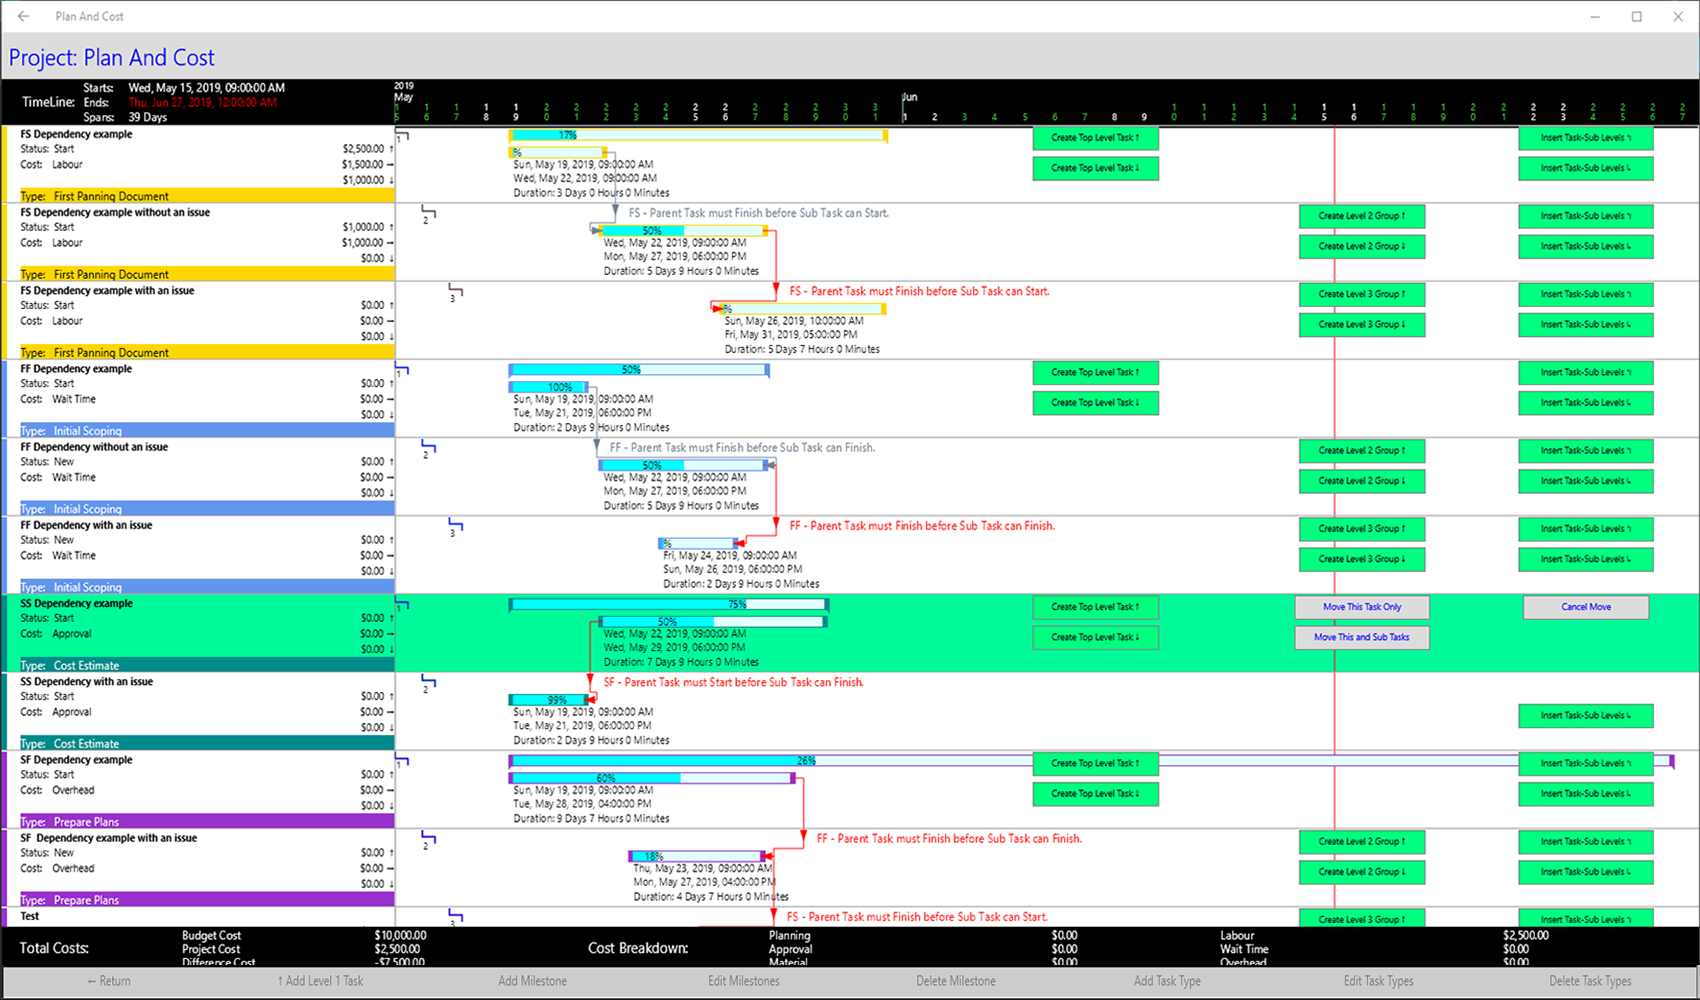
This is the most complicated page in the App.
The project here is of building a deck, it only goes as far as the installation of concrete stumps, but it gives an idea of the concept.
The timeline of tasks is linear where every task is dependent on the previous task being completed.
A Dependency Type of FS - Parent Task must Finish before Sub Task can Start connects every task.
This is the most commonly used dependency type in project planning.
There is one task relationship in this example which fails the dependency rule and the connection line and text is highlighted in red alerting us to a date/time conflict between the two tasks.
The page heading timeline is almost the same as the Current Projects page except for these differences:
The timeline start spans out to the earliest of either the project start date/time or task start date/time.
The timeline end spans out to the latest of either the project end date/time or task end date/time.
This gives us the visibility of the entire project span, project dates and tasks dates.
A project milestones section is displayed under the date time section, project milestones when added show one of six graphics and text of the milestone reason. A thin line then drops down through all tasks below, in the color selected for the graphic.
The vertical green now line works the same as in the Current Projects page.
There are two extra vertical lines which are coloured red which show the position in the timeline where the project start and end date/times occur.
This enables us to see where tasks are pushing out at either end of the project date span.
The start and end dates in the header are also both displayed in red text to highlight this issue.
This can be seen in the image below where one task is too early and one too late.
Buttons at the bottom of the Project Tasks page.
The ← Return button takes you back to the previous page.
The ↑ Add Level 1 Task button takes you to a page where you can create a task attached directly to the project.
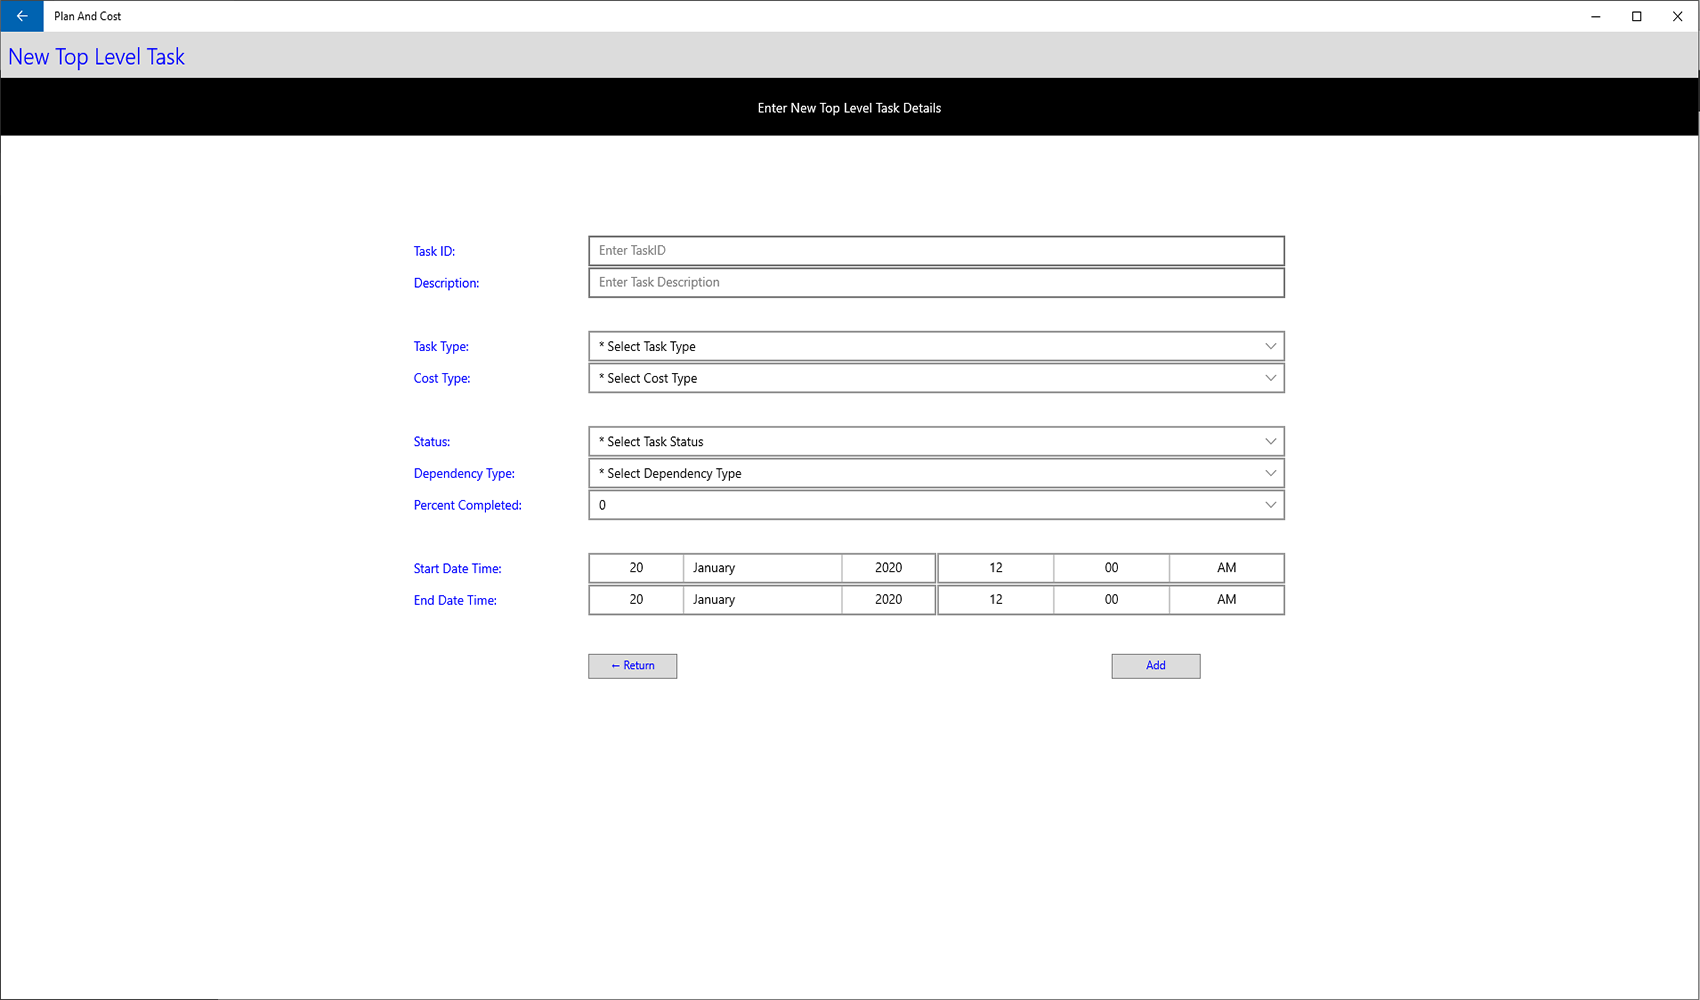
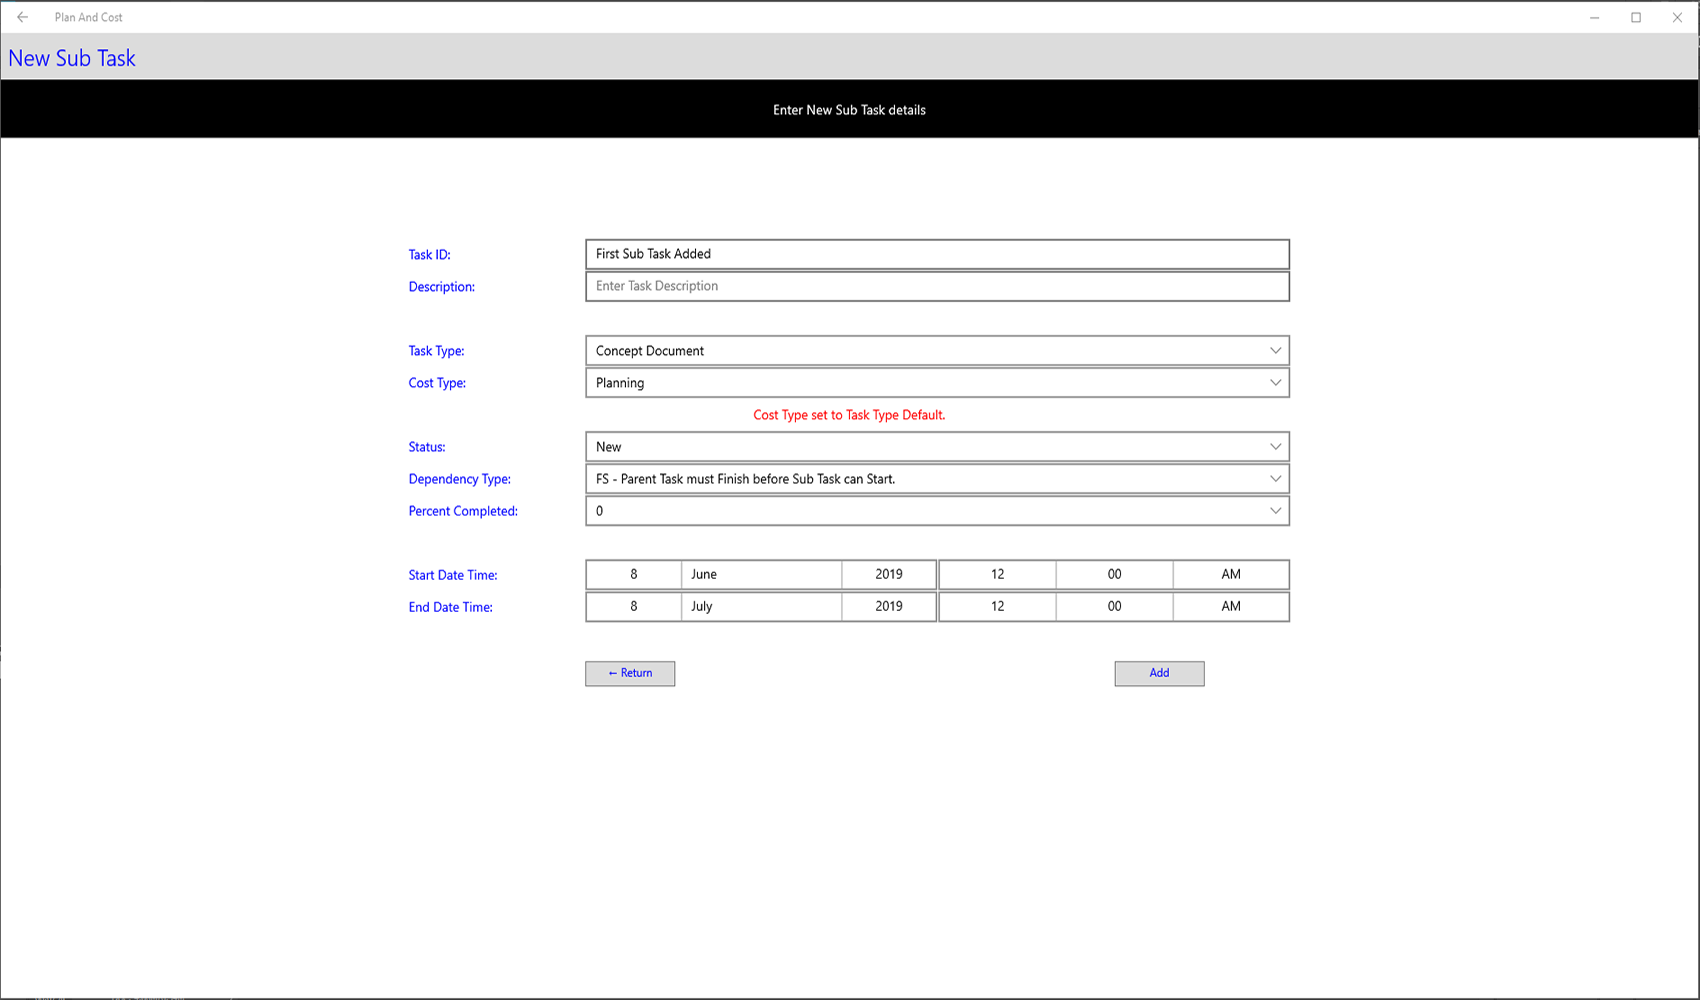
The Task ID is displayed to the top left of the tasks in the timeline, enter a meaningfull purpose for the task.
The Task Description is not displayed on a task line, it's only optional descripton information and is not a required entry.
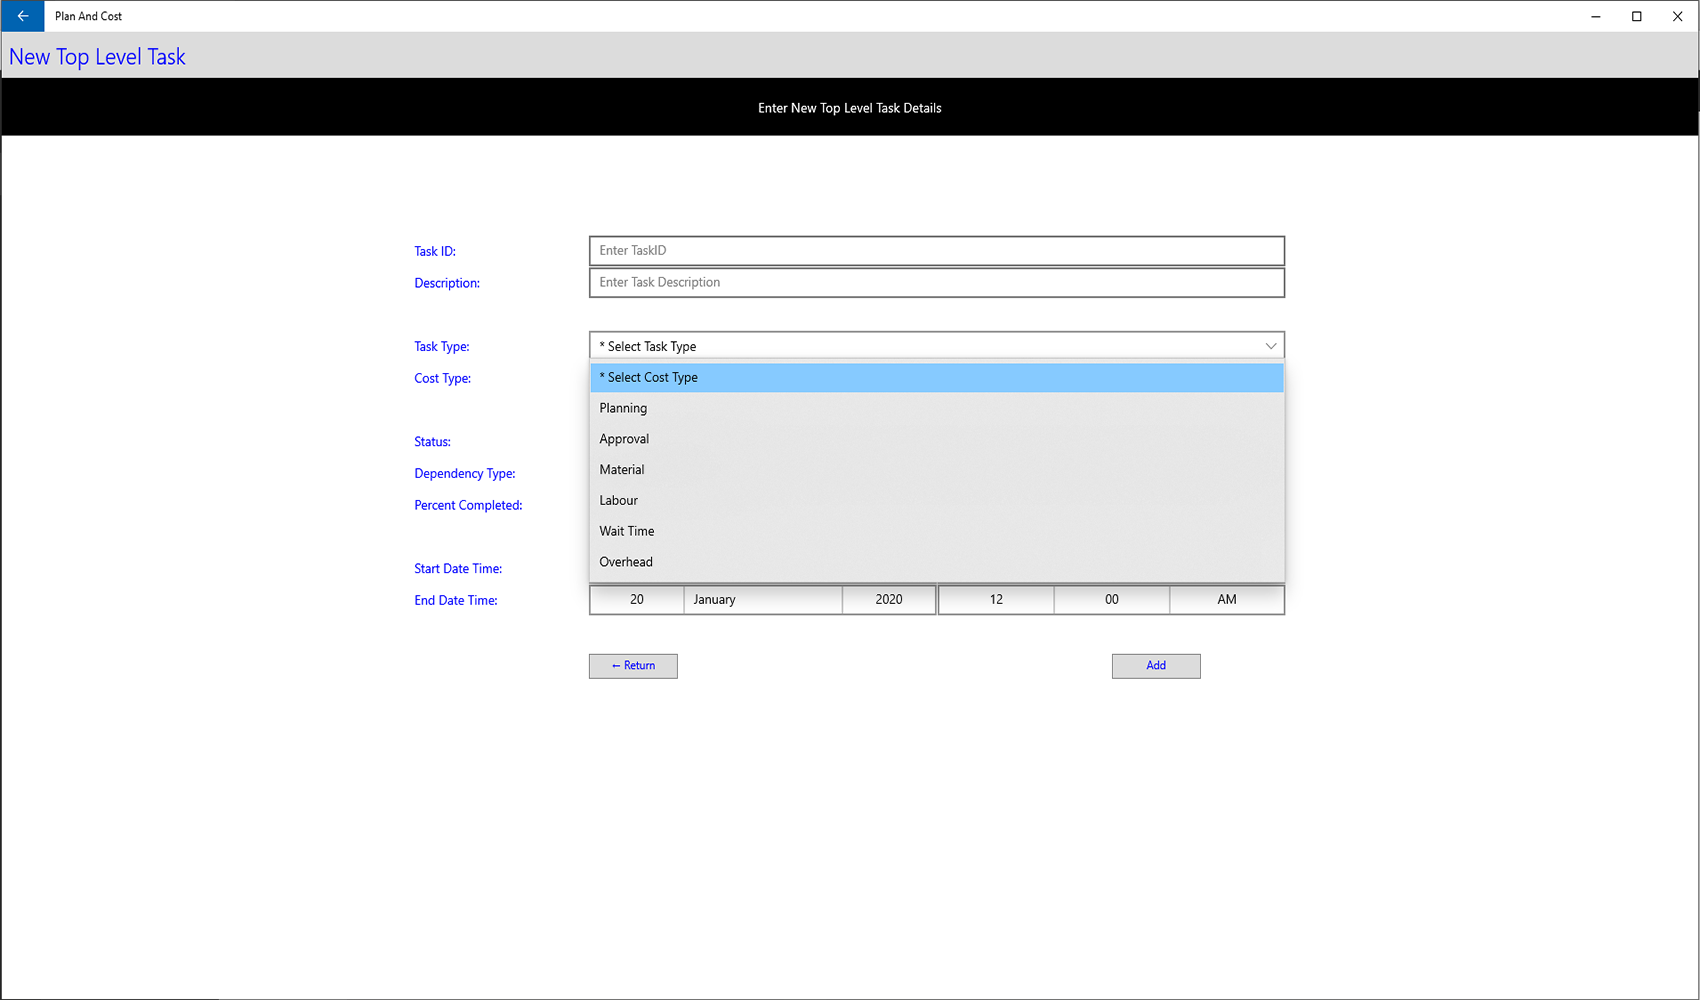
The Task Type drop down list shown below displays all Task Types created for either this specific Project only and created for all Projects, select one that is appropriate for your new Task and if one doesn't suit you can add one in Add Task Type .

The Cost Type drop down list shown below displays the six cost breakdown descriptions, the six Cost Types default to presets when adding a new Project but you can change them when you create a Project or edit one.
When you selected a Task Type above, the Cost Type specified in the Task Type specification is automatically selected from the Cost Type list for you, but you can override it by selecting a diferent Cost Type.
The Status drop down list showm below displays five status options, this is a pre-defined list and can't be changed, select a Status from the list.

The Dependency Type drop down list shown below displays five options, this is a pre-defined list and can't be changed, the first four are the standard project management dependencies and the last one NA allows you an option to not use one of the four. When this dependency type is chosen the task dependency linking lines between tasks will not be displayed, select a Dependency Type from the list.

The Percentage Completed entry box allows you to enter where you think the task has progressed to, it's displayed within the duration bar of the task and averaged up to the level one task tree duration bar, select a percentage from the list or you can key the number in and it will position to it, then click on it to select it.
The Start Date Time and End Date Time pickers are to define when you estimate the task will start and be completed, click in both the left date panel and right time panel and select the dates times you want, be sure to click the tick to make the selection carry or your selection will be ignored.
When you have completed alll entries and selections click the Add button and the new task will be created.
The Add Milestone button takes you to a page where you can create a new milestone.
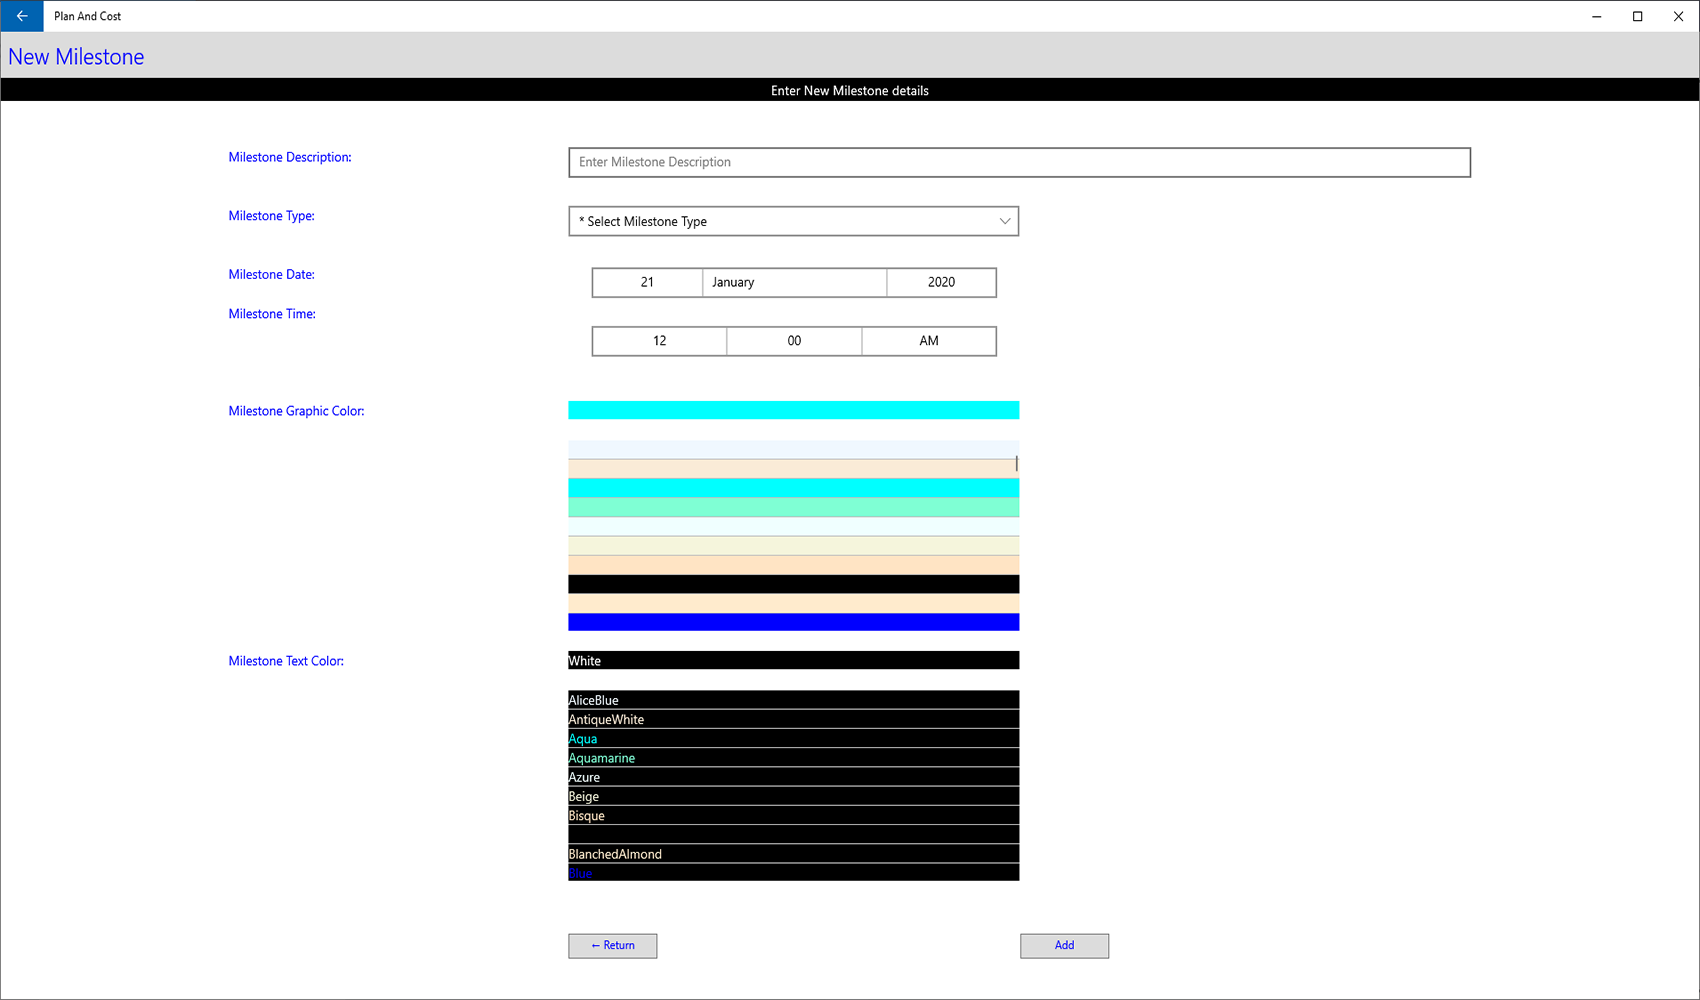
The Milestone Description will display beside the milestone graphic in the timeline header, enter a meaningfull purpose for the milestone.
The Milestone Type you select from the dropdown list of six different shapes will detemines which graphic object will be drawn in the timeline header bar. Select the one you want.
The Milestone Date and Time pickers are to define at what position in the timeline your milestone will position, click in both the left date panel and right time panel and select the date time you want, be sure to click the tick to make the selection carry or your selection will be ignored.
The Milestone Graphic Color picker allows you to select the color the milestone graphic and vertical line that will be run down through all tasks, select one that represents your milestone.
The Milestone Text Color picker allows you to select the color the milestone description will be drawn, select one that represents your milestone.
When your milestone is drawn in the timeline it will be positioned at the point of date time the milestone is set for, also the time of the milestone will be displayed in white text beside the graphic.
When you have completed alll entries and selections click the Add button and the new milestone will be created.
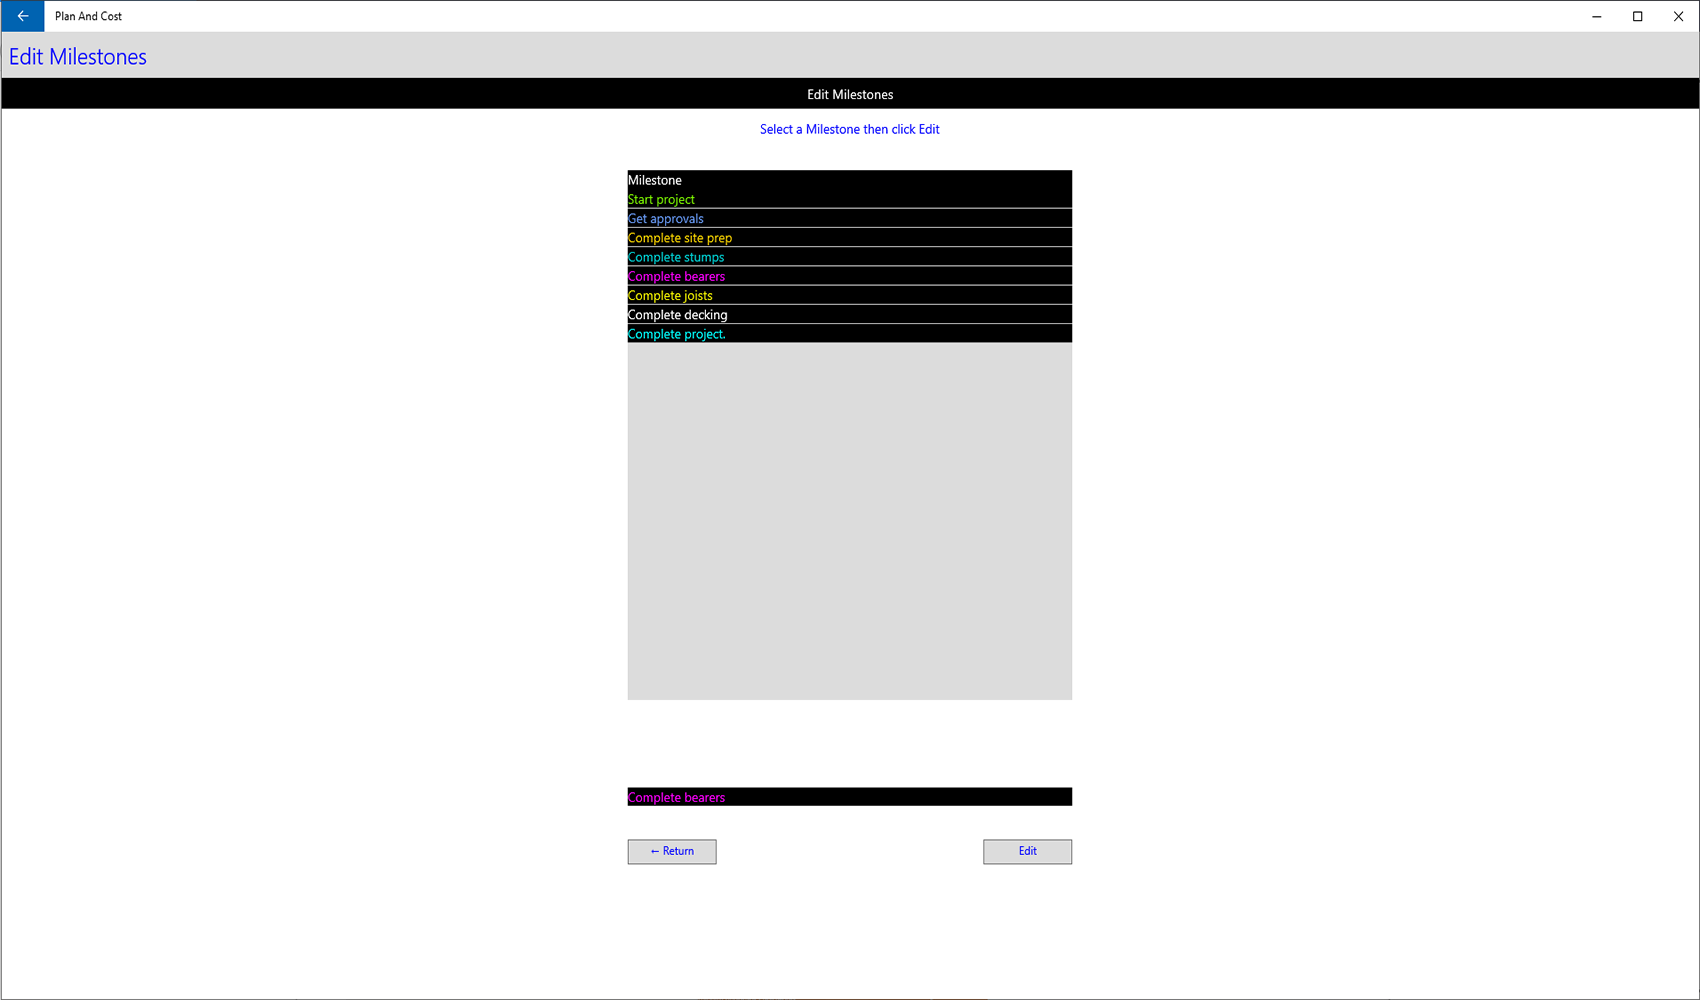
The Edit Milestone button takes you to a page where you can edit an existing milestone.
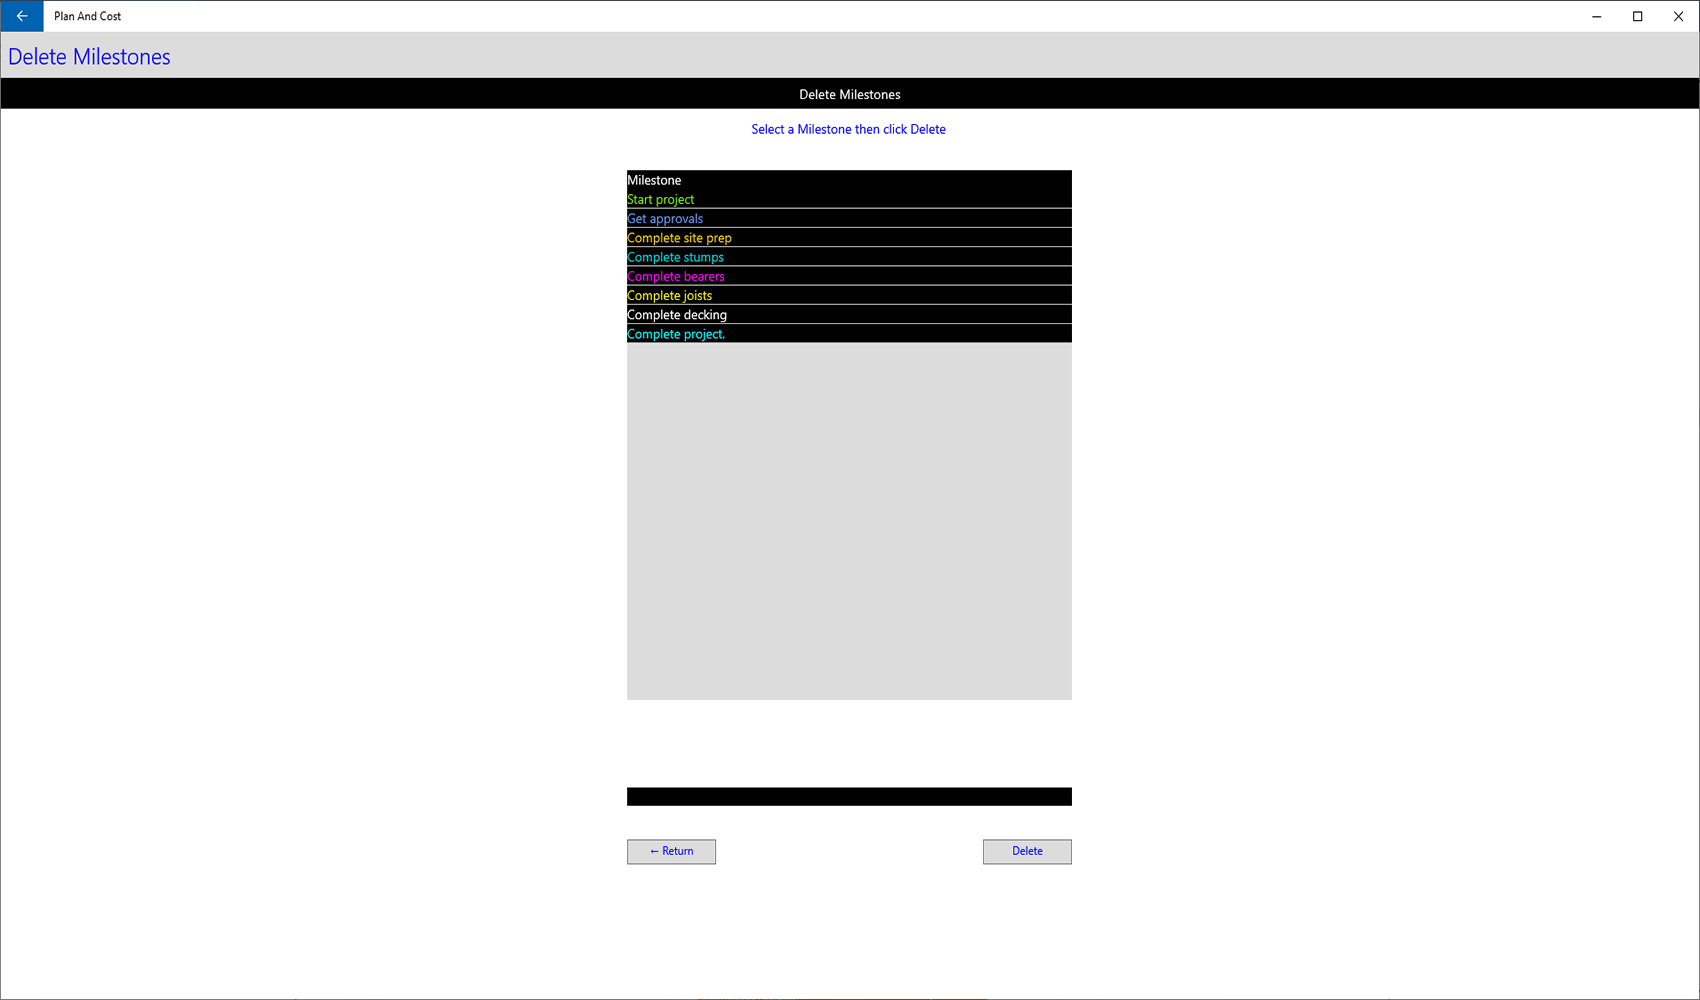
The Delete Milestone button takes you to a page where you can delete and existing milestone.
The Add Task Type button takes you to a page where you can create a new task type.
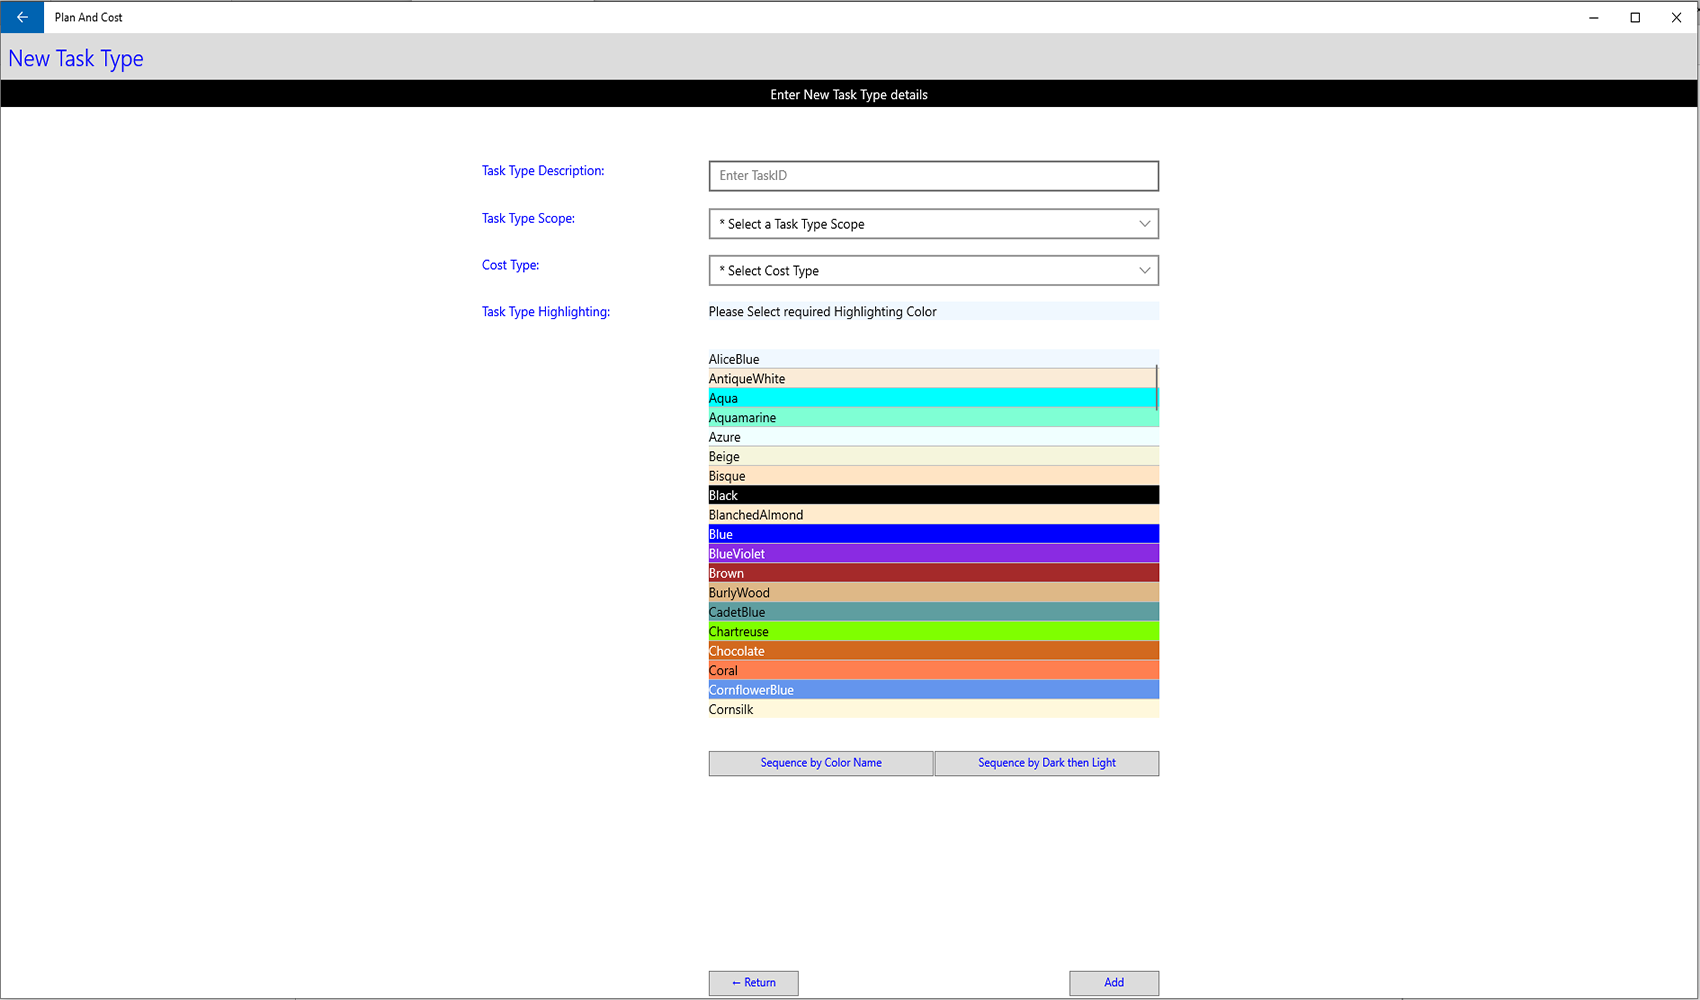
The Task Type Description is displayed to the left of tasks in the timeline.
The Task Scope determines if the task type is generic across all projects or unique to only this project.
The Cost Type is defaulted to a task when the task type is selected, It determines which of the six cost breakdown the task costs will roll up to. It can be overidden in task create or edit.
The Task Type Highlighting sets the background and foreground color combination used to highlight a task in the time line as being of a certain type.
The list of available color combinations defaults to a list sequenced by color name but the two buttons enable you to swap between a list of Sequence by Dark then Light and Sequence by Color Name.
This is the Sequence by Dark then Light list.

The Edit Task Types button takes you to a page where you can edit an existing task type.
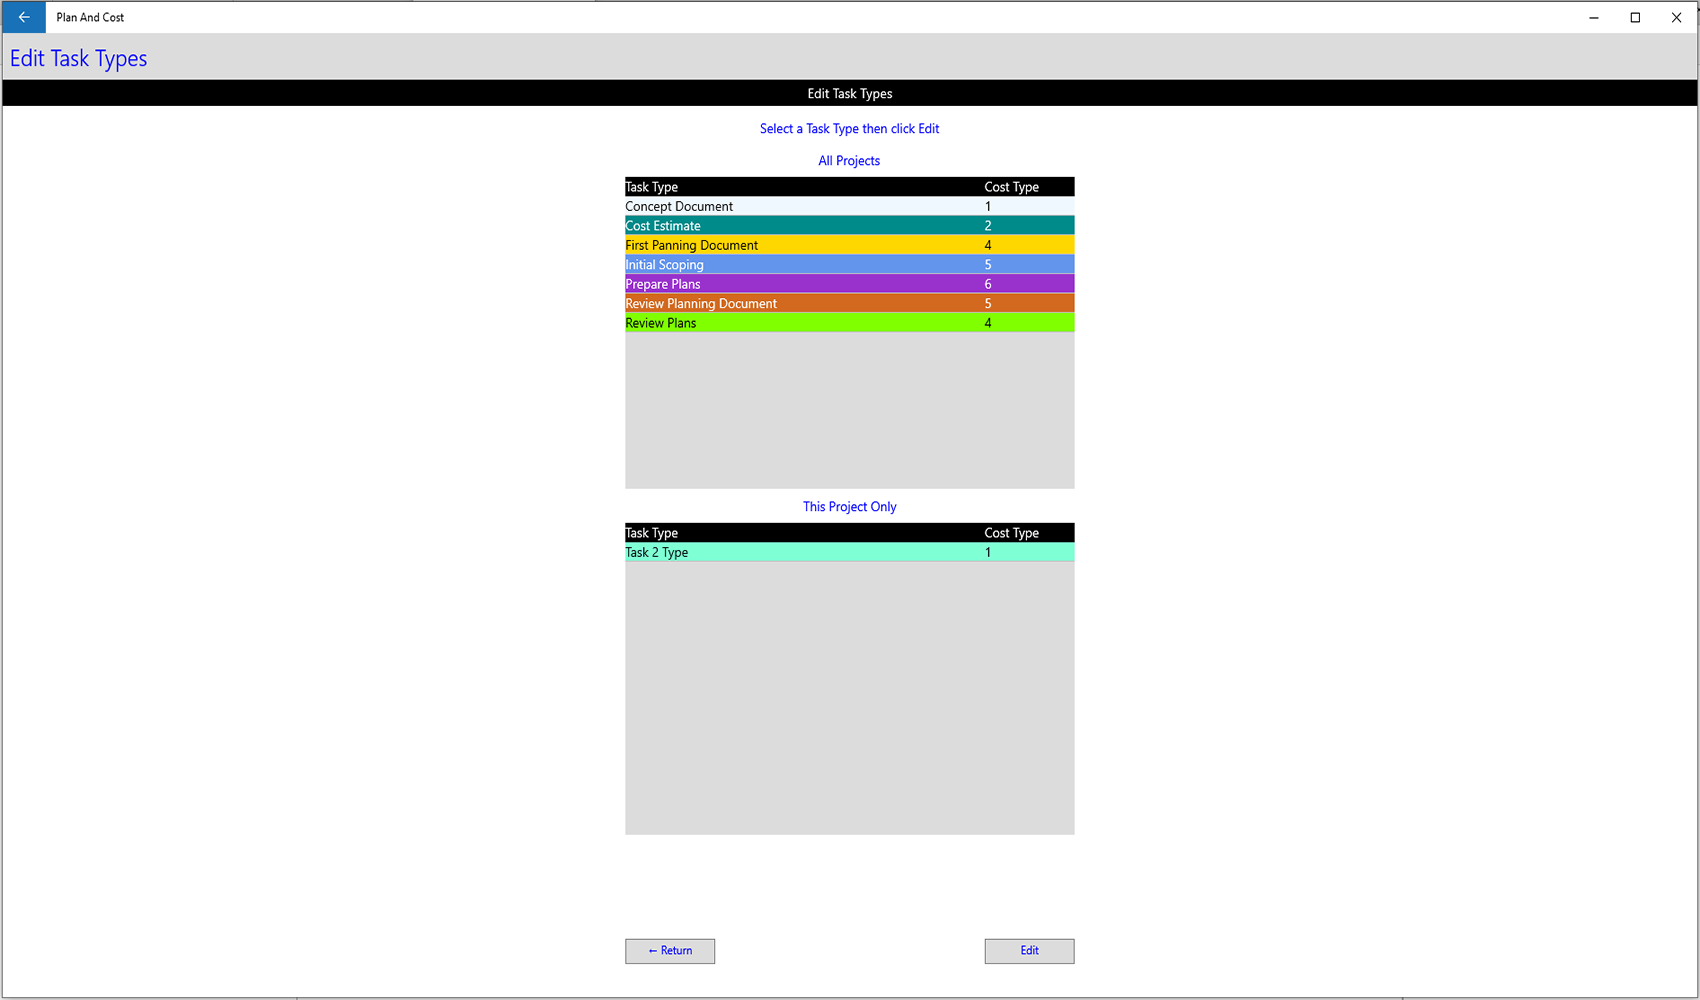
The Delete Task Types button takes you to a page where you can delete an existing task type.
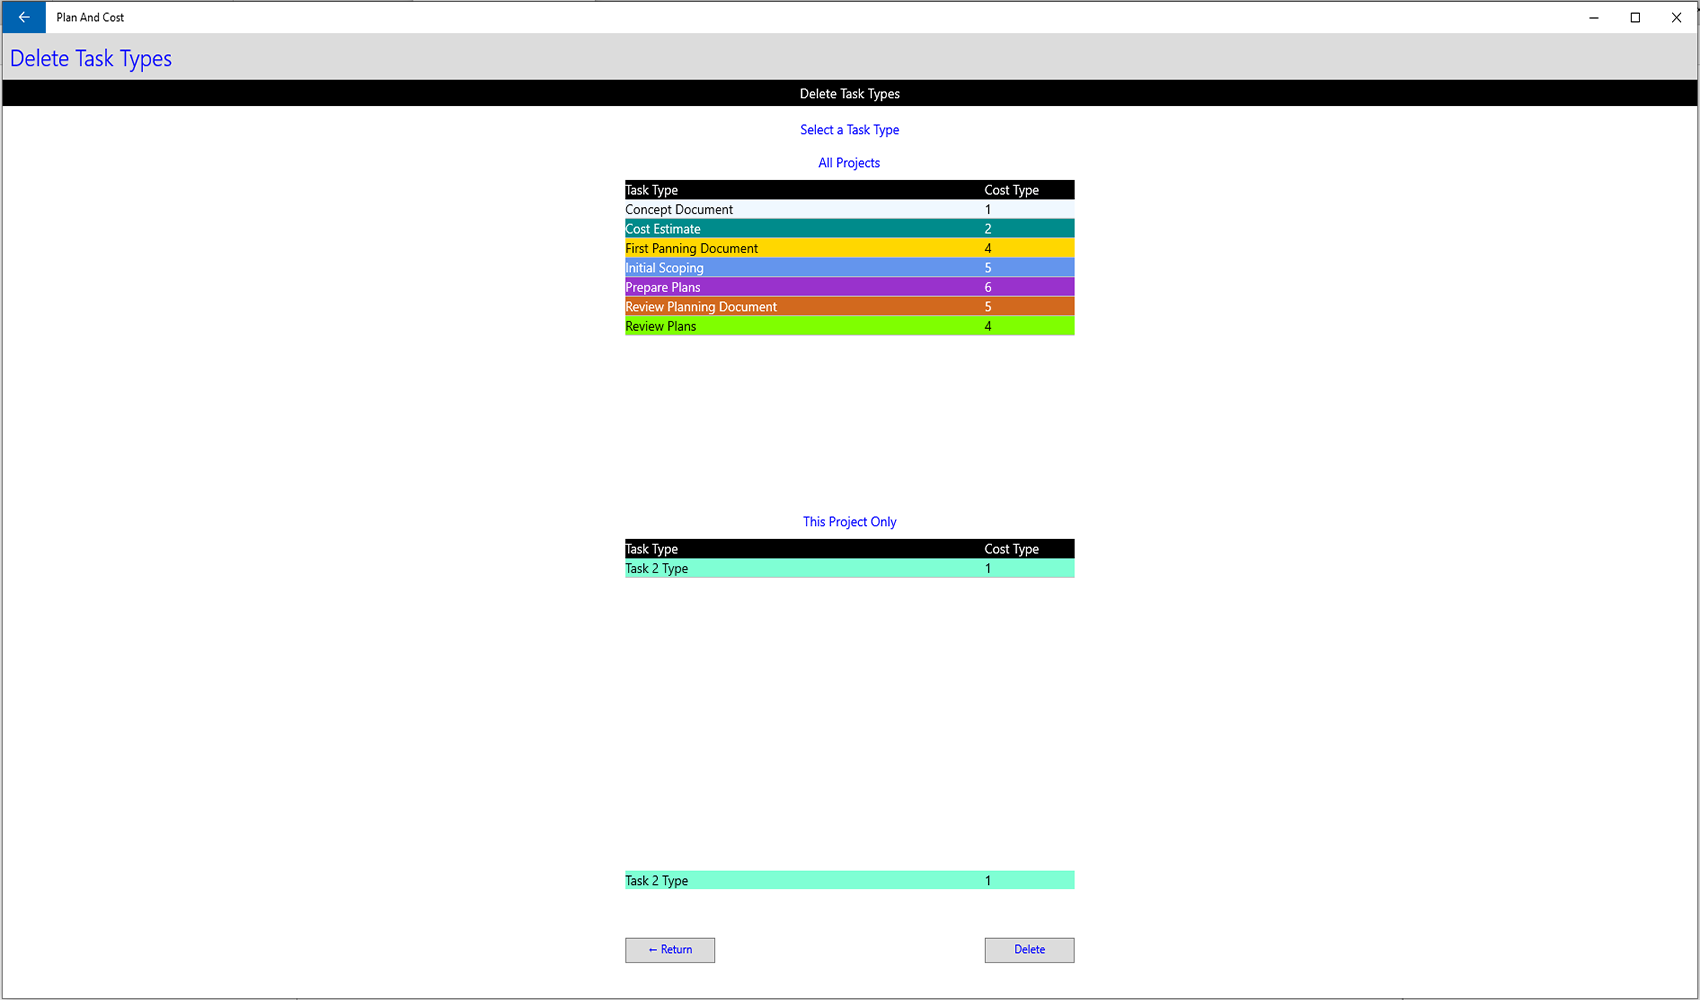
I have selected the light green background Task 2 Type in the This Project Only section above for delete and it displays down the bottom. I then click the Delete button and its gone in the next image.
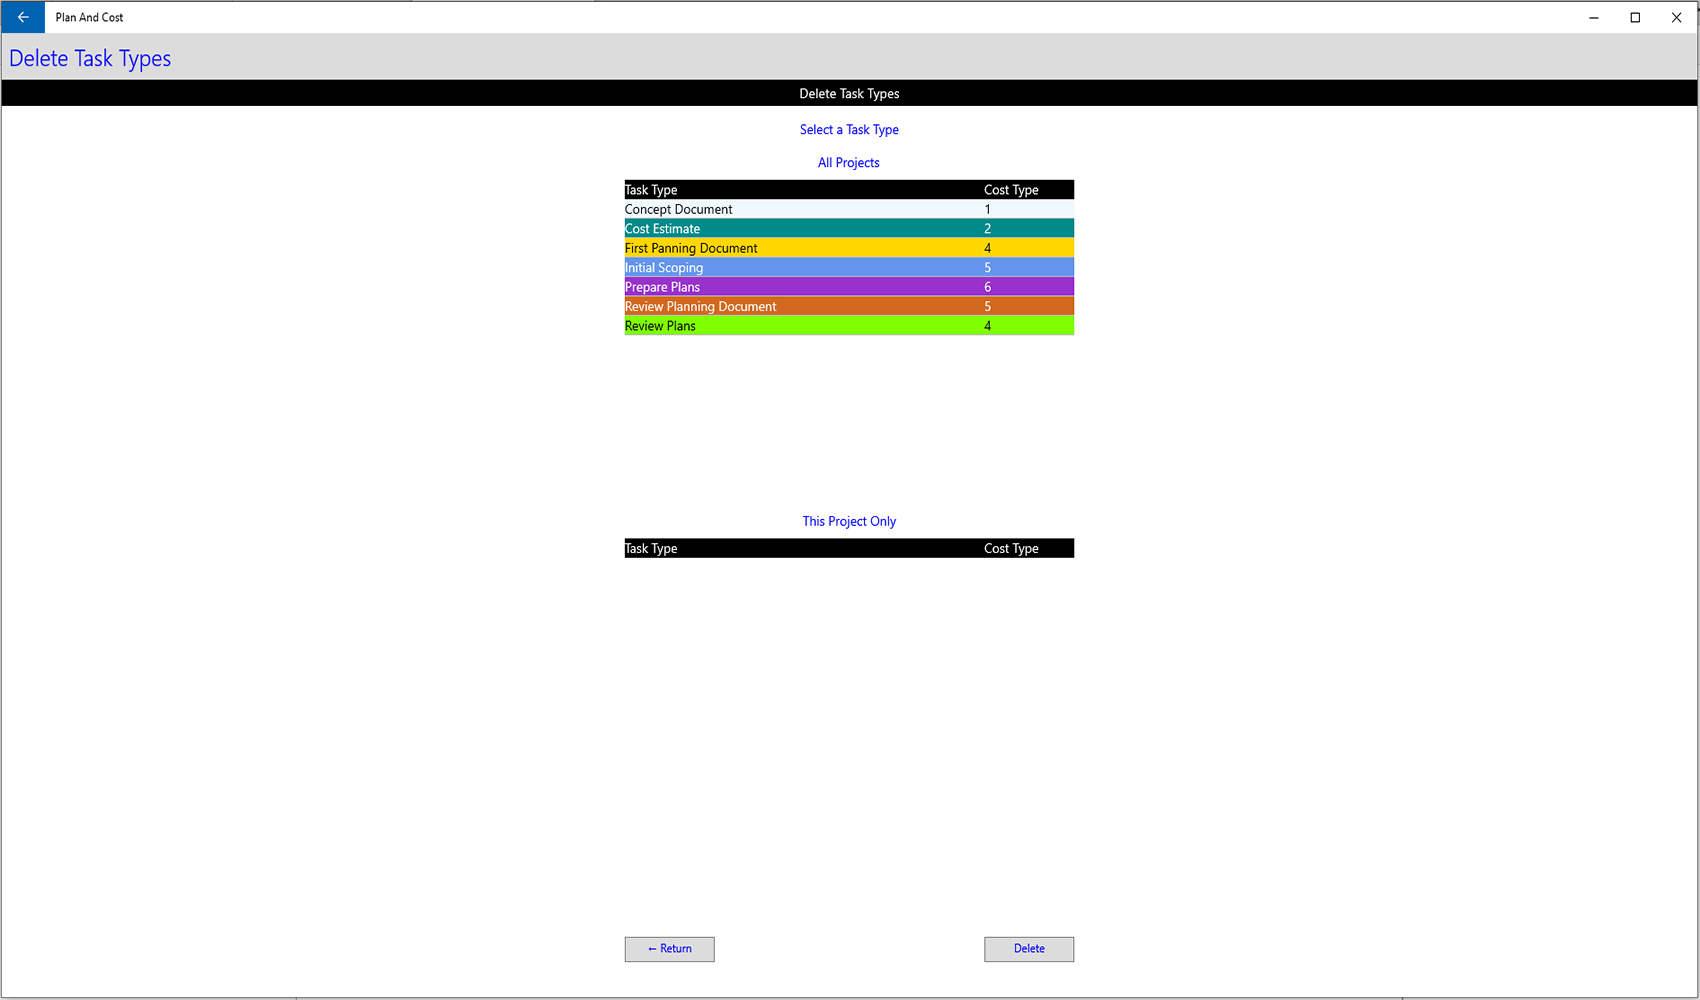
The task type was deleted because no tasks were attached to it in the current project and it's scope is only This Project Only so won't be used in other projects.
If a task type is selected which is being used by a task we get an error message like this example.
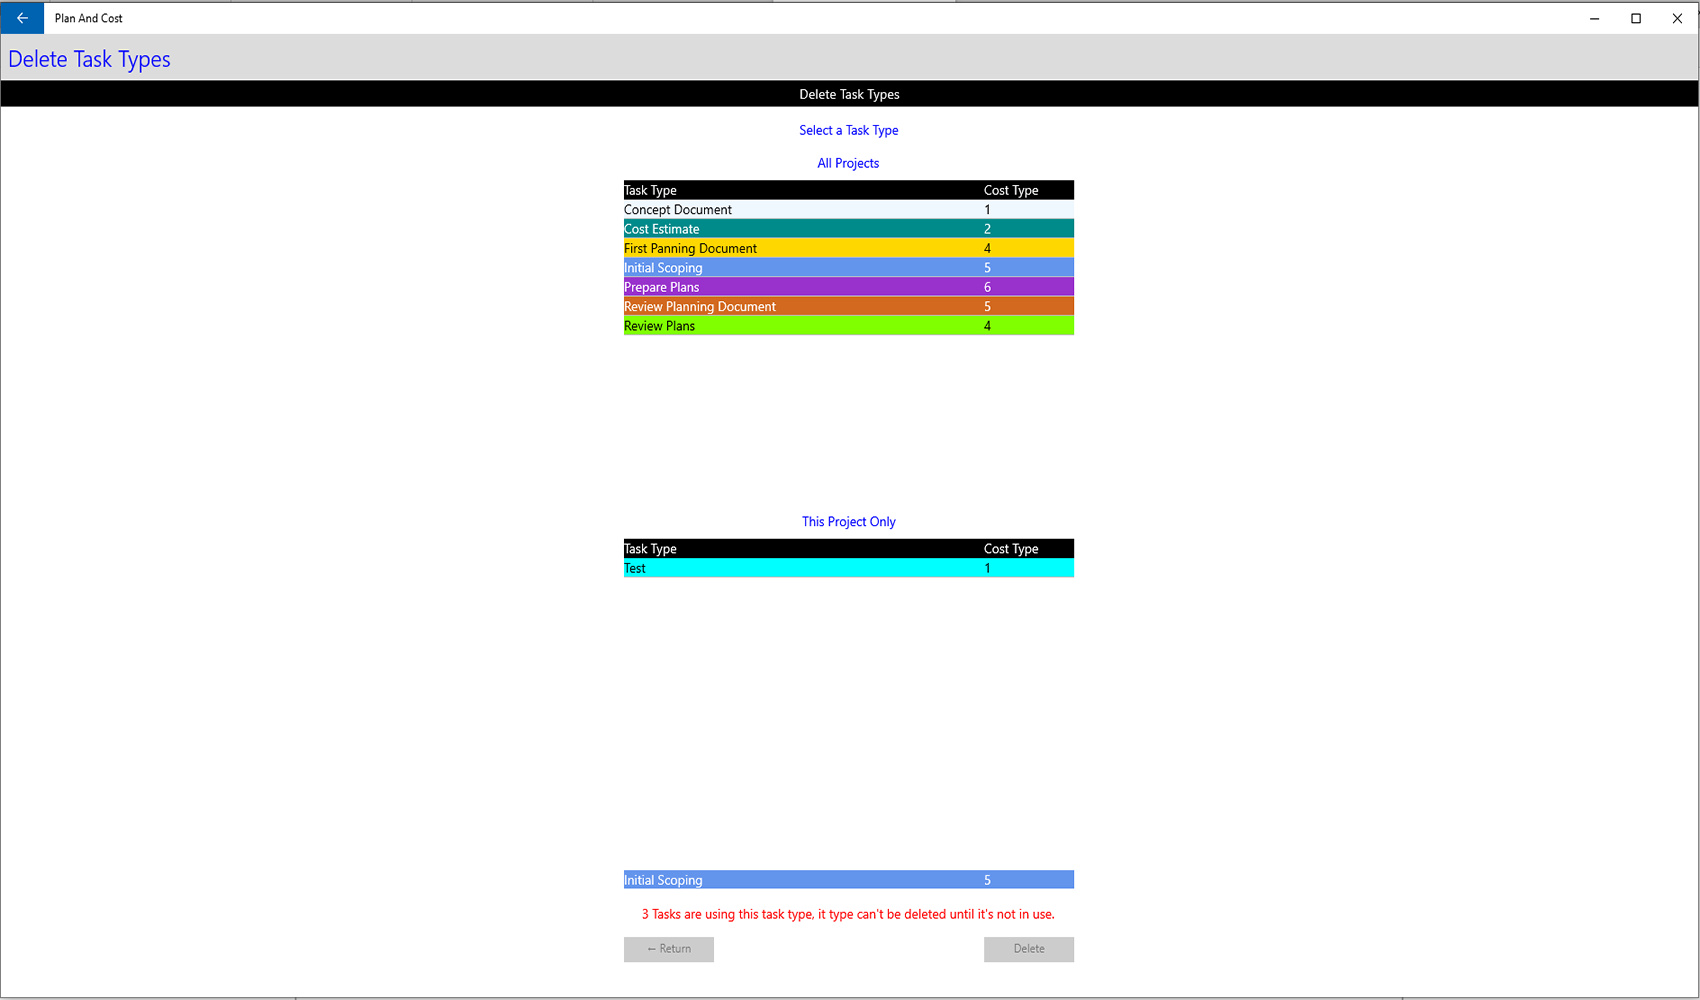
In the image above I had clicked on the Initial Scoping task type and when I click the Delete button an error message is displayed telling me three tasks are using it so it can't be deleted.
The three tasks using it just happen to be in the project I'm working on but could be in any project because it's scope is All Projects.
Buttons that are not visible on each task line.
The ← Edit Task button takes you to the Edit Task page.
The ← Edit Costs button takes you to the Edit Costs page.
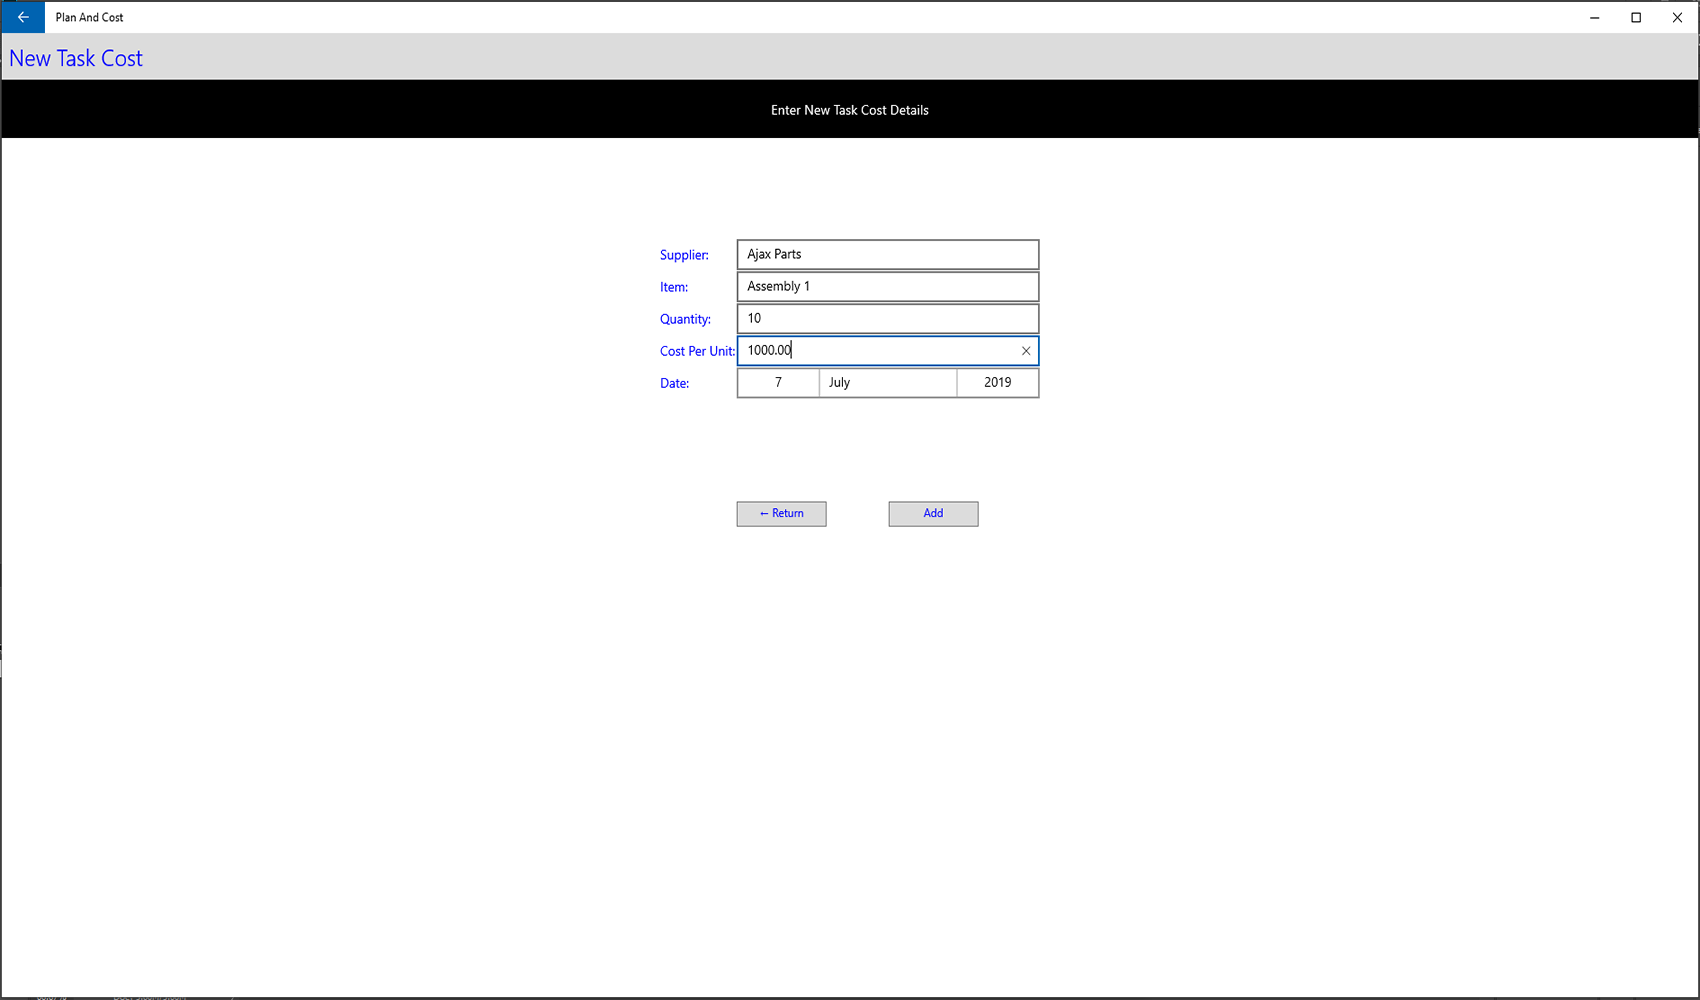
I will add a new cost to the highlighted task below so we can see the rollup cost effect
This is the cost which totals to $10,000.00 for 10 Assembly parts at $1000.00 each.
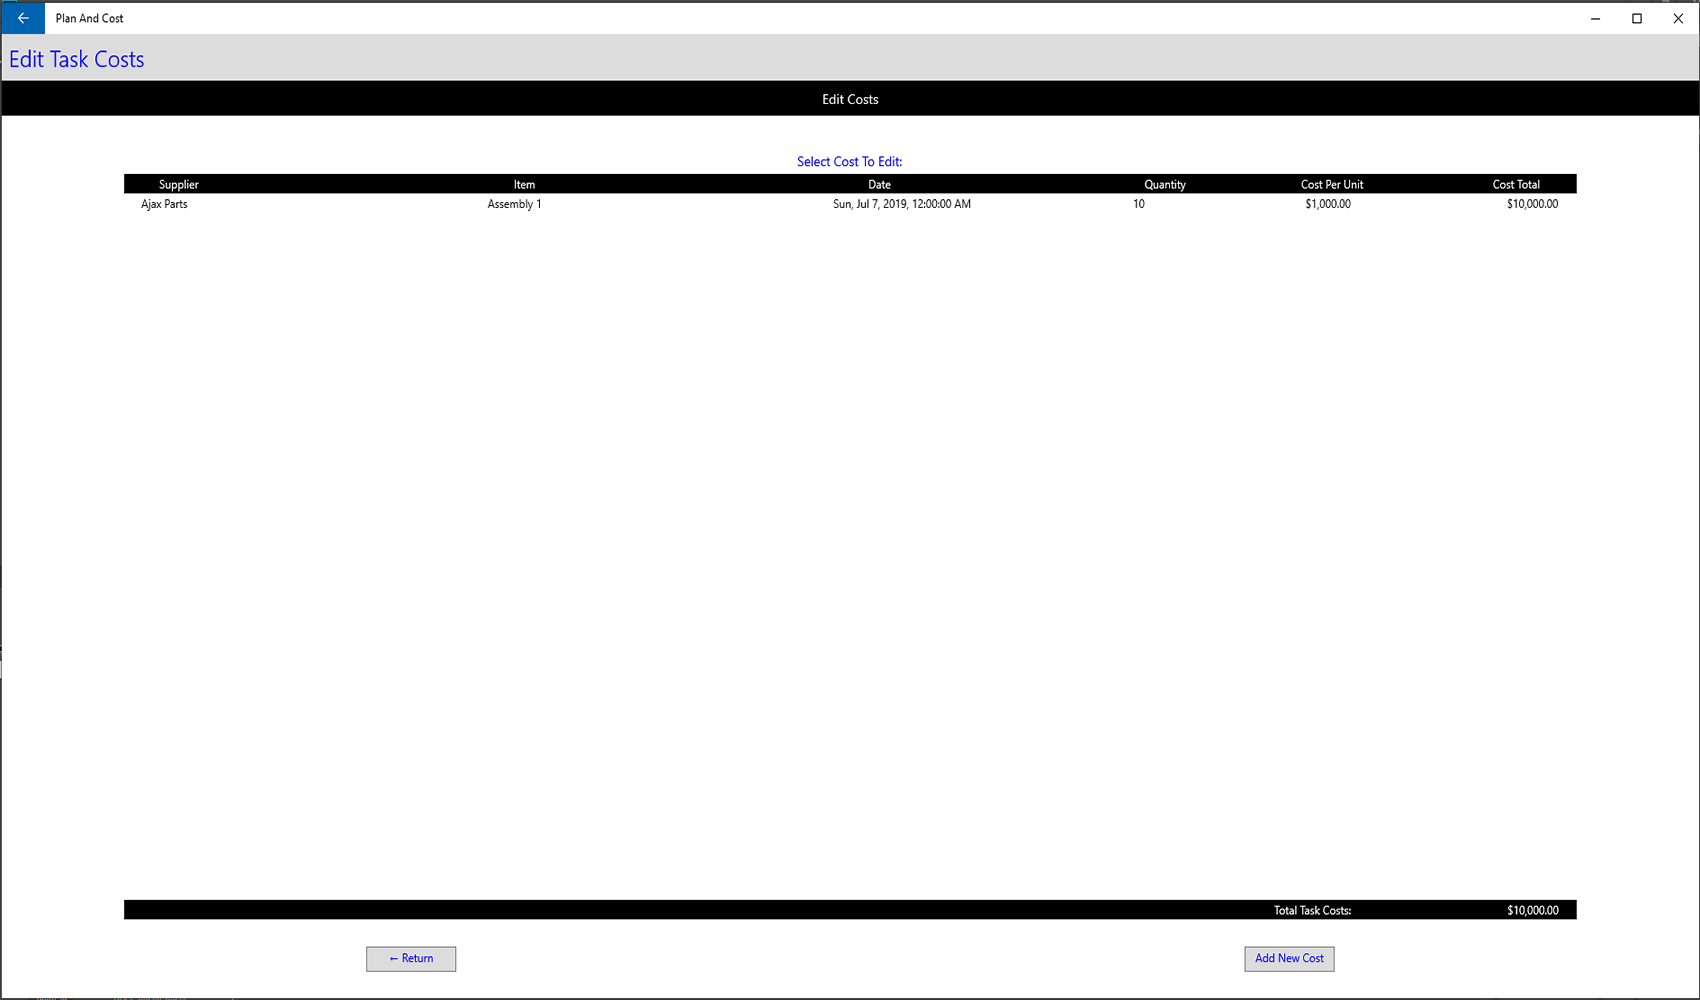
As costs are entered for a task they will be listed in this screen.
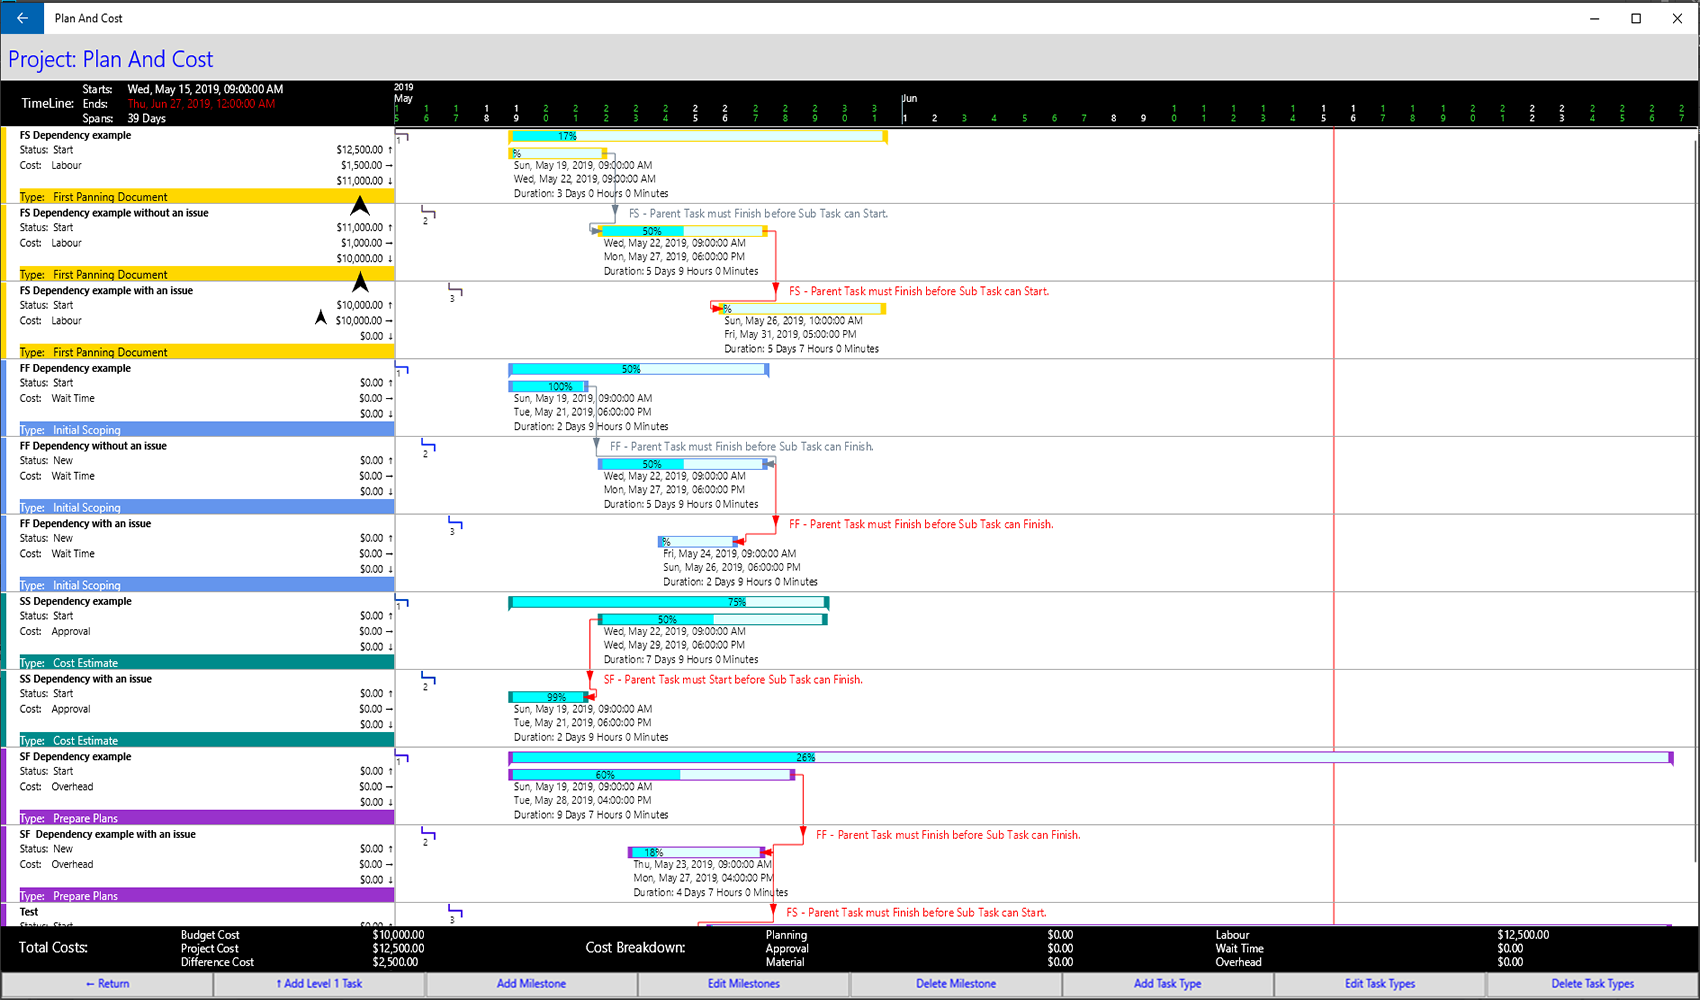
I've added three upward pointing arrows to the task timeline below to highlight the task cost rollup direction.
The cost amount entered for $10,000.00 is displayed in the middle cost line which has the little right pointing arrow beside it signifying that it's from this task.
The line below that with the little down arrow at the right is the rolled up cost amount from lower tasks, there are no lower tasks with costs so it's $0.00.
The cost amount above with the little up arrow at the right is a total of the cost for this task and the tasks below.
The task above at level 2 shows the $10,000.00 rolled up and its own cost $1,000.00 amount and the total being rolled up of $11,000.
This continues all the way up through the parent tasks and finally to the total project cost breakdowns shown on the bottom of the timeline.
Having this cost breakdown and rollup makes it easy to identify where cost blowouts are happening by identifying at what point in the timeline the extra cost is located.
The ← Move button selects and highlights the task for move and presents several buttons in other tasks in the project as a move to target.
If the selected task has children tasks an additional Move This and Sub Tasks button is shown enabling a move of the task and all its children tasks.
The ← Delete Task button takes you to the Delete Task page.
The ↓ Add Sub button takes you to a page where you can add a new sub task.
When you select a task to add a sub task the relationship will always be creating an immediate child.
The App will either create a first sub task branch if no child exists or a subsequent group branch if one or more immediate children already exists on the selected task.
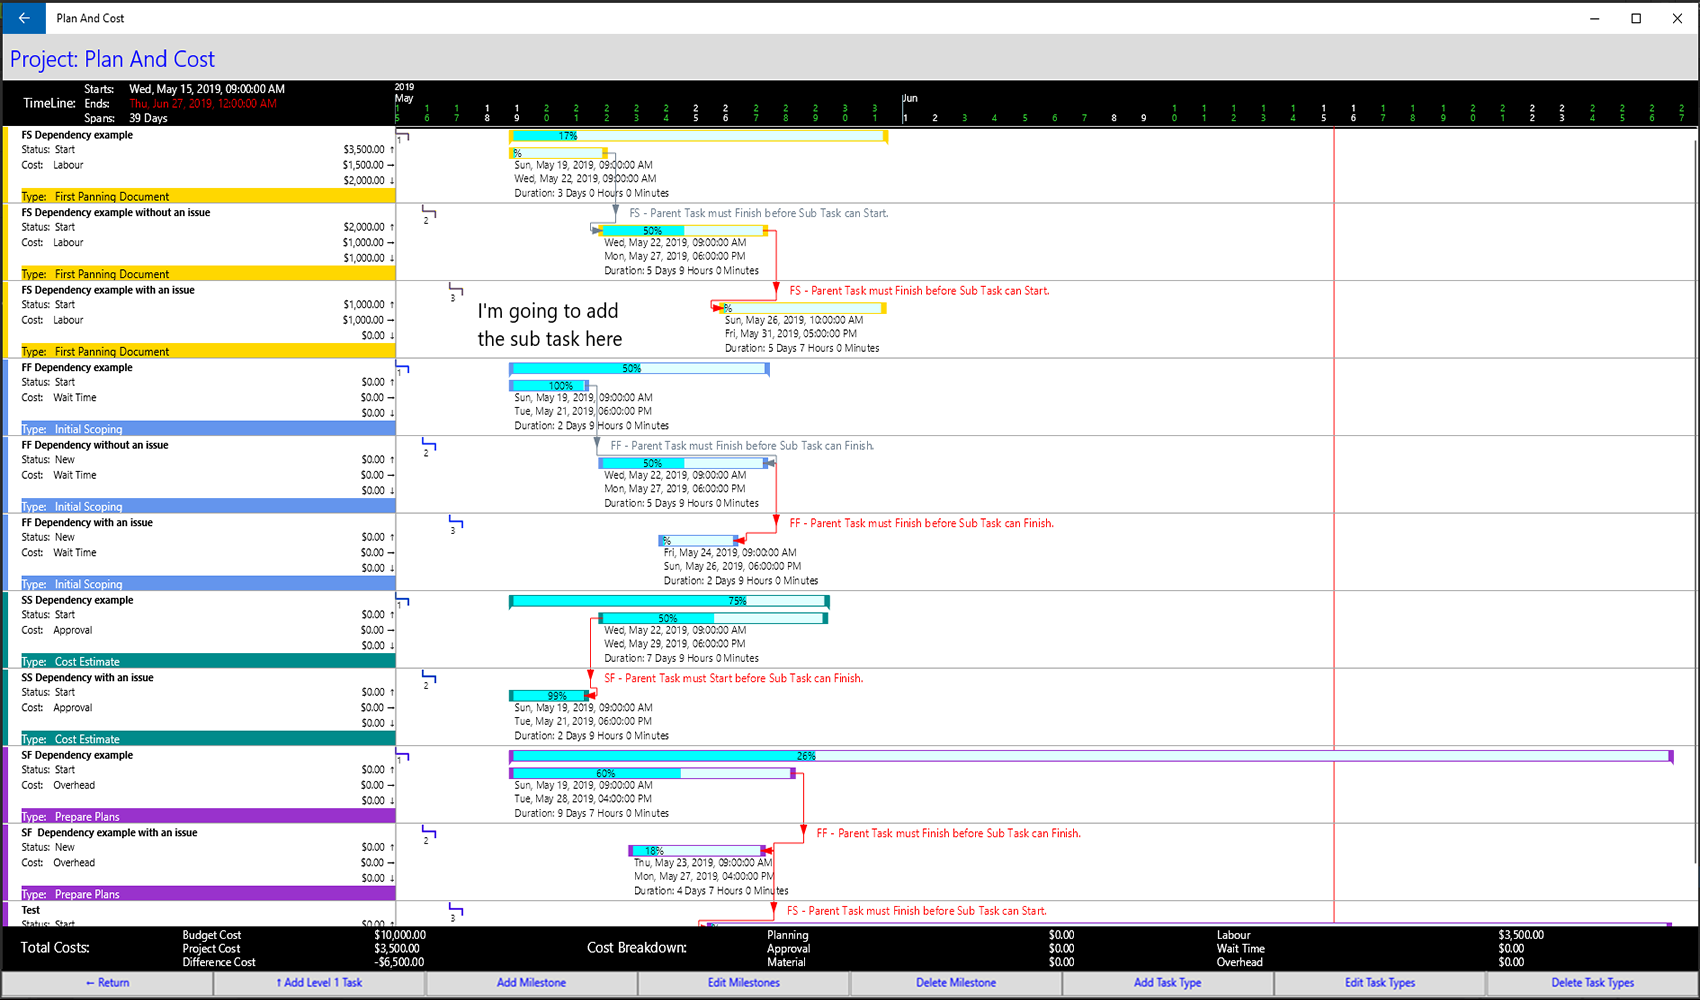
Firstly I will add a new sub task to the end tail of the first tree line to create a first branch.
It's highlighted in text below.
Now I'll add the first sub task.
After it's added as first sub task.

I will add another sub task to the same level 3 task and this is what happens. Another level 4 task is created.

To make the hidden buttons visible:
On an iOS device, swipe the task line right to left.
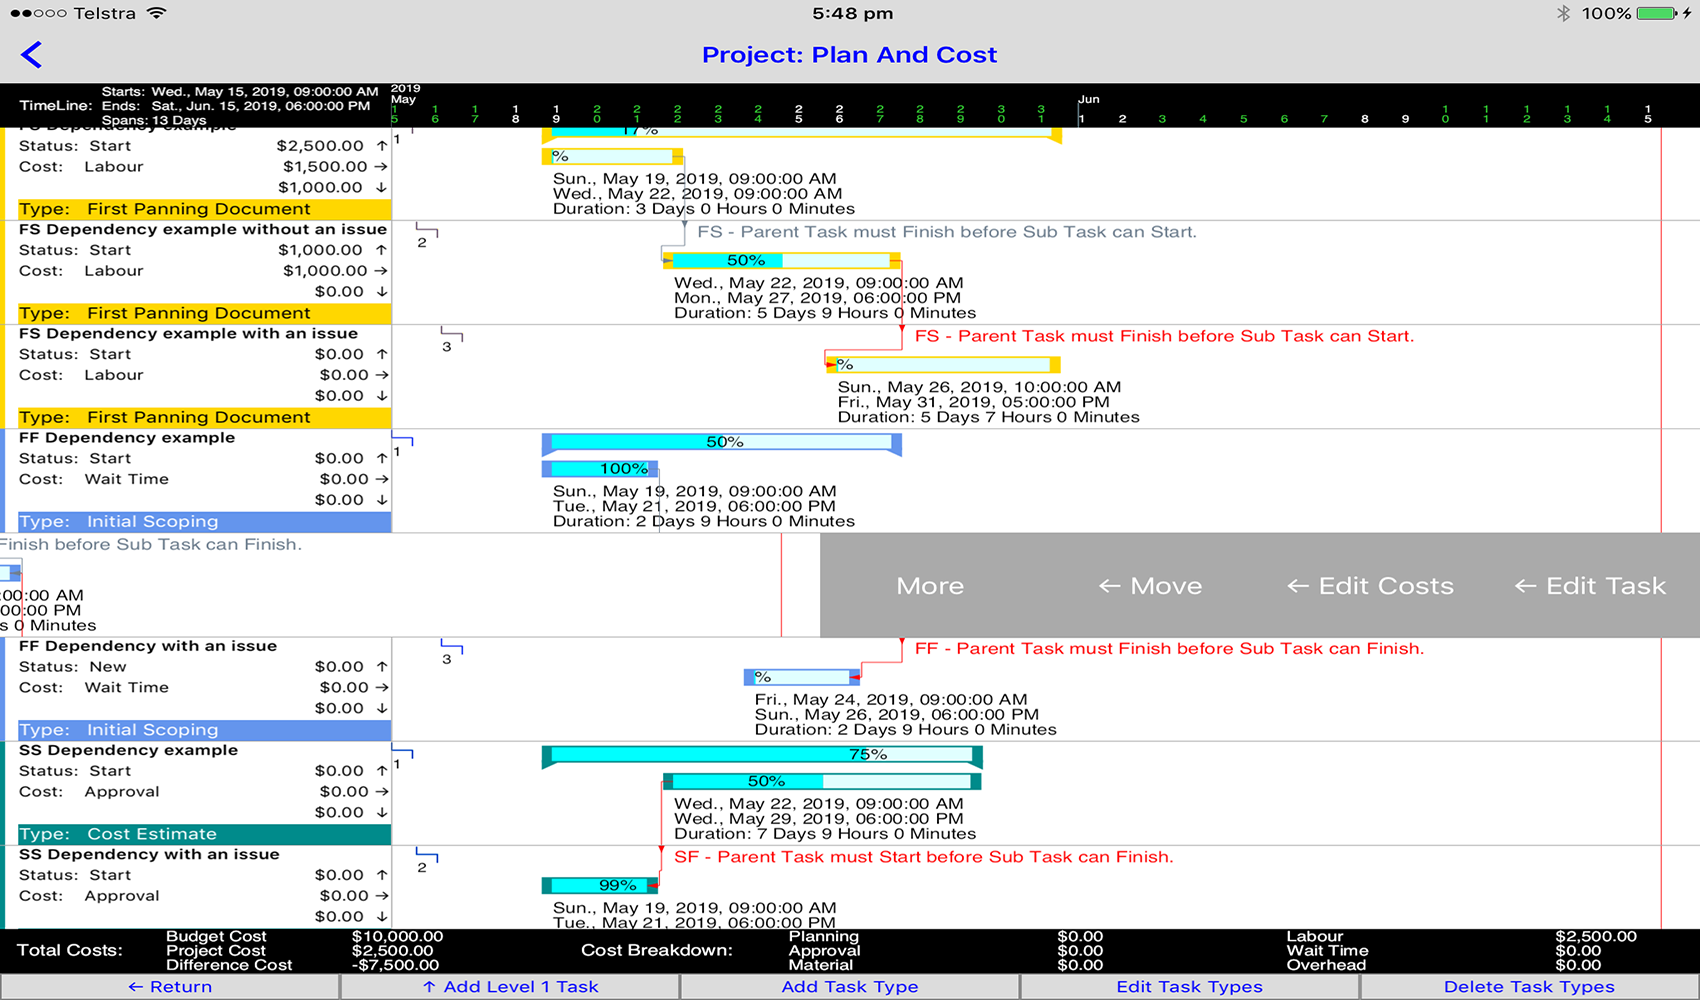
If you tap the more option the ← Delete and ↓ Add Sub buttons will appear.
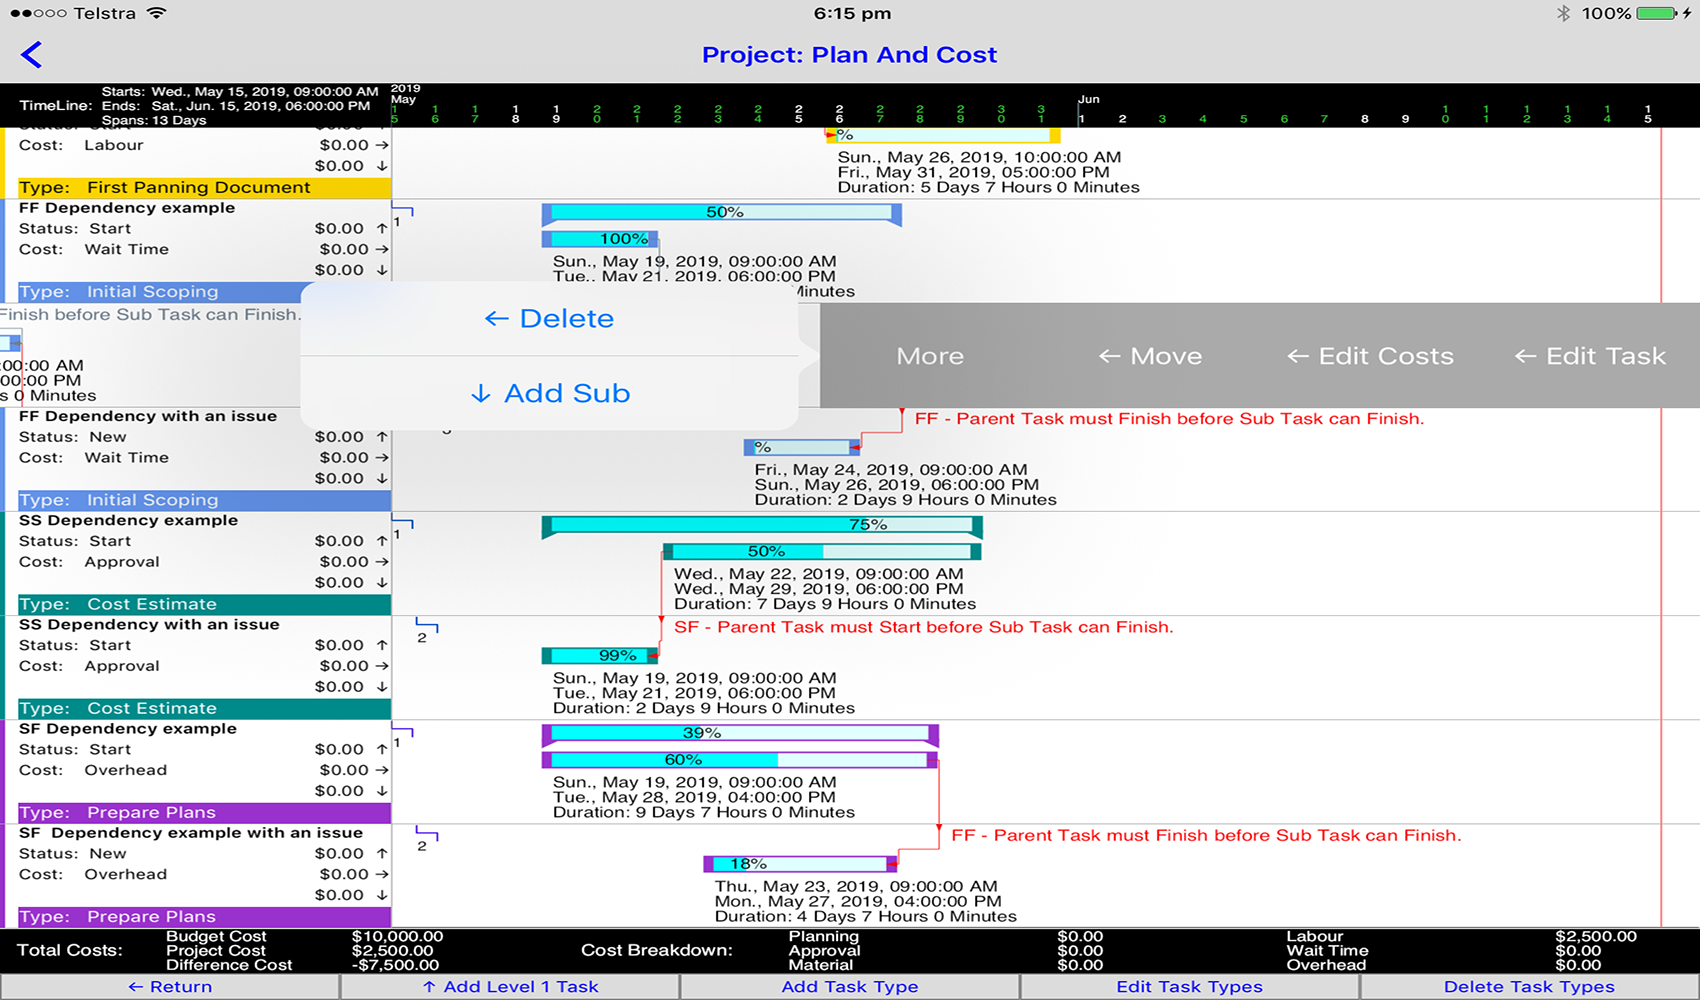
On a Windows device, right click your mouse or tap and hold a finger within the task line and the menu will slide out usually above or below if it's the top task on the screen.
I right clicked the task immediately below the popup menu and this task will be used for the options.
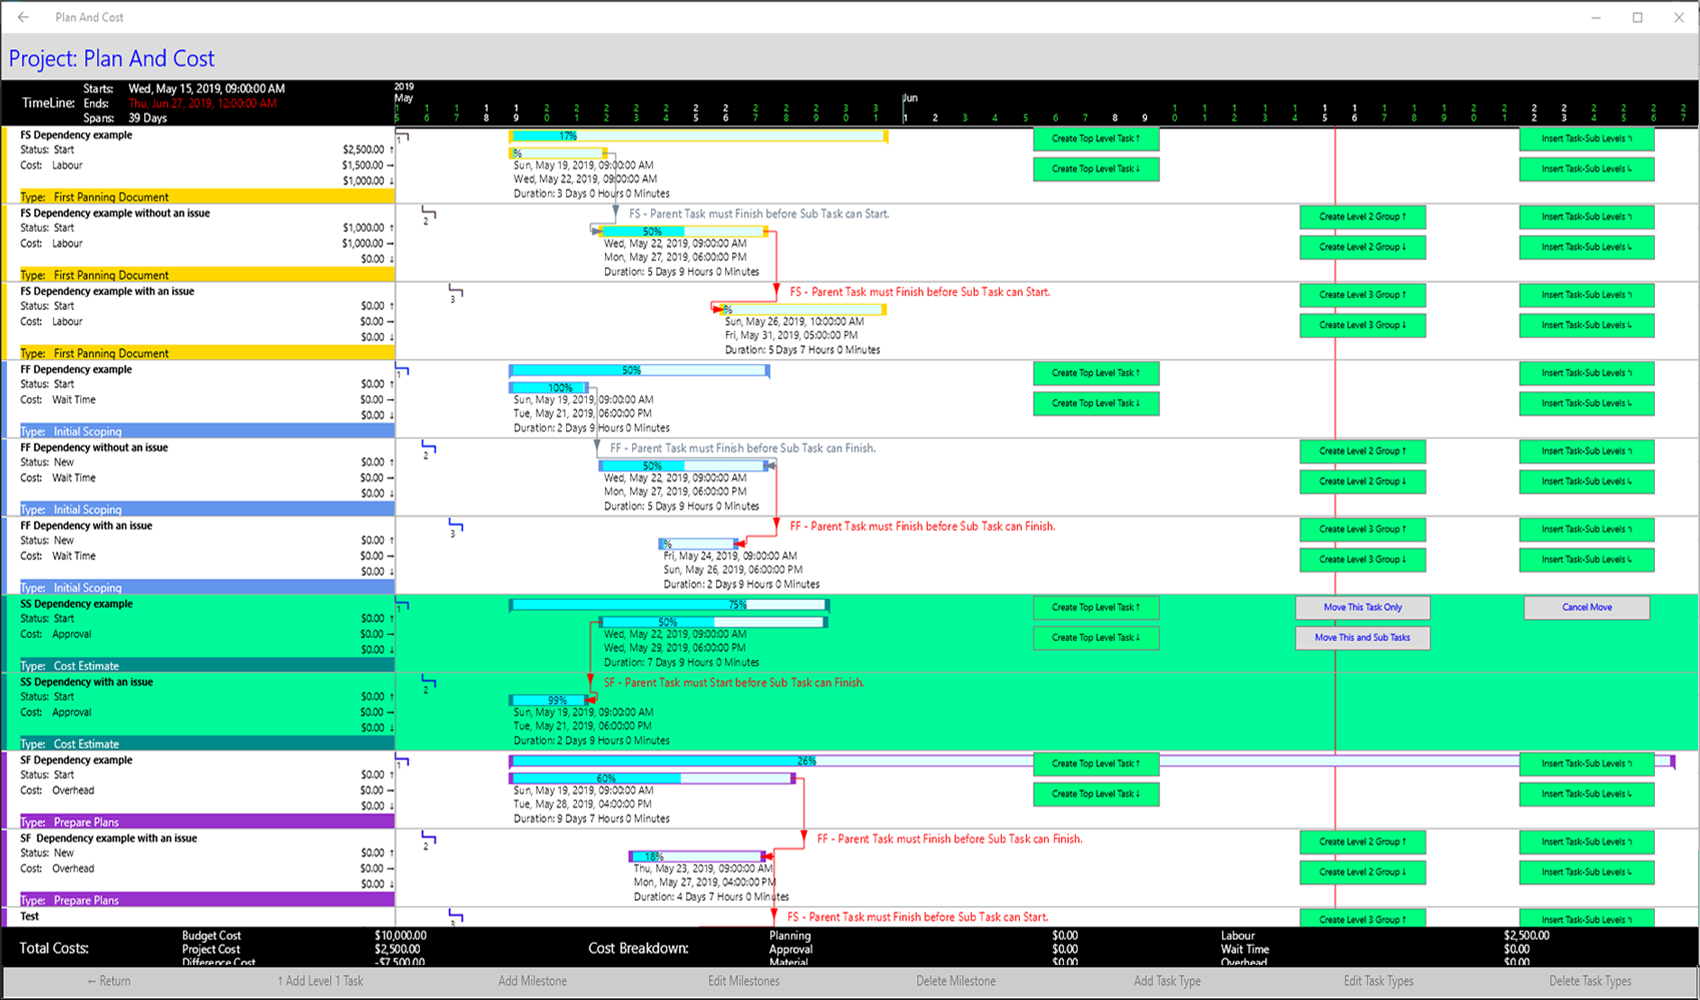
The ← Move button on the menu is the only option that stays on the project tasks page, when I click ← Move this is what happens.
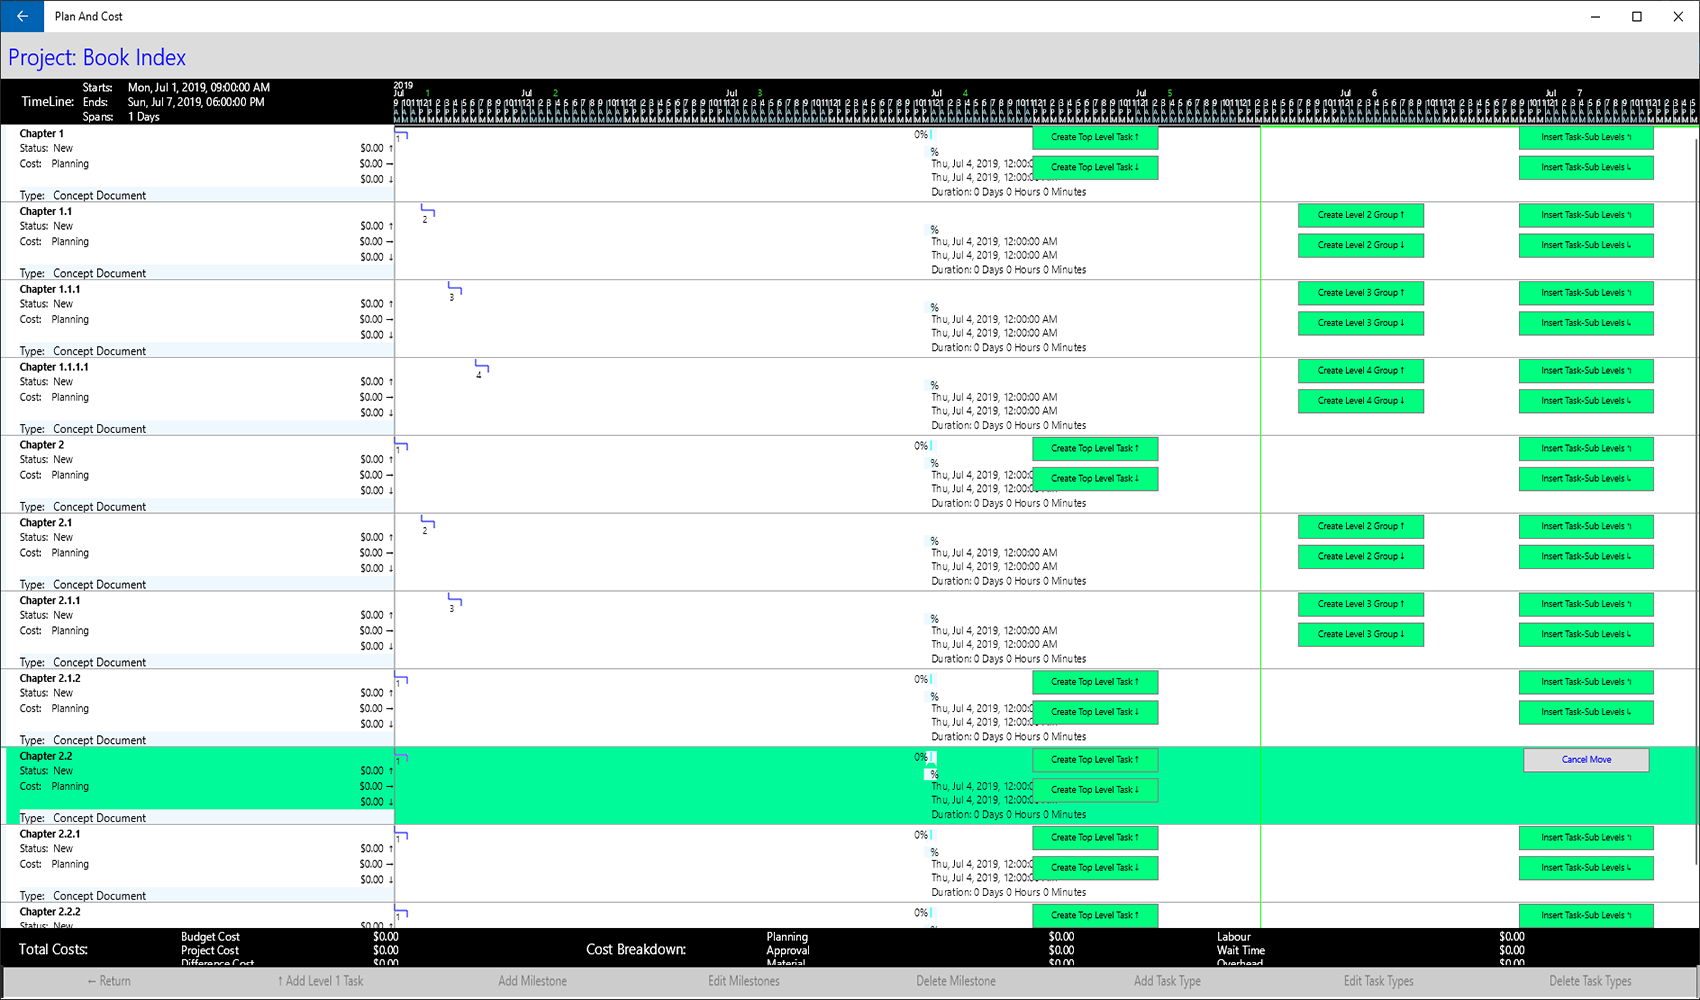
The whole task line is now highlighted lime green and three buttons with blue text on a gray background appear. They give you the option of reselecting a single task move or the task and its children or cancel to back out of the move process.
The entire list of tasks now display a series of target buttons with black text on a green background.
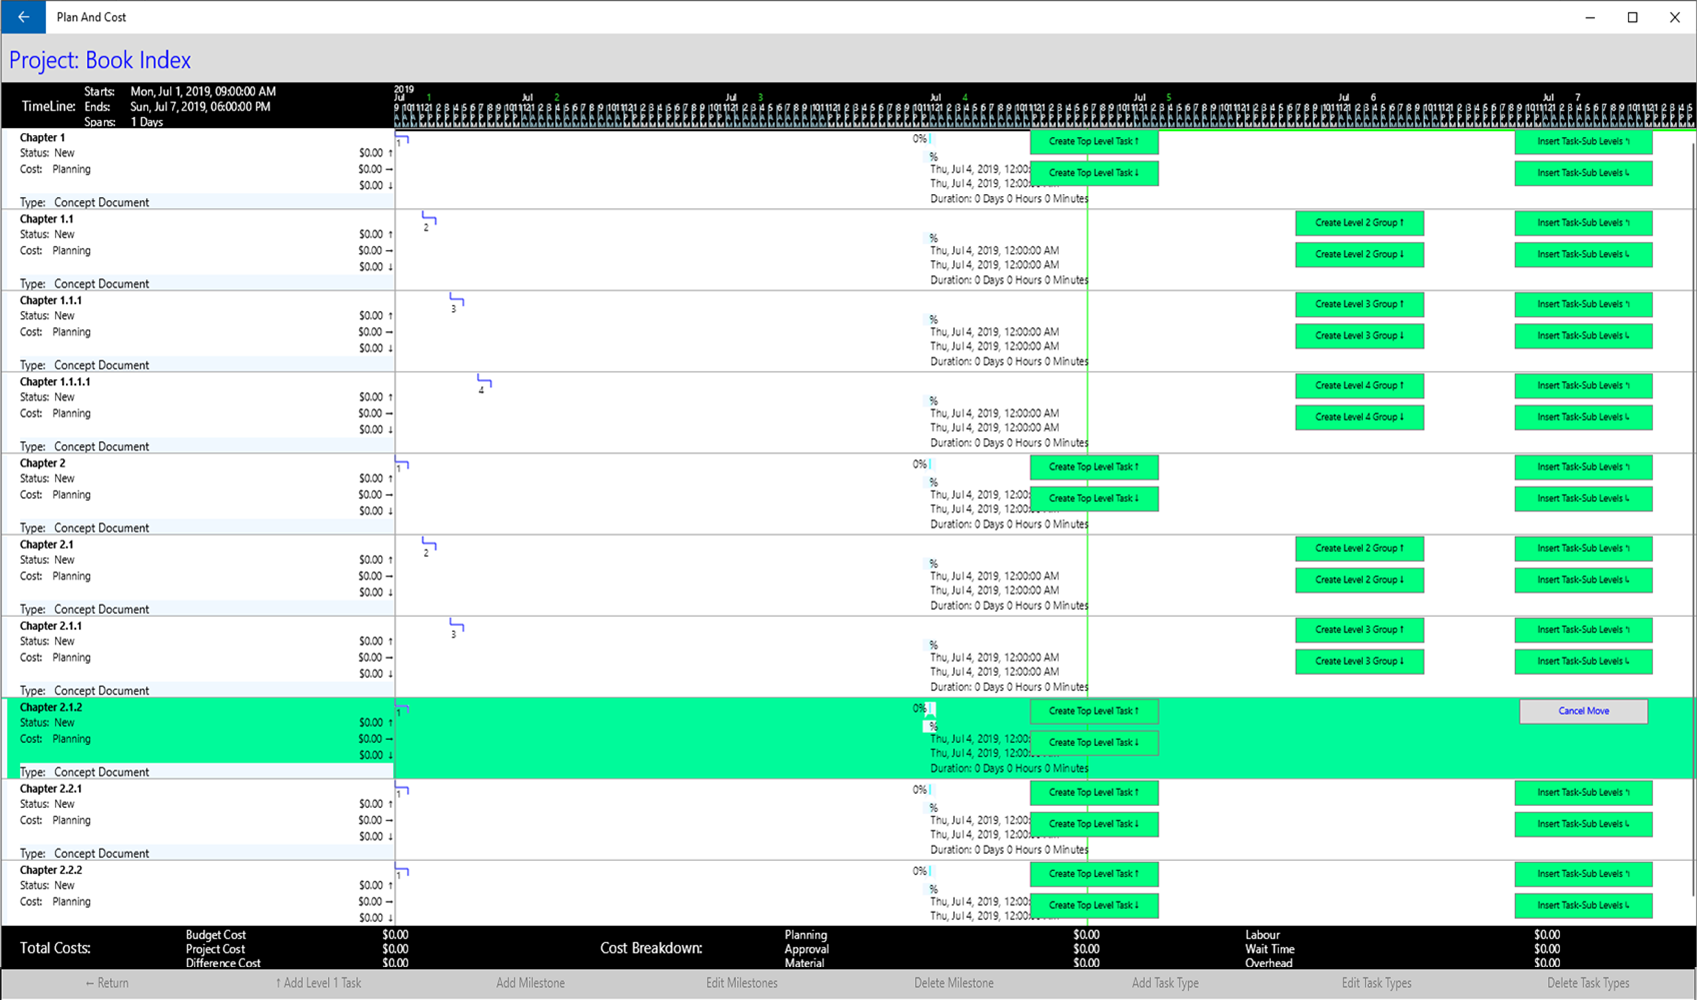
To move a Task and its sub tasks click the Move Task and Sub Tasks button and it will cause the entire group of tasks will be highlighted lime green as below.
The target buttons are still the same for all tasks except that the sub tasks now also selected to be moved don't have target buttons, you can't target to something that's being moved.
The move options possible here gives powerful restructuring capabilities to change the way tasks hang together and change things around if you create a task chain then want to change it.
The combination of these move types make it possible to create for example a whole series of top level tasks then later totally restructure them in a multi branch tree structure without needing to delete and re-enter the tasks and costs.
This is powerful, but it's not an easy thing to grasp, however if you get it wrong you can always move tasks back.
Before you start moving tasks around in an important project timeline I recommend starting a new play project and practice there until you understand it.
First play with moving only a single task back and forth.
Then get brave and move a task and its children as an insert between two tasks, then try to get it back without having to move single tasks one at a time.
To do this start a move by selecting the child task of the original insertion point then if it has a task tree under it use the move task and sub tasks option and move that tree off to a new level 1 tree.
Then select the original task you moved and its children which are now the same children it had at the beginning and put it back to its original position.
Finally select the task tree you moved to the new level 1 tree and attach it back to its original parent which was the target of the first insert.
The three green button columns represent six different types of move, three pairs of similar moves to above ↑ and below ↓ the target task positions:
* To create a top level task attached directly to the project:
This type of move is only displayed on level one tasks.
The buttons with an up arrow ↑ will if clicked do this:
Move the task and its children (if that option was selected) to a new independent top level task above the top level task where the clicked button is located.
The buttons with a down arrow ↓ will if clicked do this:
Move the task and its children (if that option was selected) to a new independent top level task below the top level task where the clicked button is located.
* To create a new group of a task at the specific level number shown on the button.
This type of move is displayed on tasks that are not level one tasks and also not tasks selected for move.
The buttons with an up arrow ↑ will if clicked do this:
Move the task and its children (if that option was selected) to a new group at the same level (another branch) above the task where the clicked button is located.
The buttons with a down arrow Create Top Level Task ↑ button. will if clicked do this:
Move the task and its children (if that option was selected) to a new group at the same level (another branch) below the task where the clicked button is located.
* To insert before a first task, between tasks or after the last task.
This type of move is displayed on all tasks except those selected for move.
The buttons with an up to the left arrow ↰ will if clicked do this:
Move the task and its children (if that option was selected) as an insert before the task where the clicked button is located.
The buttons with a down to the right arrow ↳ will if clicked do this:
Move the task and its children (if that option was selected) as an insert after the task where the clicked button is located.
Finally for all of the six move types the gap where the moved tasks came from is then closed up.
Now I will step through this to demonstrate the different moves in a book chapter project with chapters and sub chapters.
Then I will move tasks to various locations to build a tree structure.
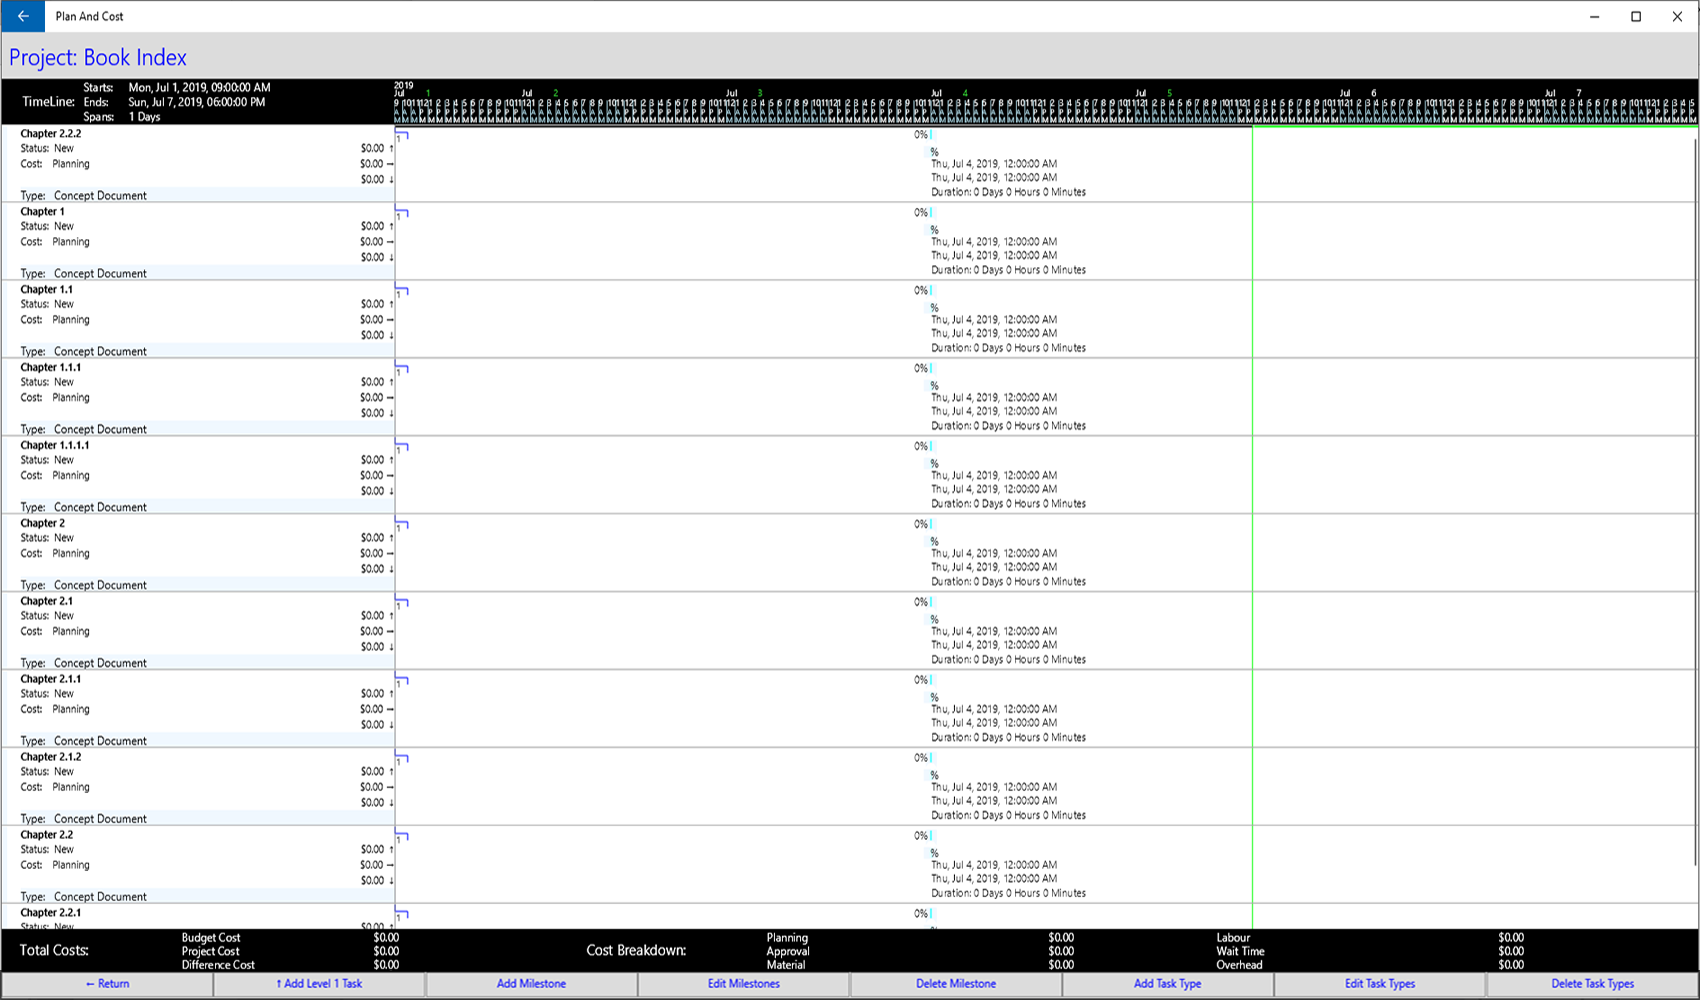
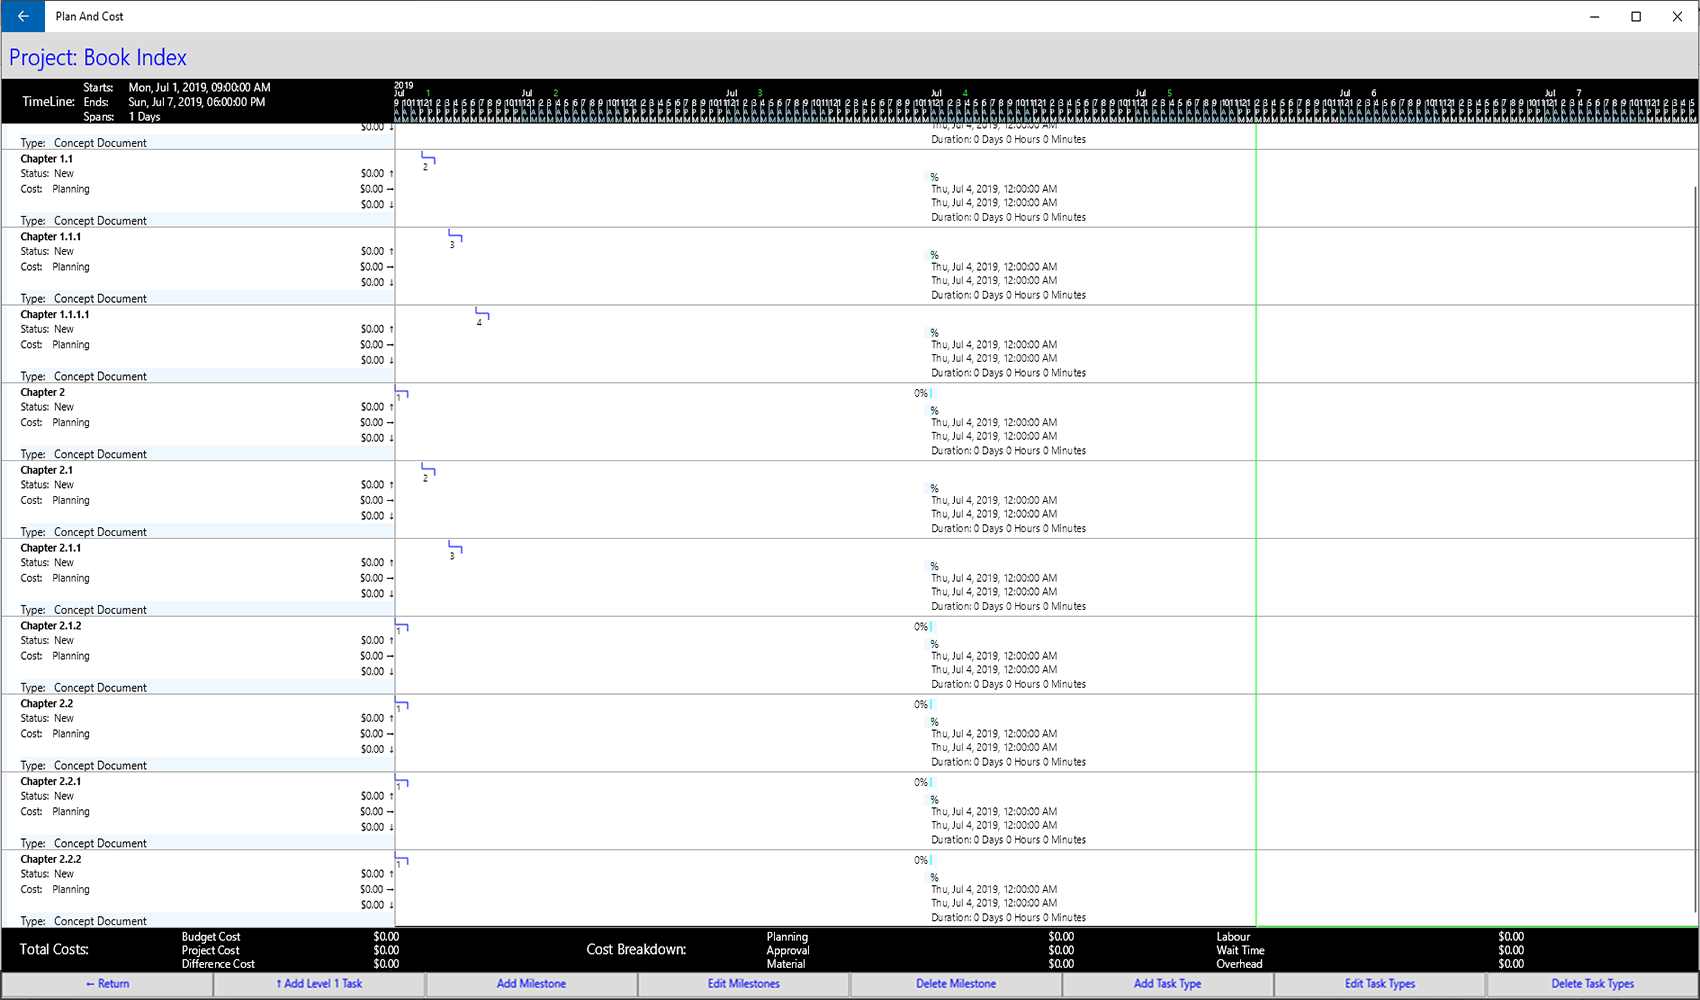
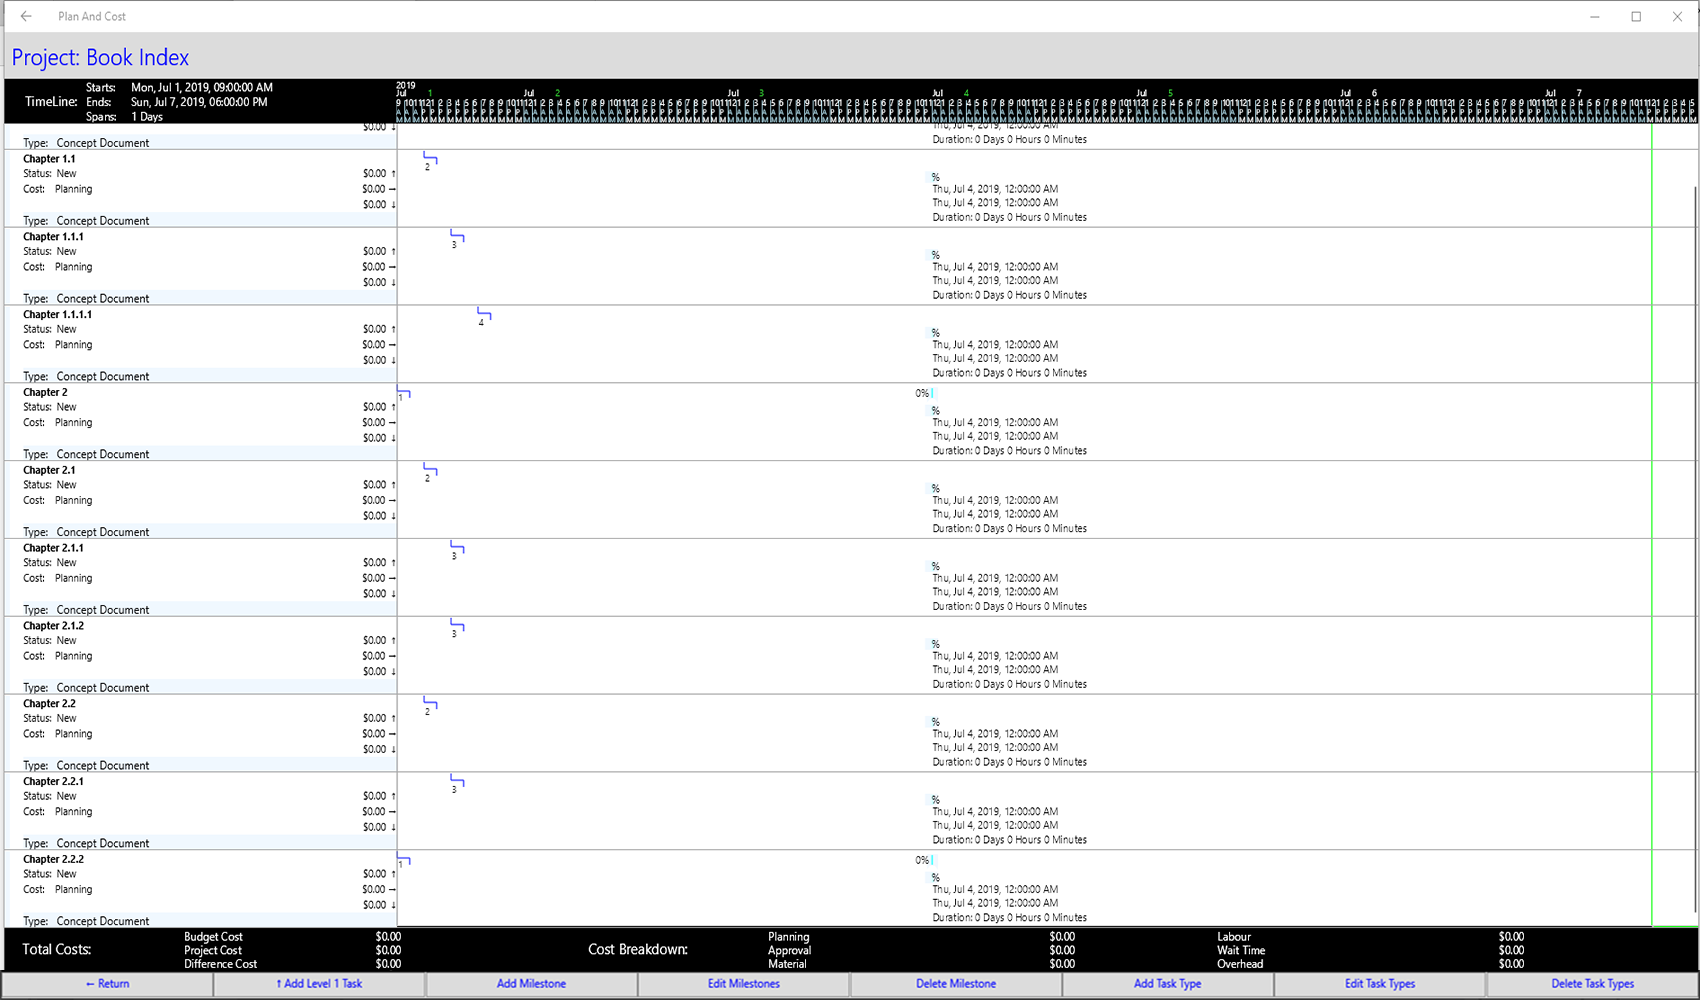
This is the project tasks I just created.
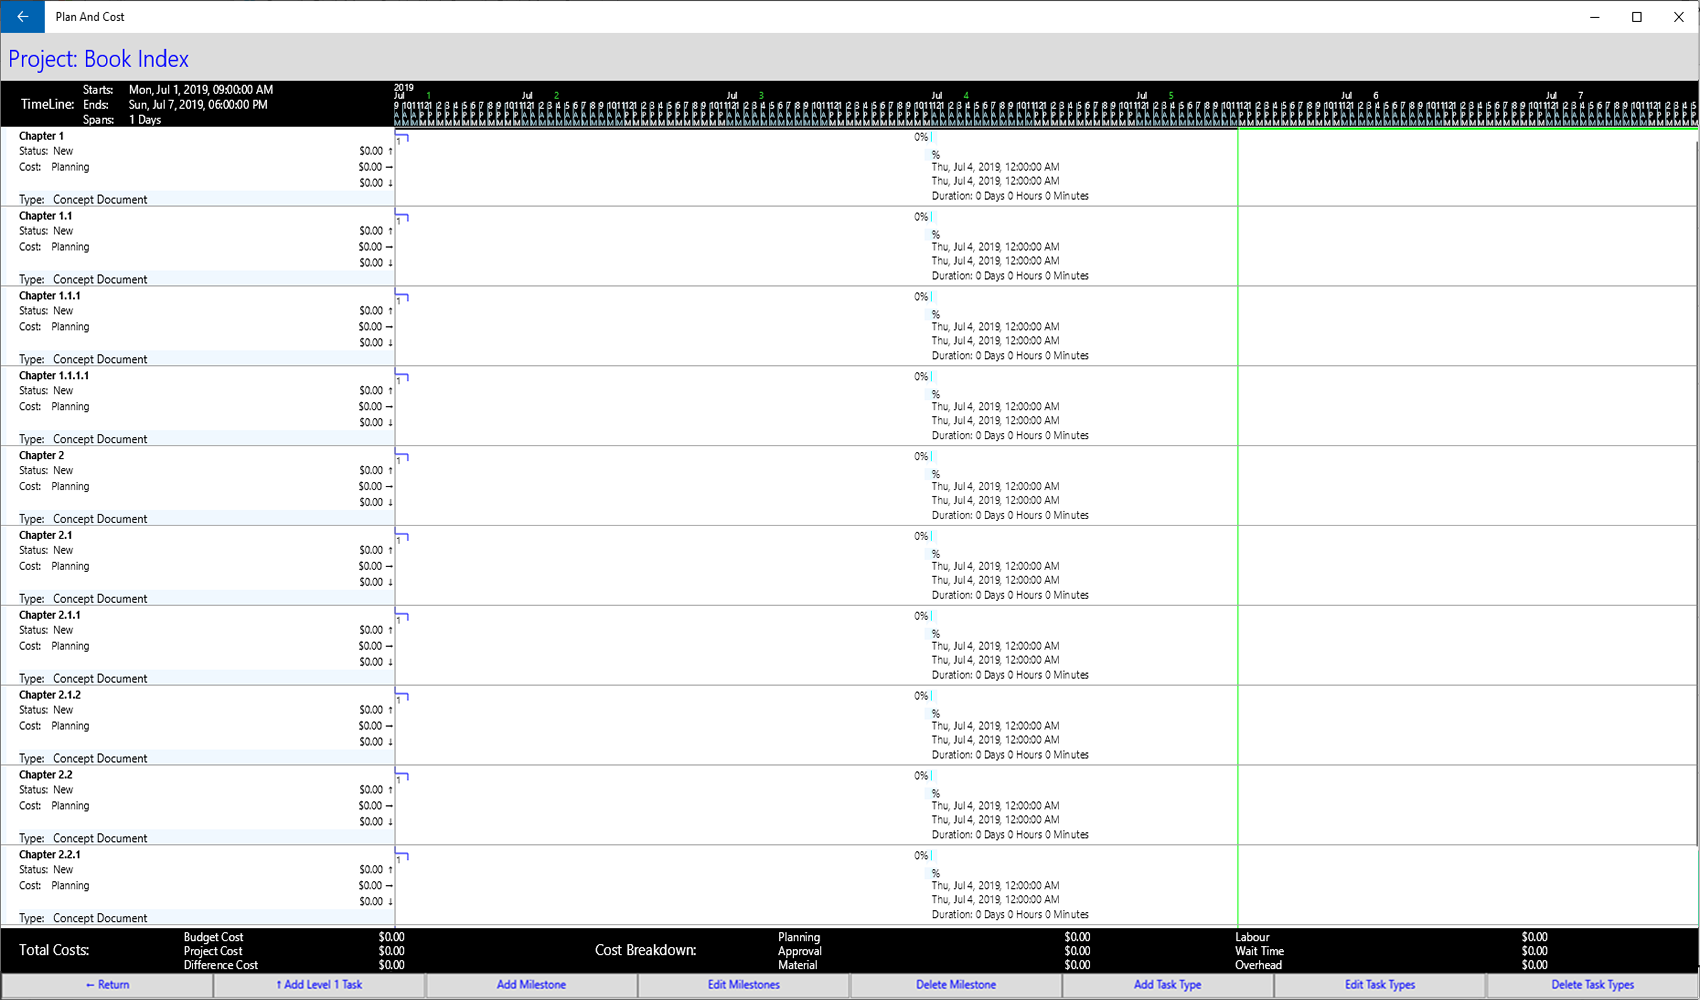
They are all level 1 tasks, the number 1 displayed inside the blue tree line indicates this.
I have kept this as simple as possible with no dependencies, date ranges or different task types etc. in the tasks to make is consistently simpler.
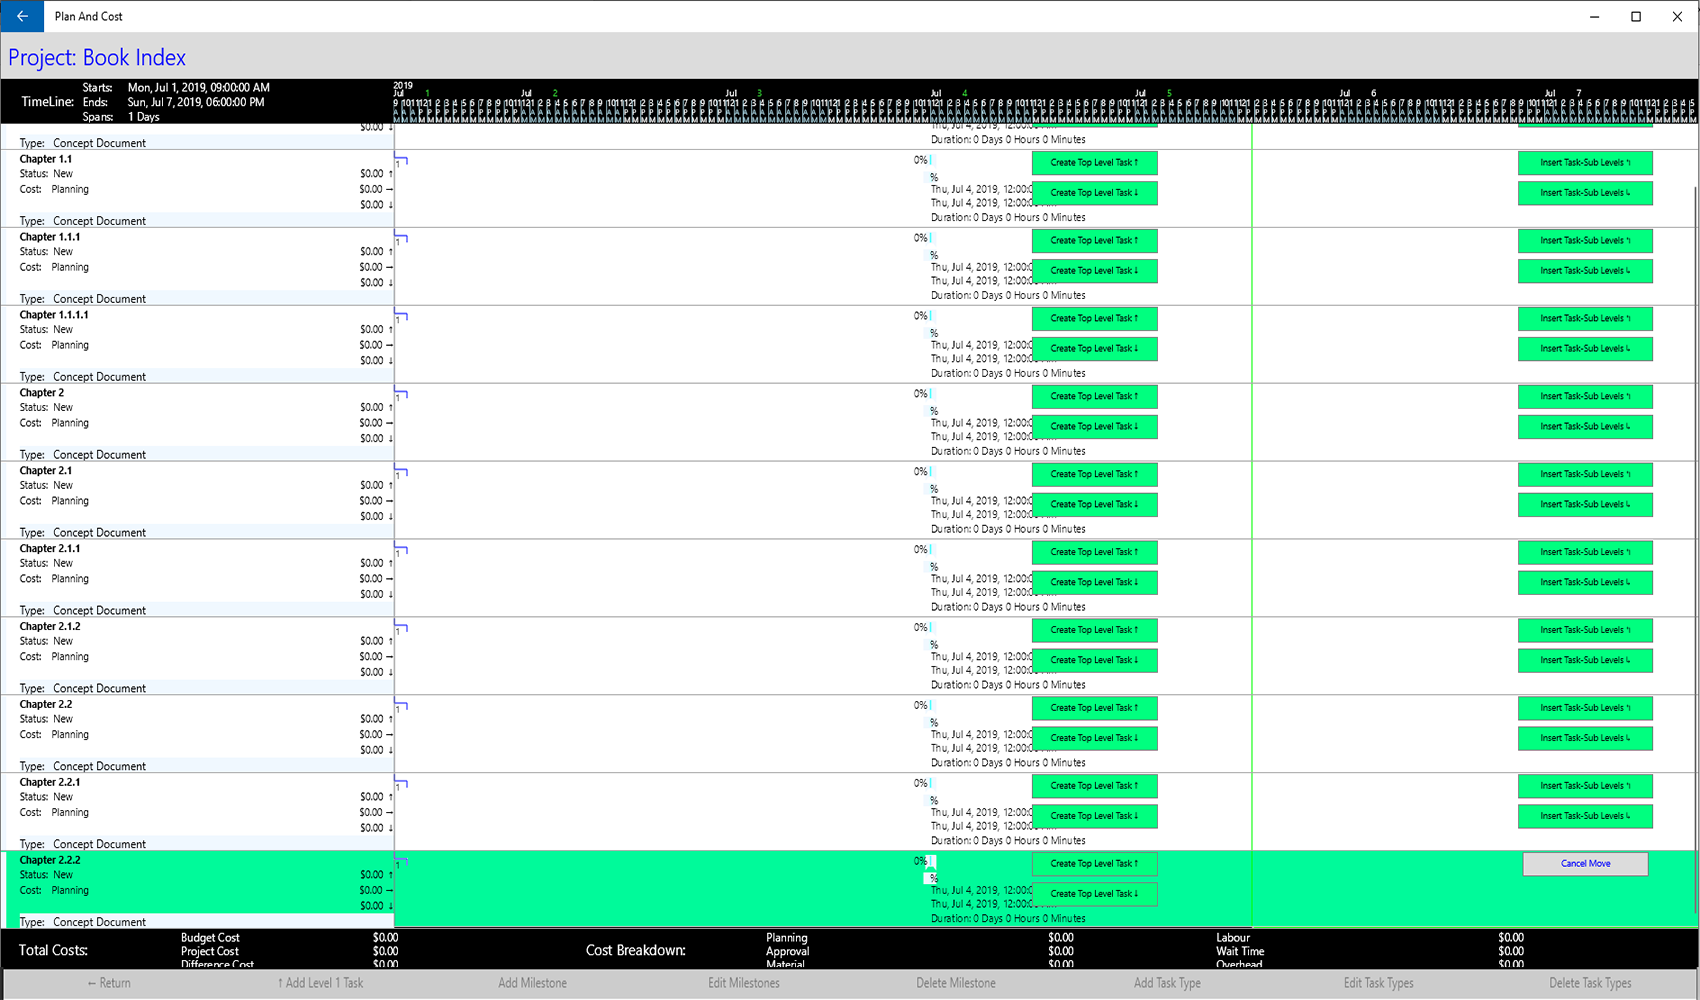
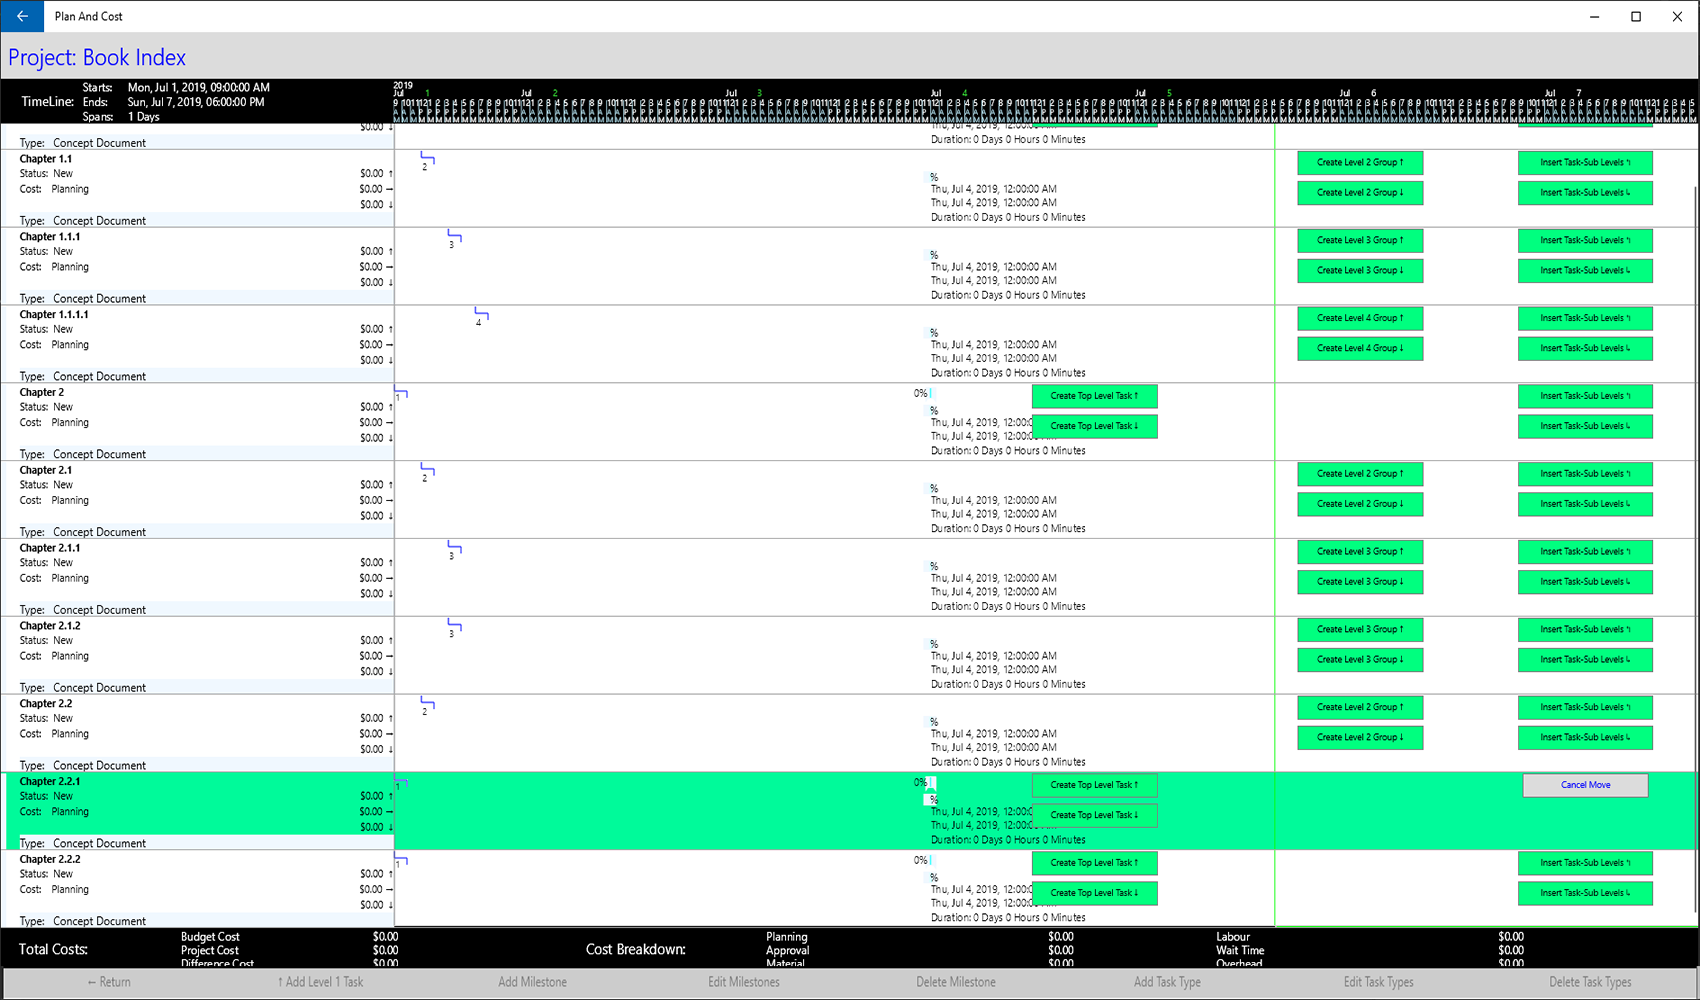
Now I will initiate a move of the single task Chapter 2.2.2 at the bottom and move it to a new top level task right at the top of the tasks.
I will select the very bottom task to be moved and now click on the Chapter 1 Create Top Level Task ↑ button.
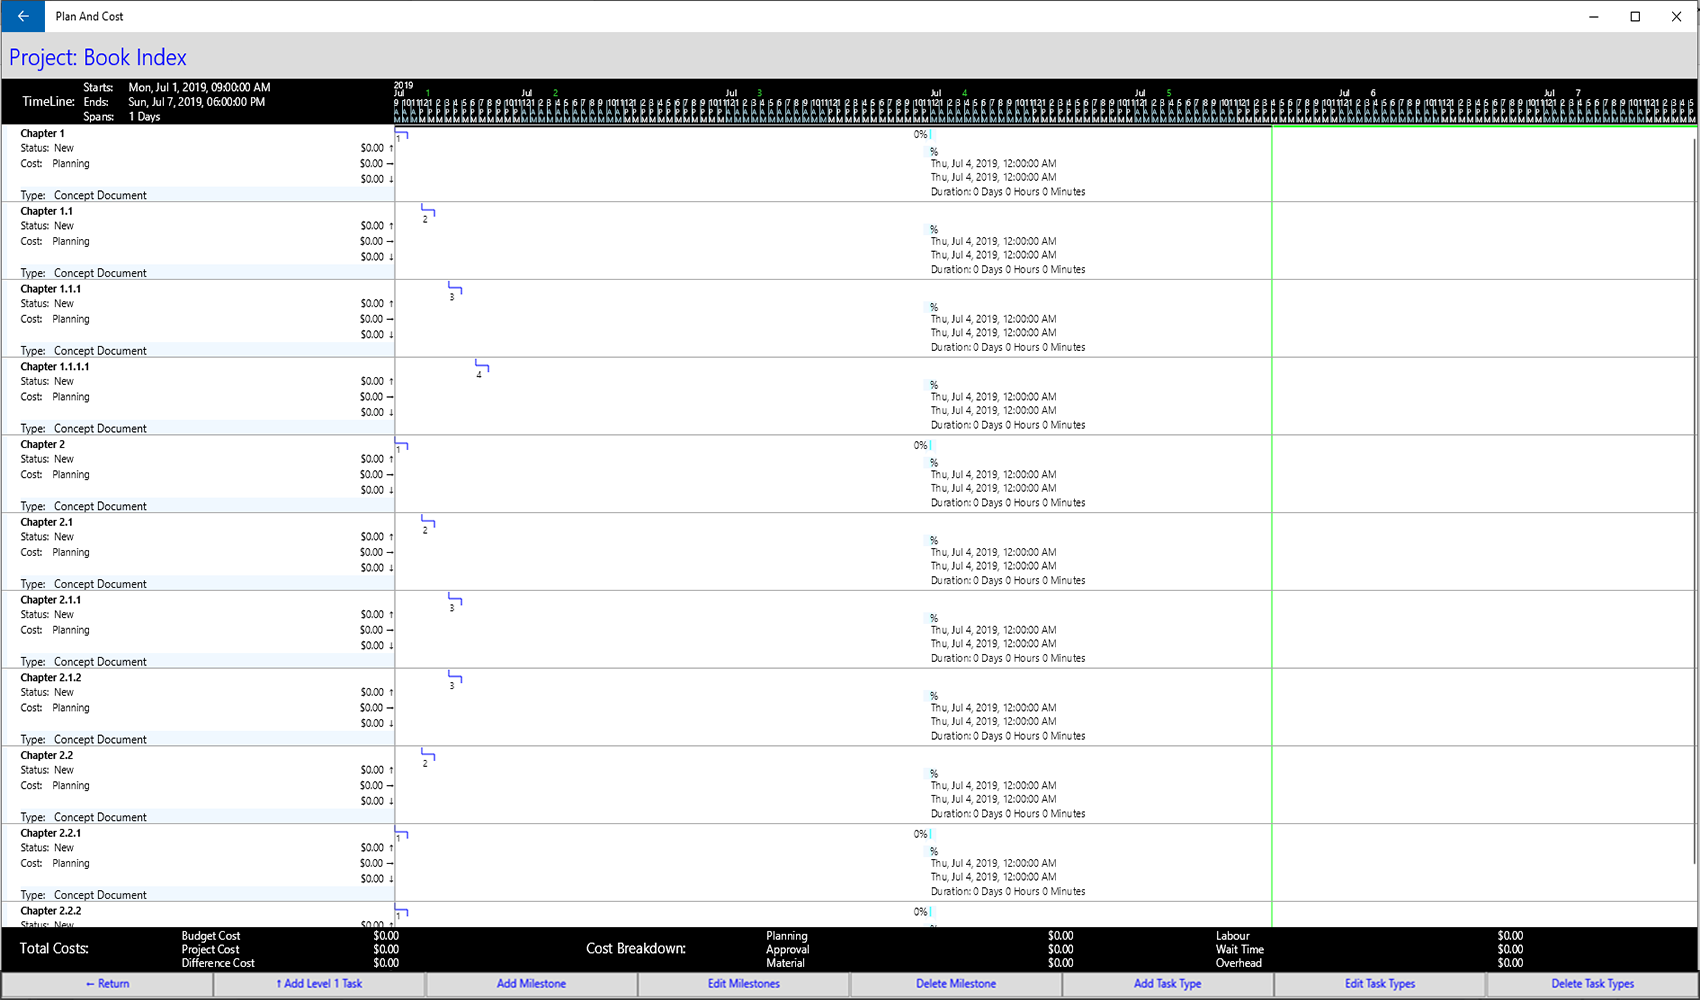
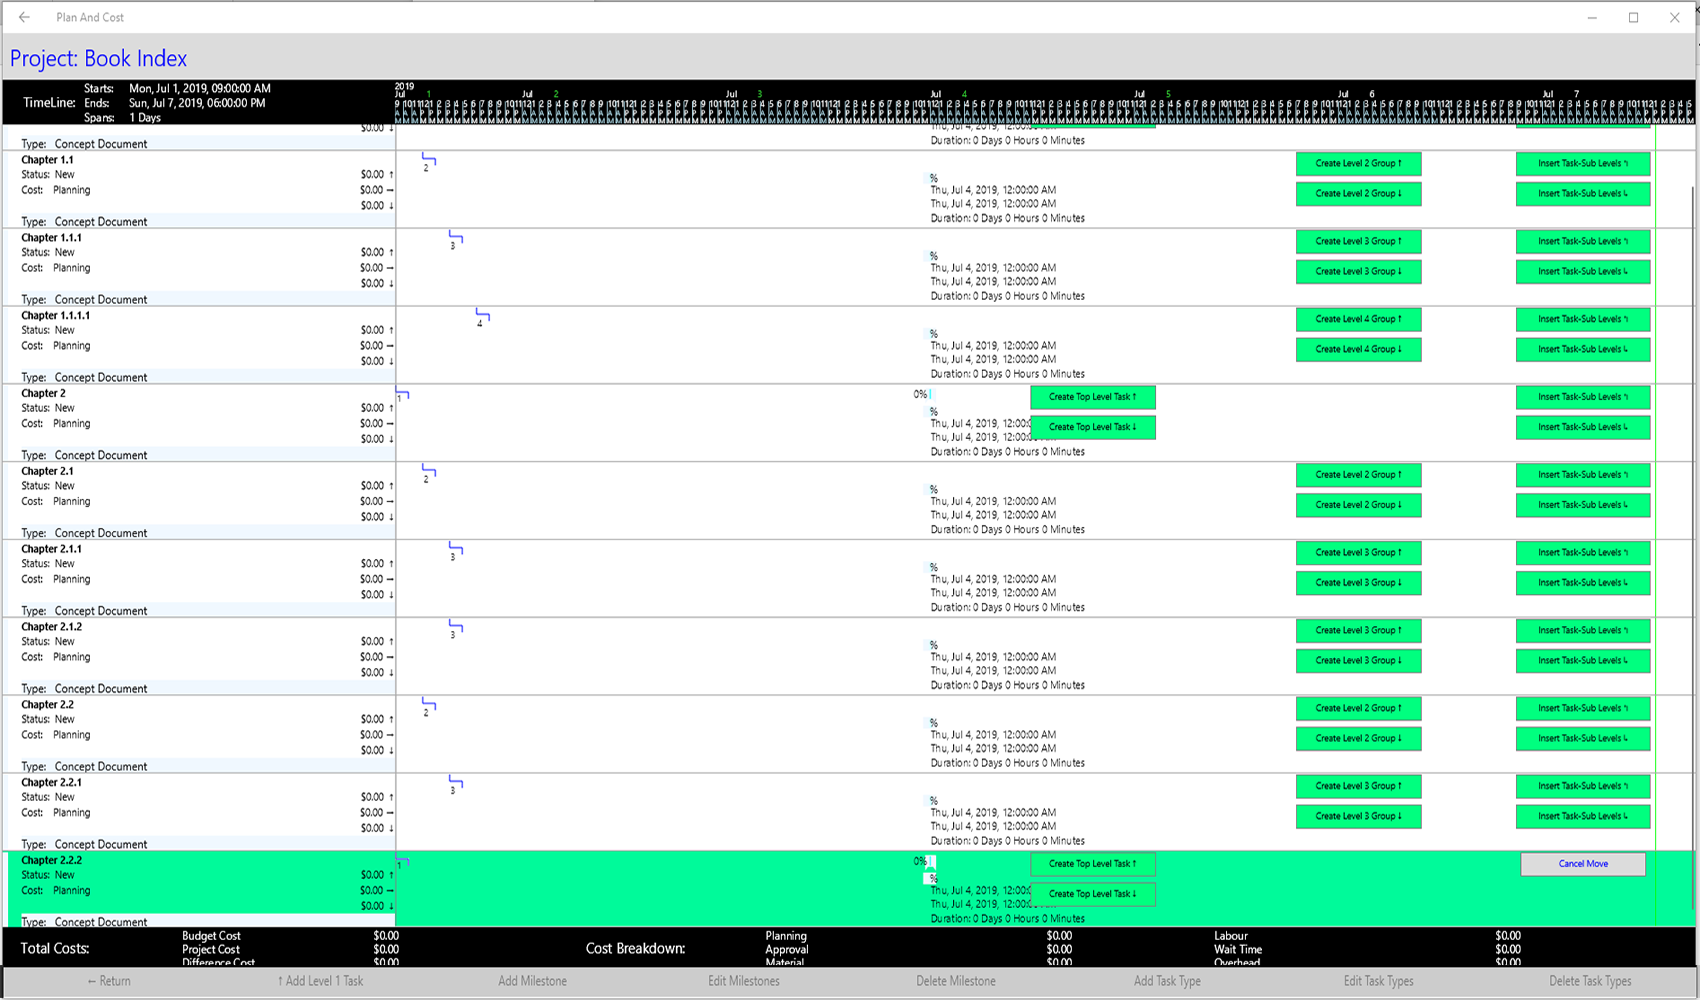
This is the result. Chapter 2.2.2 is now at the top.
To move the Chapter 2.2.2 task back you do this:
Select the Chapter 2.2.2 task for move then click the Create Top Level Task ↓ button in the bottom task and it will go back to the bottom.
This process is the same to move to a top level task above or below any task.
I've moved it back and now we will start some inserts to move the sub chapters to their sub task positions and we will start with Chapter 1.1 which is selected for move in the image below.
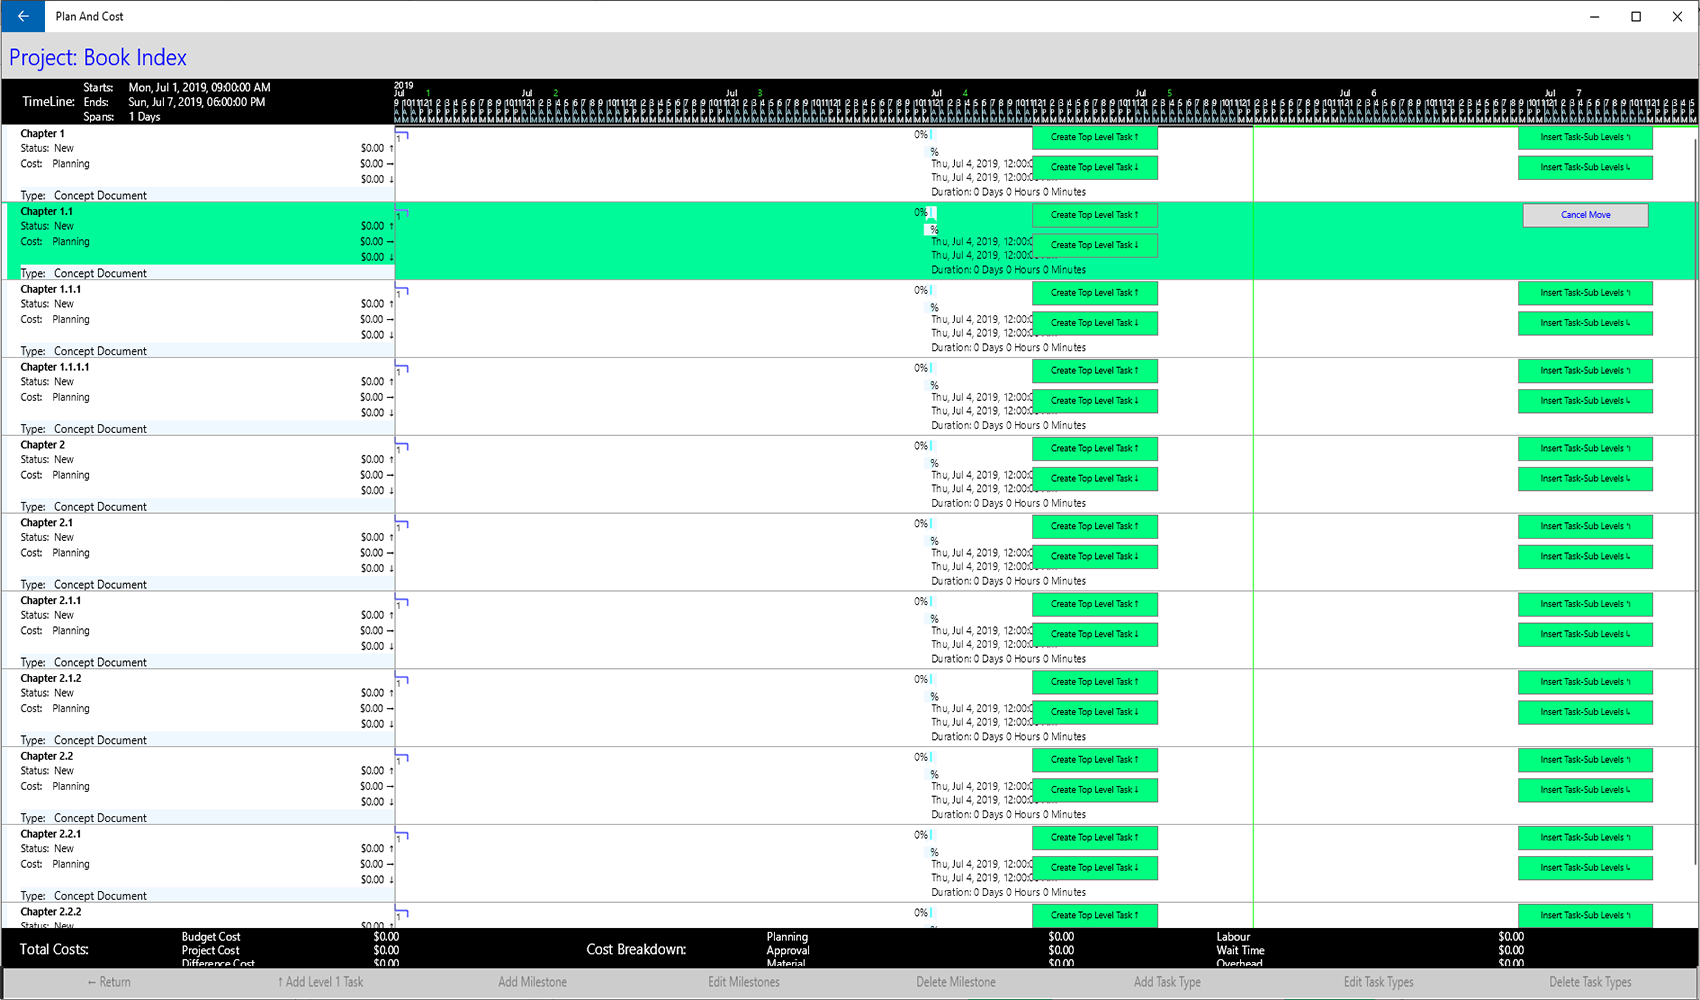
The target is to be a sub task of Chapter 1 and we need to click the Insert Sub Task Level ↳ button in the Chapter 1 task line.
This is the result after I click it, it's now indented as a level 2 task.
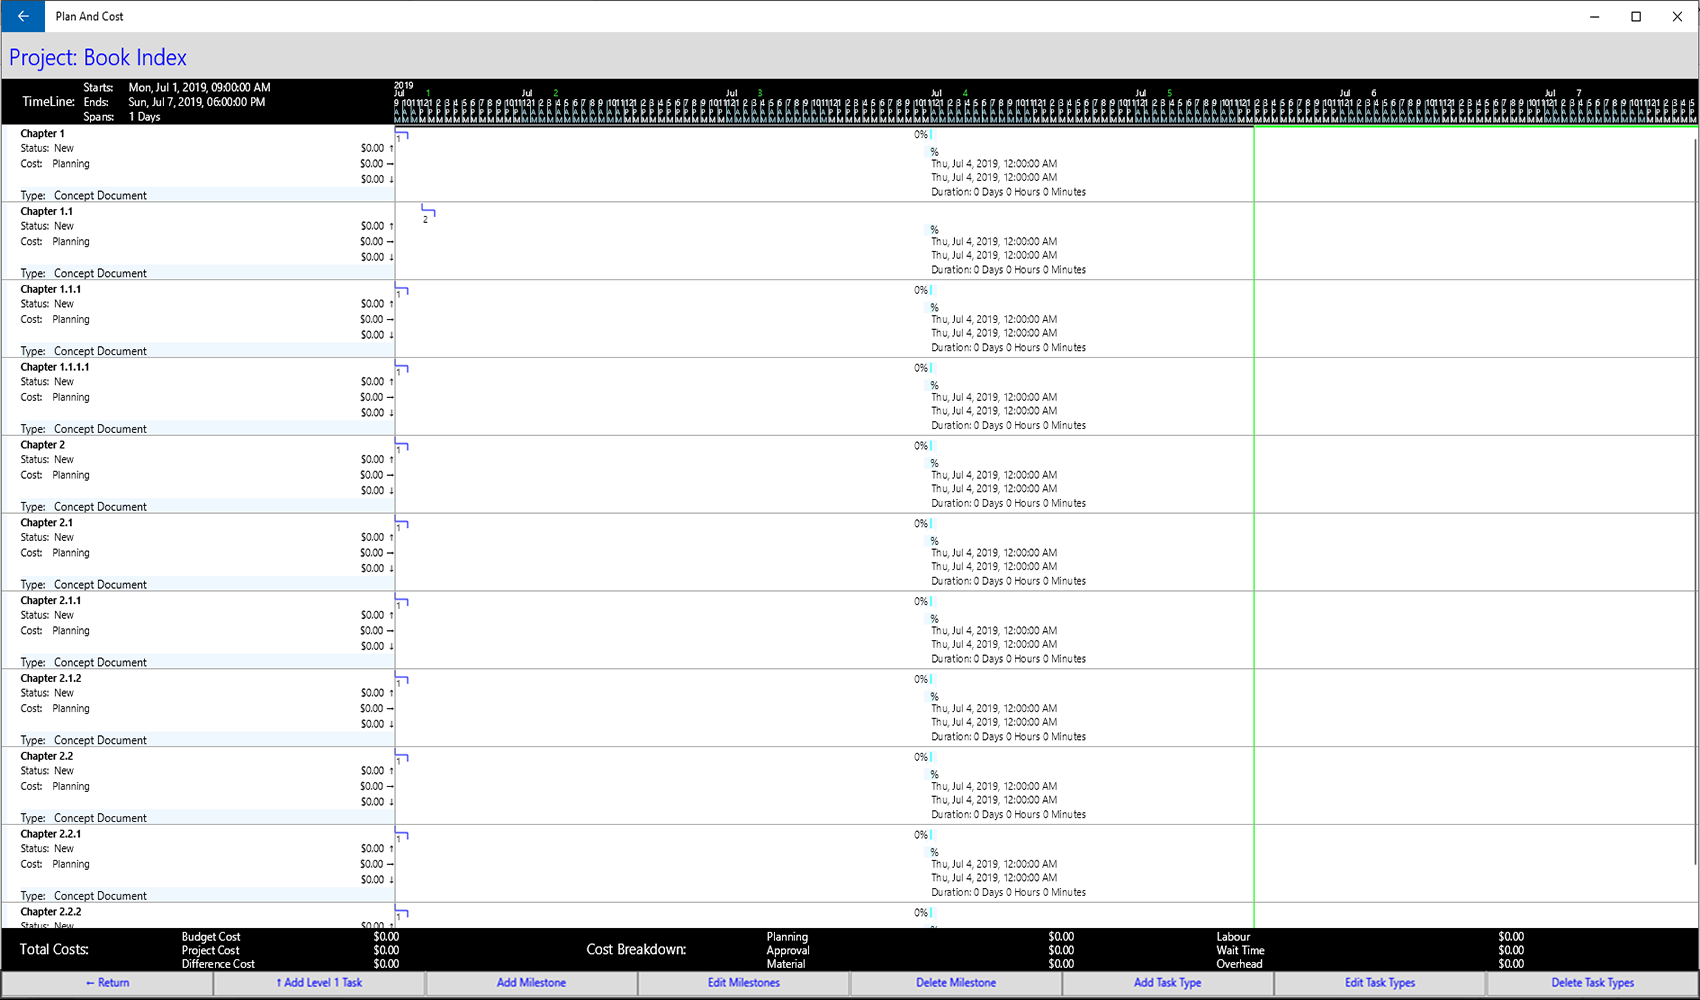
Had I clicked the Insert Sub Task Level ↰ button in the Chapter 1 task line instead Chapter 1.1 would now be the level 1 task and Chapter 1 would be the sub task. I.E. Inserted before instead of after.
If you make a mistake you can always move it back.
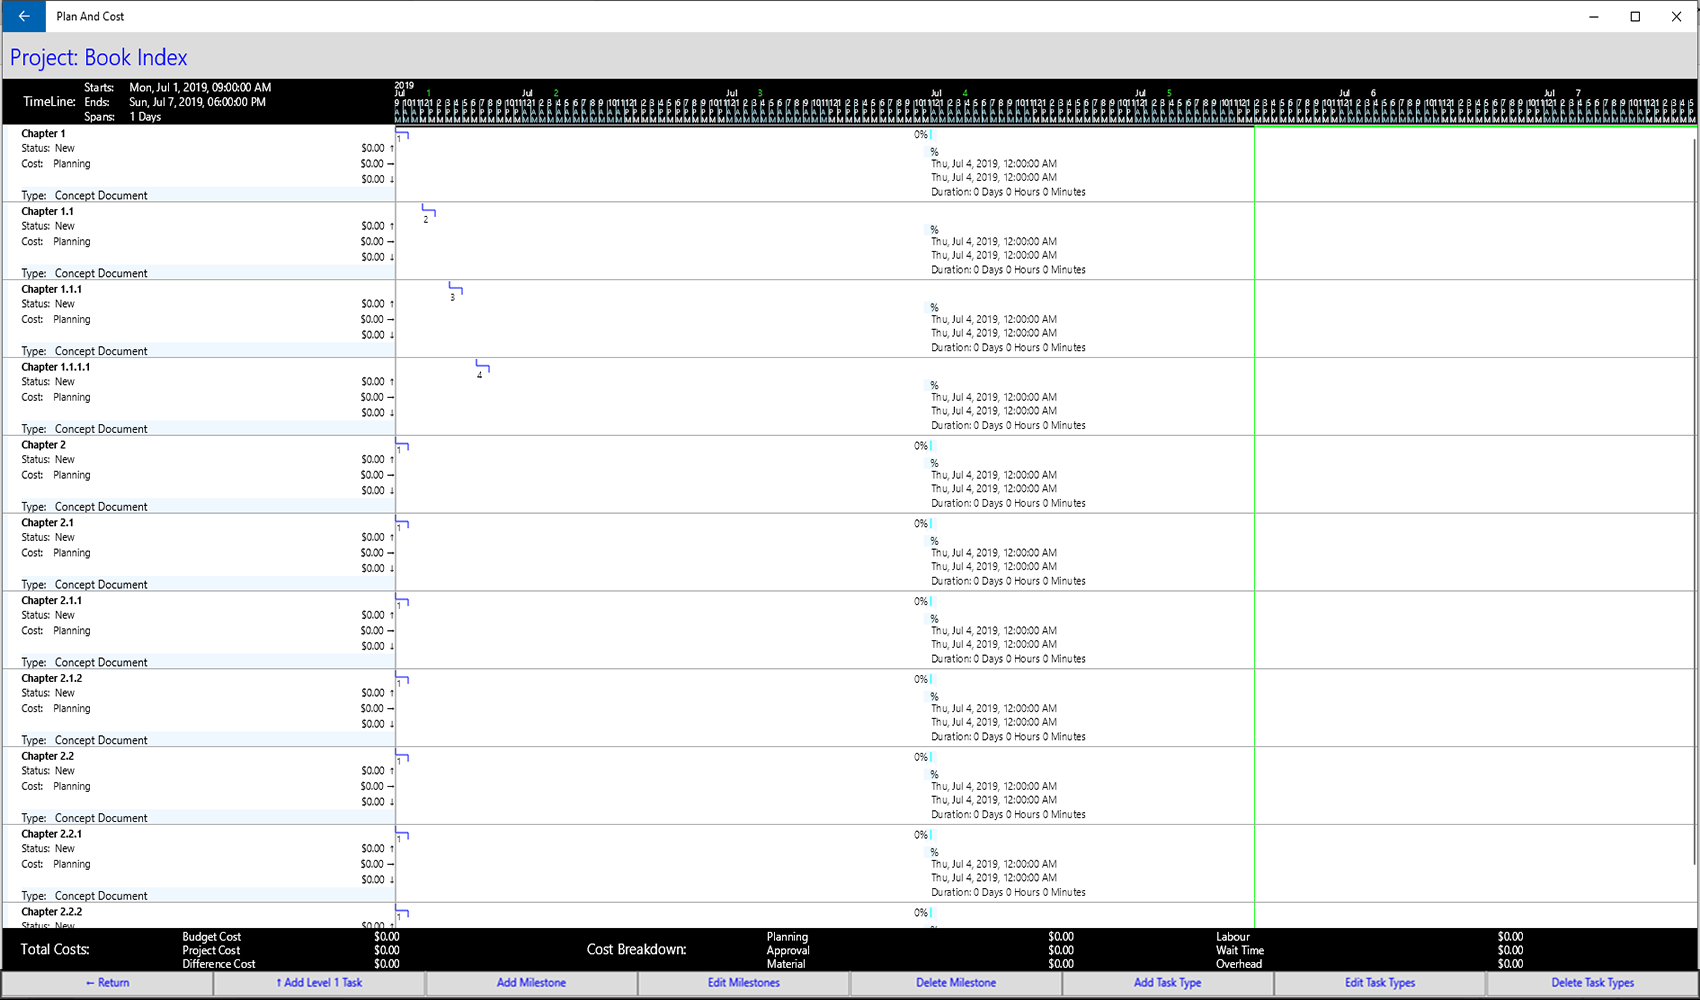
Now I'm going to move the balance of the Chapter 1 tasks to follow on by using the same process, one by one inserts ↳.
Here they are indented like book chapters.
Now we have gone through four of the six move types for a single task and all that's left is the Create Groups ↑ and ↓ moves.
When I created the project tasks for Chapter 2, I created sub chapter tasks which will be groups.
Chapters 2.1 and 2.2 are sub splits of 2.
Chapters 2.1.1 and 2.1.2 are sub splits of 2.1.
Chapters 2.2.1 and 2.2.2 are sub splits of 2.2.
They are pairs of branches from the same sub chapter tasks.
This is where we use the Create Group buttons ↑ and ↓.
Firstly I'll move the first three tasks which are also insert moves like the Chapter 1 moves and now it looks like this.
Now we need to move the final four chapters tasks with Create Group moves.
Firstly we will move Chapter 2.2 because we need to move it before what will be its children tasks later, Chapters 2.2.1 and 2.2.2.
We are going to create a level 2 group task after the Chapter 2.1 task. which will create a branch.
We click the Create Level 2 Group ↓ button on the Chapter 2.1 task to do it.
Here is the result.

Chapters 2.1 and 2.2 are now both attached directly to Chapter 2.
Now we will move Chapter 2.1.2 to complete the group under Chapter 2.1.
We are going to create a level 2 group task after the Chapter 2.1 task. which will create a branch.
We click the Create Level 2 Group ↓ button on the Chapter 2.1.1 task to do it.
Here is the result.
The entire group of 2.1 is now where we want it.
Next we move Chapter 2.2.1 to be a sub task of Chapter 2.2.
Then click Insert Sub Task Level ↳ button on the Chapter 2.2 task.
Now it's moved to be a subtask of Chapter 2.2.
Finaly me need to move Chapter 2.2.2 by clicking the Create Level 2 Group ↓ on the Chapter 2.2.1 task and now it's created the new branch of Chapter 2.2.

All done the chapters are now moved to their correct location.
You may never need to do something like this but if you understand the method it will be easy to do.